![]()

A Raspberry Pi balenaCloud starter project taking readings from a either a Bosch BME680 sensor, a Sense-HAT, or a 1-wire temperature sensor (such as a Dallas DS18B20), storing using InfluxDB and reporting using Grafana.
The Bosch BME680 is recommended as it includes sensors for temperature, humidity, pressure and gas content and is available on a breakout board from a few different places for around $10-$20.
As an alternative, if you have one already, you can use the Raspberry Pi Sense-HAT. This however does not include a sensor for gas content and so if you use this the air quality readout is derived from humidity and temperature target values.
If you have neither a BME680 nor a Sense-HAT, or if you only need temperature readings, you can use a so-called 1-wire sensor, such as the DS18B20. Air quality metrics are not available with these sensors.
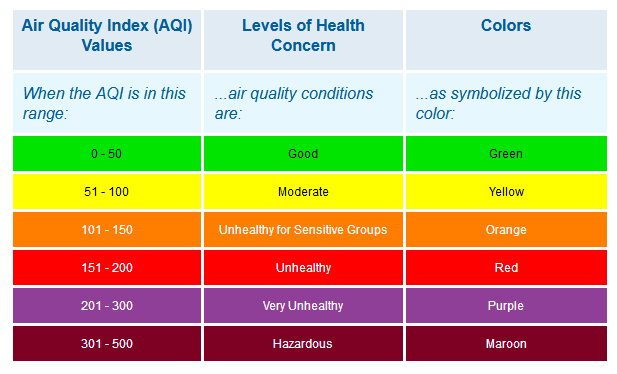
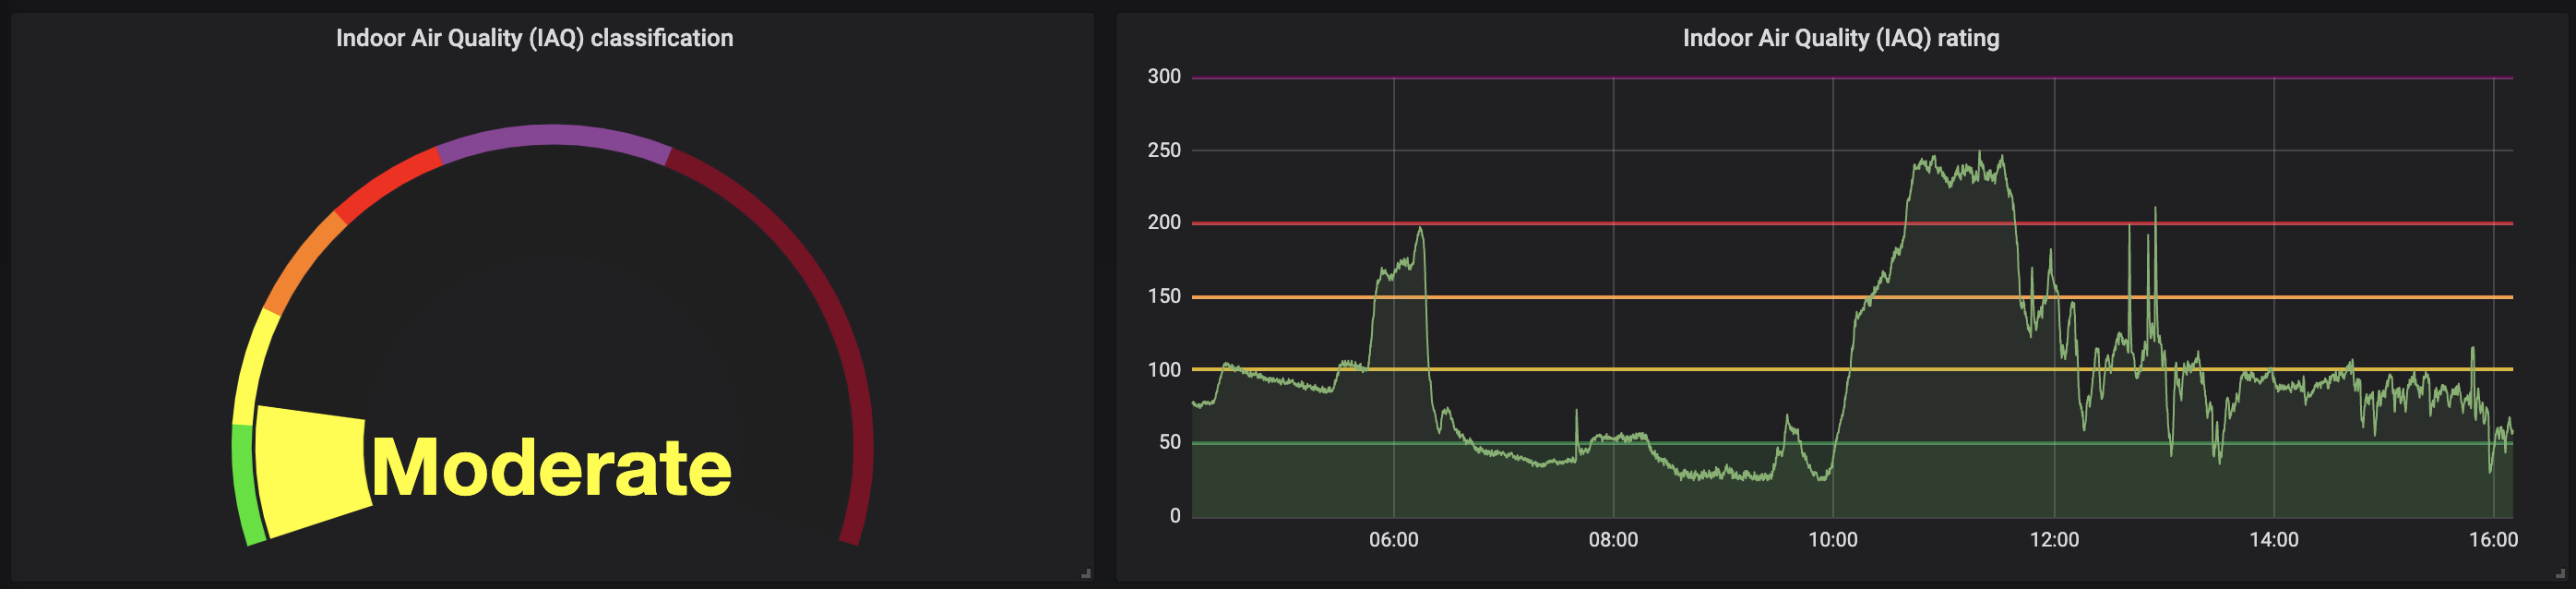
The sensor provides a reading for Indoor Air Quality (IAQ) which is a range from 0 to 500 where lower is better, and displays it with a web interface provided by Grafana.

Here’s the shopping list for this project. Depending if you’d like to crack out the soldering iron or not will dictate what sensor board you can use; some are plug and play, some require a little soldering.
- Raspberry Pi 2Bv1.2/3B/3B+/3A+/Zero
- 8GB (or larger) Micro-SD Card (we recommend Sandisk Extreme Pro SD cards)
- Power supply & micro-USB cable
- Bosch BME680 sensor with breakout board (see below for places to find one) or...
- Optional: Sense HAT (optional replacement for the BME680, but does not include an air quality sensor)
- Optional: 1-wire temperature sensor (temperature only)
- Optional: Pimoroni Enviro+ Air Quality (only supports Temp, Humidity, Pressure, Light (Lux), NH3, Oxidising and Reducing Gases currently)
- Optional: Male-to-female Dupont cables (optional)
You can get hold of the Bosch BME680 sensor on a breakout board from a variety of vendors too, all at varying costs. If you’d like to do everything without a soldering iron, take a look at Pimoroni, who offer a BME680 breakout board compatible with their breakout garden HAT so that everything plugs together with no soldering required. If you don't want to do any soldering and are happy to sacrifice the air quality reading, you can also use the Sense HAT, with the added bonus that you'll get a smiley face showing on the LED matrix! However, if you're buying hardware specifically for this project, get one of the BME680 options below, don't buy a Sense-HAT just for this! If you only need temperature readings, you can find DS18B20 1-wire sensors readily available on eBay (and much cheaper than the BME680 or Sense-HAT), with minimal soldering required.
If you’re happy to do a little soldering, that opens up a few more options:
- Pimoroni BME680 breakout £18.50
- Adafruit BME680 breakout US$22.50
- Sparkfun SparkX BME680 US$19.95 (can be solder-free with their HAT)
- Unbranded BME680 breakout US$9.92
- Dallas DS18B20 1-wire temperature sensor £4.00 (The Pi Hut also has a guide to soldering/wiring up these sensors, alternatively, DS18B20 sensors in a waterproof casing with flying leads attached are readily available on eBay or similar)
Running this project is as simple as deploying it to a balenaCloud application.
One-click deploy to balenaCloud:

If required, this project supports offsetting of the measured values before they are recorded in the database.
To offset temperature, add a balenaCloud environment variable called BALENASENSE_TEMP_OFFSET, and add an offset in degrees C.
To offset humidity, add a balenaCloud environment variable called BALENASENSE_HUM_OFFSET and add a value in % RH.
To adjust the pressure sensor and compensate for altitude, add a balenaCloud environment variable called BALENASENSE_ALTITUDE and set it to your altitude above sea level in meters.
To use 1-wire sensors such as the DS18B20 on the Raspberry Pi, you'll need to enable the 1-wire GPIO interface by adding the w1-gpio device tree overlay. Information on the 1-wire interface is available at pinout.xyz, but in the case of BalenaOS, you can do this easily in the Device Configuration section of the BalenaCloud dashboard by adding a custom configuration variable called RESIN_HOST_CONFIG_dtoverlay, with value w1-gpio.
More information about device tree overlays and other advanced boot settings for the Raspberry Pi is available in the BalenaOS docs and BalenaCloud management reference section.
The Pi Hut guide to using a DS18B20 sensor with a Raspberry Pi shows how to wire these sensors up. Don't forget you'll need a pullup resistor between the Vin and data lines.
1-wire devices each have a unique ID; if you have more than one sensor attached to your Raspberry Pi, it is possible to select which one to use by setting the BALENASENSE_1WIRE_SENSOR_ID device variable in BalenaCloud. If no ID is given, the first sensor found will be used.
For more information about how to find the ID for 1-wire devices, the Pi Hut guide referenced above, or this Raspberry Pi tutorial are useful.
Versions of balenaSense after v1.5 introduce Telegraf to capture the data from the sensor which permits the feed of data to other sources in addition to the internal InfluxDB instance.
Configure the following environment variables within the balenaCloud dashboard to enable the feed to the InfluxDB Cloud 2.0 service:
INFLUX_BUCKET- the name of the bucket you createdINFLUX_ORG- your login email address used for InfluxDB cloudINFLUX_TOKEN- the read/write token for your bucket
Configure the following environment variables within the balenaCloud dashboard to enable a feed to an external InfluxDB instance:
INFLUXDB_EXTERNAL_URL- the HTTP URL to your InfluxDB instanceINFLUXDB_EXTERNAL_USERNAME- the username for authentication to your InfluxDB instanceINFLUXDB_EXTERNAL_PASSWORD- the password for authentication to your InfluxDB instance
Versions of balenaSense after v1.7 have an integrated MQTT broker available on port 1883. You can configure Telegraf to output the sensor data using MQTT by setting the TELEGRAF_MQTT_URL_PORT environment variable as follows:
- INTERNAL - Telegraf will send the sensor data to the internal MQTT broker, which other devices on your network can subscribe to and obtain the data
- ip:port - Set to the IP address and port (for instance 192.168.1.100:1883) of an MQTT broker on your network and Telegraf will publish the data to that address (Do not prepend with "mqtt://")
- empty - Set the variable to an empty value or delete it to prevent Telegraf from publishing the sensor data via MQTT (this is the default state)
The MQTT topic will be published in the format balena-sense/(hostname)/balena-sense and the data will be in JSON format. The default hostname is the first seven characters of the unique device UUID, available on the dashboard. Note that if you change the hostname, the topic will still use the first seven characters of the device UUID.
If you're feeding to one of the above services and have multiple sensors, you can add the BALENASENSE_ID variable to each of your devices. This will then be passed to the output database along with the measurements, allowing you to filter and plot metrics from each device individually.
A full guide covering the initial setup of this project is available on our blog.
We published an additional blog covering the setup of a fleet of balenaSense devices to feed to a central database on our blog here.


