
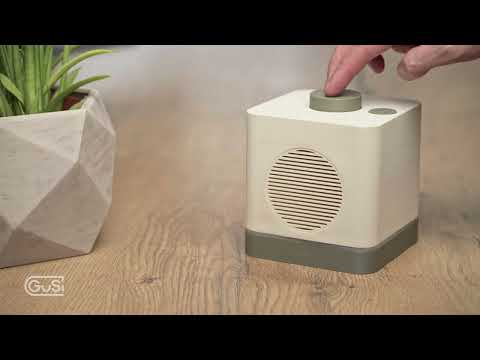
GuSi – the user friendly internet radio
The GuSi radio is a very user-friendly internet radio with only two buttons. It allows the user to switch through predefined stations with just one push on the button. This makes it especially suitable for seniors or handicapped people.
A short demonstration of the radio:
 WLAN-Anmeldung ohne WPS
country=DE
ctrl_interface=DIR=/var/run/wpa_supplicant GROUP=netdev
update_config=1
network={
ssid="NAME"
psk="KENNWORT"
}
Ersetze NAME und KENNWORT innerhalb der Anführungszeichen durch die WLAN-Anmeldedaten ersetzen.
Speicher das Dokument als Datei speichern als: wpa_supplicant.conf Achte darauf, dass die Endung ".conf" sein muss und nicht ".txt"!
Datei auf die SD-Karte einfügen, zurück ins Radio setzen und starten.
 WiFi registration without WPS
country=EN
ctrl_interface=DIR=/var/run/wpa_supplicant GROUP=netdev
update_config=1
network={
ssid="NAME"
psk="KENNWORT"
}
Replace NAME and PASSWORD within the quotation marks with the WiFi credentials.
Save the document as a file Save as: wpa_supplicant.conf Make sure that the extension is “.conf” and not “.txt”!
Move the file onto the SD-card, put it back into the radio and start it.
- 1 x Raspberry Pi zero
- 1 x Raspberry Header CG3
- 1 x Power supply unit (5 V with a barrel jack 2.1 / 5.5 mm)
- 1 x Hifiberry MiniAMP
- 1 x Micro SD Card
- 1 x Small speaker with 10-30 W
- 1 x LED 5 mm
- 1 x Pushbuton (Cherry MX Key)
- 1 x Power jack socket
- 1 x Speaker cable (about 0.5 mm²
- 1 x Cable (about 0.14 mm²)
- 1 x Micro-USB plug
- 1 x Pan head screw M2.5 6 mm
- 1 x Pan head screw M2.5 10 mm
- 1 x GPIO edge adapter
- 1 x Dupont crimps set
- 1 x Rotarry encoder KY-040
- 1 x SHIM OnOff
Almost everything except the screws can be ordered via this part list.
The 3D-files can be downloaded at printables.com
Install Raspberry Pi OS lite on the SD card. You can use the tool Raspberry Pi imager
Raspberry Pi device:
Raspberry Pi zero / Raspberry Pi zero 2
Operating system:
Raspberry Pi OS Bullseye (64-Bit)
as the OnOFF SHIM and start.py will not run under Bookworm!
Storage:
elect the SD-Card
Klick on the Next button and allow OS customisation.
General
Services
Enable SSH (password)
2.1) Insert the card into the Raspberry and let it boot up. Find out which IP address your Pi got. (You can try ping gusi in terminal).
2.2) Access the Raspberry via SSH:
ssh [email protected]
3.1) Prepare the configuration file:
sudo nano /boot/config.txt
Comment out the line dtparam=audio=off by inserting a ‘#’ in front of it. It should look like this:
#dtparam=audio=off
Insert the following code at the end of the file:
################## GUSI ################
# Disable Bluetooth
dtoverlay=pi3-disable-bt

# Enable Hifiberry Soundcard
dtoverlay=hifiberry-dac
Save the change with CTRL + X and confirm with Y and Enter
3.2) Install the required packages
sudo apt-get update -y && sudo apt-get upgrade -y && sudo apt-get install -y git mpd mpc alsa-utils python3-pip python3-gpiozero
3.3) Install the required packages
sudo apt-get update -y && sudo apt-get upgrade -y && sudo apt-get install -y git mpd mpc alsa-utils python3-pip python3-gpiozero
3.4) Install the OnOff SHIM for the power control
curl https://get.pimoroni.com/onoffshim | bash
Let the device restart
3.5) Clone the Git repository
git clone https://github.com/earlmckay/gusi-radio.git
3.6) Make the script executable and run it (choose between German and English):
For German:
chmod +x /home/gusi/gusi-radio/setup_gusi_DE.sh
sudo /home/gusi/gusi-radio/setup_gusi_DE.sh
For English:
chmod +x /home/gusi/gusi-radio/setup_gusi_DE.sh
sudo /home/gusi/gusi-radio/setup_gusi_DE.sh
4.1) Customise the radio stations in the gusi.py:
sudo nano /home/gusi/gusi-radio/gusi.py
Each time the button is pressed, the script switches to the next station (defined in variables S1, S2, S3), and an announcement (s1.mp3, s2.mp3, s3.mp3) is played to indicate which station can now be heard.) The announcements are generic and say “Station one”.
Customize radio station:
Change the URLs for "S1", "S2" and "S3" in the "VAR DEFINITIONS" area.
S1 = "https://server7.stream.com/stream"
S2 = "http://www.sw.de:8000/de"
S3 = "https://streamplus.de/stream.mp3"
If more stations are needed, the list of variables can be extended with "S4", "S5" ... .
Set order:
By listing the channels defined above, you can choose which should be included in the rotation and in which order.
stations = [S1, S2, S3]
Alignment of the announcements:
Sort the order of the announcements according to the order of the stations (S1 = s1.mp3).
Also make sure that the number of stations and announcements is the same!
announcements = ["s1.mp3", "s2.mp3", "s3.mp3"]
Customized announcements:
You can, of course, generate your own announcements (by recording them yourself or using TTS). For better identification, the name of the station can be played, for example.
You can place the newly generated announcements under the following path:
/var/lib/mpd/music/
(This folder also contains all other radio announcements (e.g. error announcements). You can also regenerate and replace these if necessary.)
As soon as there is a change in the music folder, you must update the database:
mpc update
4.2) Customise the WiFi Country in the auto-wps.py:
nano /home/gusi/gusi-radio/auto_wps.py
Search for "country" (Linie 35):
new_config = """ctrl_interface=DIR=/var/run/wpa_supplicant GROUP=netdev
update_config=1
country=DE
Replace DE with the required country code (for example "GB")
Following cable lengths are required:
- Loudspeaker: 2 x 120 mm
- Rotary encoder: 5 x 200 mm
- Pushbutton: 2 x 200 mm
- OnOff SHIM: 2 x 100 mm
- LED: 2 x 160 mm
Insulate both ends by approx. 3 mm.
The Rotary Encoder has a total of 5 pins:
- GRD: Ground
- +: voltage
- SW: Push
- CLK: Primary rotation
- DT: Phase shifted rotation
Crimp the 5 prepared cables with a female Dupon connector on each side and connect the cables to the Rotary Encoder.


Before you insert the power socket, solder the cables first. This is more comfortable and avoids damaging the plastic housing. Seen from the back, the positive pole is on the left and the negative pole on top.
Now you can solder the cables to the micro USB connector. The left contact is the positive pole, the one on the right side is the negative pole (see picture).


First the easy part. Solder two cables to the two speaker contacts. The other ends of the cables do not need to be worked on, as they will be clamped into the amplifier later.
Before you screw in the speaker, the speaker grille must be inserted first. Make sure that the holes are exactly aligned with those in the housing. Now place the speaker in the cabinet on the grille and fix it with the 6 mm screws.

For the LED you need the two prepared cables and two female Dupon connectors, which are crimped on one side of the cable. The other sides have to be soldered to the LED itself. I used here for the anode (longer pin of the LED) the red cable and for the shorter side (cathode) the black cable. To avoid a short circuit, a heat shrink tube can be used. Now push the LED into the holder.

The board comes with optional female connectors, which I also used. For the two button contacts I cut and soldered two male Dupon connectors. The pre-assembled cables can now be equipped with a male Dupon connector on one end and a female connector on the other end.
![]()
First, the Raspberry can be screwed to the lower base plate. Then the GPIO corner adapter can be plugged on, followed by the MiniAmp.
Then everything can be connected one by one.
- Rotary Encoder to Raspberry
- SHIM OnOff with Raspberry
- Pushbutton with SHIM OnOff
- LED with Raspberry
- Power supply with SHIM On Off
- Speaker with MiniAmp


Finally, I would like to thank Robert Nickel for his support, as well to Notification Sounds for providing the sounds.
<style> h1 { color: #16A085; font-size: 6em; border-bottom: 0; } h2 { color: #16A085; font-size: 2em; border-bottom: 0; } h3 { color: #16A085; } /* unvisited link */ a:link { color: #16A085; } /* visited link */ a:visited { color: #16A085; } /* mouse over link */ a:hover { color: #16A085; } /* selected link */ a:active { color: #16A085; } </style>


