- CentOS Linux Server OS Preparation
- Environment
- Notice
- Warning
- Configuration
- Easy Installation
- Advanced Installation
- Customize your own function
- Note
- CHANGELOG
Try Ubuntu World ===> https://github.com/charlietag/ubuntu_preparation
You want initialize your linux server by your own script. But you DO NOT want to use PUPPET , CHEF , Ansible. You can just leverage my initialization project here.
This is a small light bash project. Suit small companies which have only few servers to maintain. GIVE IT A TRY!!
centos stream release 9 server environment settings
-
This is useful when
- You have less than 5 CentOS-Stream-9 servers to maintain.
- You are deploying monolithic architecture app.
-
This repo is TOTALLY transfer from passenger to puma for rails.
- NGINX + PUMA + PHP-FPM + MariaDB + Rails + Laravel + Redmine
-
CentOS Stream release 9
- os_preparation
- release :
masterv3.x.x
- release :
- os_preparation
-
CentOS Stream release 8
- os_preparation
- release :
v2.x.x
- release :
- os_preparation
-
CentOS 8 (8.x)
- os_preparation
- release :
v1.x.x
- release :
- os_preparation
-
CentOS 7 (7.x) (deprecated)
- os_preparation
- release :
v0.x.x
- release :
- os_preparation
-
CentOS 7 (7.x) - passenger + nginx version (deprecated)
- os_preparation
-
release :
before_passenger_to_puma -
If you prefer passenger + nginx (passenger-install-nginx-module)
please switch to git tag named "before_passenger_to_puma"
git clone --depth 1 --branch before_passenger_to_puma https://github.com/charlietag/os_preparation.git
-
- os_preparation
- Due to CentOS 8 - EPEL-modular repo always failed everytime updating metadata cache.
This will disable repo cache expiration permanently, instead, using dnf-automatic / yum-cron to makecache- [Optional] Make cache before doing DNF / YUM installation
- /root/bin/dnf.sh (alias dnf) will help you with this
dnf makecache/yum makecache
Disableddnf repo cache expirationdnf config-manager --setopt metadata_expire=-1 --save
- Enabled
- dnf-automatic
- For
dnf makecacheby daily
- For
- dnf-automatic
- [Optional] Make cache before doing DNF / YUM installation
- Before os_security
- After finish first run os_preparation, you'd better DO A REBOOT before implementing os_security
- Systemd target
- Default target (os_preparation will force to use this target)
- multi-user.target
- Ref. /etc/inittab
- multi-user.target: analogous to runlevel 3
- graphical.target: analogous to runlevel 5
- WARNING If you are under graphical.target NOT under multi-user.target.
- It is highly recommended that you do the following:
- Reinstall whole CentOS using "Minimal Install" / "Server"
- Or at least try the following:
systemctl set-default multi-userrebootdnf groupinstall 'Minimal Install'(If this is not working, try alsodnf groupinstall 'Server')dnf groupremove 'Server with GUI'reboot- you can start with os_prepation now
- Reference description here
- It is highly recommended that you do the following:
- Check method
systemctl get-default
- Default target (os_preparation will force to use this target)
- Environment Groups
- Based on (os_preparation will make sure this environment group is installed)
- "Minimal Install"
- Removing Environment Groups (os_preparation will remove these environment groups by default)
- "Server with GUI"
- "Workstation"
- "KDE Plasma Workspaces"
- "Virtualization Host"
- "Custom Operating System"
- Check method
dnf grouplist
- Based on (os_preparation will make sure this environment group is installed)
- Please do this in fresh install OS
- What does this not cover, DO the following manually
- Login user
- Change password of root
- Add GENERAL USER and setup password of GENERAL USER
- /etc/ssh/sshd_config
- PermitRootLogin no
- PasswordAuthentication yes
- RAM
-
mkswap if RAM is insufficient to start MariaDB
mkdir /swap
dd if=/dev/zero of=/swap/swapfile bs=1M count=4096
mkswap /swap/swapfile
chmod 0600 /swap/swapfile
/sbin/swapon /swap/swapfile
chmod 755 /etc/rc.d/rc.local
echo "/sbin/swapon /swap/swapfile" >> /etc/rc.d/rc.local
-
- Login user
-
ssh
withoutSendEnv -
Before installation
dnf clean all
dnf install -y git
git clone https://github.com/charlietag/os_preparation.git
-
Make sure config files exists , you can copy from sample to modify.
cd databag
ls |xargs -I{} bash -c "cp {} \$(echo {}|sed 's/\.sample//g')"
-
Mostly used configuration :
-
DEV use (server in Local / server in Cloud) && Production use (server in Local / server in Cloud)
databag/
├── F_01_ENV_02_os_01_env.cfg
├── F_01_ENV_04_ssh_config.cfg
└── _gitconfig.cfg
-
-
Verify config files (with syntax color).
cd databag

echo ; \
ls *.cfg | xargs -I{} bash -c " \
echo -e '\e[0;33m'; \
echo ---------------------------; \
echo {}; \
echo ---------------------------; \
echo -n -e '\033[00m' ; \
echo -n -e '\e[0;32m'; \
cat {} | grep -vE '^\s*#' |sed '/^\s*$/d'; \
echo -e '\033[00m' ; \
echo "
-
Verify ONLY modified config files (with syntax color).
cd databag

echo ; \
ls *.cfg | xargs -I{} bash -c " \
echo -e '\e[0;33m'; \
echo ---------------------------; \
echo {}; \
echo ---------------------------; \
echo -n -e '\033[00m' ; \
echo -n -e '\e[0;32m'; \
cat {} | grep -v 'plugin_load_databag.sh' | grep -vE '^\s*#' |sed '/^\s*$/d'; \
echo -e '\033[00m' ; \
echo "
I'm a lazy person. I want to install ALL and give me default configurations running Nginx , MariaDB, php-fpm, puma 5 (rails). And help me to create default projects about "Rails" and "Laravel"
-
Command
./start -a
reboot
-
Default project path
-
DEFAULT user for rails/laravel developer is not ssh allowed
-
/etc/ssh/sshd
DenyGroups no-ssh-group
-
-
group "no-ssh-group" add to default dev user
- phpuser (this name can be modified)
- rubyuser (this name can be modified)
-
rails
- default user: rubyuser (can be changed)
/home/${current_user}/rails_sites/myrails/
--->
/home/rubyuser/rails_sites/myrails/
- Redmine
- default user: rubyuser (can be changed)
/home/${current_user}/rails_sites/redmine/
--->
/home/rubyuser/rails_sites/redmine/
- laravel
- default user: phpuser (can be changed)
/home/${current_user}/laravel_sites/myrails/
--->
/home/phpuser/laravel_sites/myrails/
-
-
Config your own hosts file (/etc/hosts)
<192.168.x.x> myrails.centos8.localdomain
<192.168.x.x> redmine.centos8.localdomain
<192.168.x.x> mylaravel.centos8.localdomain
-
Browse URL
http://myrails.centos8.localdomain
http://redmine.centos8.localdomain (default account: admin/admin)
http://mylaravel.centos8.localdomain
I want to choose specific part to install.
-
Command
./start.sh -h
usage: start.sh
  -a                   ,  run all functions
  -i func1 func2 func3 ,  run specified functions
-
functions/
-
Write your own script here, file named start with F_[0-9][0-9]_YourOwnFuntionName.sh
-
Run command
./start.sh -i YourOwnFuntionName
-
-
templates/
- Put your own templates here, folder named the same as YourOwnFuntionName
-
databag/
- Put your special config variables here, file named the same as YourOwnFuntionName
- How to use
-
In databag/YourOwnFunctionName
- local your_vars_here
-
In templates/YourOwnFunctionName/yourowntemplate_file
- You can use ${your_vars_here}
-
In YourOwnFuntionName , you can call
# Method : eval "echo \"$variable\""
# Might have escape issue, if template is complicated
RENDER_CP ${$CONFIG_FOLDER}/yourowntemplate_file /SomeWhere/somewhere
# Method : cat template | sed 's/\{\{var\}\}/$var/g'
# BETTER method for rendering template
RENDER_CP_SED ${$CONFIG_FOLDER}/yourowntemplate_file /SomeWhere/somewhere
instead of
cp ${$CONFIG_FOLDER}/yourowntemplate_file /SomeWhere/somewhere -
In YourOwnFuntionName , you just want to LOAD VARIABLES ONLY from databag, try add a comment into your function script
# For Load Variables Only Usage, add the following single comment line with keyword DATABAG_CFG:enable
# DATABAG_CFG:enable
-
-
helpers/
- Write your own script here, file named start with helper_YourOwnHelperName.sh
- Works with helpers_views
-
helpers_views/
- Put your own templates for ONLY helper USE here, folder named the same as YourOwnHelperName
-
tasks/
- Write your own script here, file named start with task_YourOwnTaskName.sh , _task_YourOwnTaskName.sh
- Scripts here will automatically transfer to function, just like scripts under "functions/"
- But this is for global use for os_preparation , os_security. So it's been moved to os_preparation_lib
-
plugins/
- Only scripts which can be called everywhere like, ${HELPERS}/plugins_scripts.sh
- Use this as a script, not function
(root)# ./start.sh -i F_00_debug
#############################################
         Preparing required lib
#############################################
Updating required lib to lastest version...
Already up to date.

#############################################
            Running start.sh
#############################################

---------------------------------------------------
NTP(chrony) ---> pool.ntp.org
---------------------------------------------------
RUN: chronyd -q 'pool pool.ntp.org iburst'
2020-09-08T01:47:33Z chronyd version 3.5 starting (+CMDMON +NTP +REFCLOCK +RTC +PRIVDROP +SCFILTER +SIGND +ASYNCDNS +SECHASH +IPV6 +DEBUG)
2020-09-08T01:47:38Z System clock wrong by -0.002320 seconds (step)
2020-09-08T01:47:38Z chronyd exiting
RUN: hwclock -w
---------------------------------------------------


==========================================================================================
        F_00_debug
==========================================================================================
-----------lib use only--------
CURRENT_SCRIPT : /root/os_preparation/start.sh
CURRENT_FOLDER : /root/os_preparation
FUNCTIONS      : /root/os_preparation/functions
LIB            : /root/os_preparation/../os_preparation_lib/lib
TEMPLATES      : /root/os_preparation/templates
TASKS          : /root/os_preparation/../os_preparation_lib/tasks
HELPERS        : /root/os_preparation/helpers
HELPERS_VIEWS  : /root/os_preparation/helpers_views

-----------lib use only - predefined vars--------
FIRST_ARGV     : -i
ALL_ARGVS      : F_00_debug

-----------function use only--------
PLUGINS            : /root/os_preparation/plugins
TMP                : /root/os_preparation/tmp
CONFIG_FOLDER      : /root/os_preparation/templates/F_00_debug
DATABAG            : /root/os_preparation/databag
DATABAG_FILE       : /root/os_preparation/databag/F_00_debug.cfg

-----------function extended use only--------
IF_IS_SOURCED_SCRIPT  : True: use 'return 0' to skip script
IF_IS_FUNCTION        : True: use 'return 0' to skip script
IF_IS_SOURCED_OR_FUNCTION  : True: use 'return 0' to skip script

${BASH_SOURCE[0]}    : /root/os_preparation/functions/F_00_debug.sh
${0}                 : ./start.sh
${FUNCNAME[@]}          : source F_00_debug L_RUN L_RUN_SPECIFIED_FUNC source source main
Skip script sample    : [[ -n "$(eval "${IF_IS_SOURCED_OR_FUNCTION}")" ]] && return 0 || exit 0
Skip script sample short : eval "${SKIP_SCRIPT}"

================= Testing ===============
----------Helper Debug Use-------->>>

-------------------------------------------------------------------
        helper_debug
-------------------------------------------------------------------
HELPER_VIEW_FOLDER : /root/os_preparation/helpers_views/helper_debug


----------Task Debug Use-------->>>

-----------------------------------------------
        task_debug
------------------------------------------------ PHP 8.1 (AppStream)
(Ref. https://rpms.remirepo.net/wizard/) - PHP-FPM (AppStream)
(Ref. https://rpms.remirepo.net/wizard/) - Laravel 9.x (Ref. https://laravel.com/)
- MariaDB 10.5 (AppStream) (equals to MySQL 5.7)
- nodejs (AppStream) (stable version - 16)
- Nginx 1.20 (dnf module)
(latest version - via Nginx Official Repo) - Redis 6.2
- Ruby 3.1.2
- Rails 7.0
- puma 5 (systemd integrated, puma-systemd-mgr,
puma-mgr)
- puma 5 (systemd integrated, puma-systemd-mgr,
- Redmine 5.0.3
- ruby 3.1.2
- rails 6.1.7
- Useful tools
- Enhanced tail
multitail(not found in RHEL 9)- multitail /var/log/nginx/*.access.log
- Enhanced grep
- ack
- ls | ack keyword
- ack -i keyword *
- default options (-r, -R, --recurse Recurse into subdirectories (default: on))
- ack
- Enhanced tail
- Tmux 3.2a
- VIM Plugins
- TMUX Plugins
After this installation repo, the server will setup with "Nginx + Puma (socket)" , "Nginx + PHP-FPM (socket)" , so your Rails, Laravel, can run on the same server. The following is something you have to keep an eye on it.
- folder privilege
-
Rails Project
rails new <rails_project> -d mysql --skip-spring
cd <rails_project>
chown -R ${current_user}.${current_user} log tmp
-
Laravel Project
composer create-project --prefer-dist laravel/laravel <laravel_project>
cd <laravel_project>
chown -R ${current_user}.${current_user} storage
chown -R ${current_user}.${current_user} bootstrap/cache
- Command
-
Rails
rails new <rails_project> -d mysql --skip-spring
-
Rails 5.1 has dropped dependency on jQuery, you might want it back via yarn
-
Add npm of jquery using Yarn
cd <rails_project>
yarn add jquery
-
Setup jquery npm for asset pipeline
vi <rails_project>/app/assets/javascripts/application.js
//= require rails-ujs //= require turbolinks //= require jquery/dist/jquery //= require bootstrap/dist/js/bootstrap //= require_tree . -
Yarn works with rails 5.1 asset pipeline as below
-
Usage for default path: <rails_project>/node_modules/{pkg_name}/dist/{pkgname}.{js,css}
//= require jquery
-
If package is different from this rule, ex: bootstrap. You might specify explicitly (better)
//= require jquery
//= require jquery/dist/jquery
//= require bootstrap/dist/js/bootstrap
-
-
Laravel
composer create-project --prefer-dist laravel/laravel <laravel_project>
-
Useful script snippet
-
If you are always get disconnected, and you want to kill last failed connection of SSH
netstat -palunt |grep -i est | awk '{print $7}'| cut -d'/' -f1 |xargs -I{} bash -c "ps aux |grep sshd |grep {}|grep -v grep" | head -n -1 | awk '{print $2}' |xargs -I{} kill {}
-
If you want to restart network for new config, instead of using
systemctl restart network, which is deprecated in CentOS 8-
Reload network config (mostly, this would work)
nmcli c reload
-
Stop networking and start networking in NetworkManager (NM)
nmcli n off; nmcli n on
-
-
Since RHEL 9 , no more configs under
/etc/sysconfig/network-scripts/, instead, keyfile under/etc/NetworkManager/system-connectionsonly. So config network usingnmcliwill be a better method -
Modify network static IP using
nmcli-
Setup static ip
nmcli connection modify eth0 \
  ipv4.addresses 192.168.122.7/24 \
  ipv4.gateway 192.168.122.1 \
  ipv4.dns 192.168.122.1 \
  ipv4.method manual
-
Disable IPv6, and peerDNS
nmcli connection modify eth0 \
  ipv4.ignore-auto-dns "true"

nmcli connection modify eth0 \
  ipv6.method "disabled" \
  ipv6.addr-gen-mode "stable-privacy" \
  ipv6.ignore-auto-dns "true" \
  ipv6.ignore-auto-routes "true" \
  ipv6.never-default "true"
-
List only device name except loop 0 using
nmclinmcli -g name connection show
-
-
- gem install without making document
-
Deprecated
no-ri, no-rdoc -
Config
echo "gem: --no-document" > ~/.gemrc
-
-
Remove test database and setup root password
After doing this, still need some tweak, try to manage database with https://www.adminer.org/
$ mysql_secure_installation
Just keep hitting
<ENTER>, toUSE ALL DEFAULT SETTING -
After mysql_secure_installation
- MariaDB 10.5 auth method will just like MariaDB 10.3
-
Database tools - Adminer
- Easy to manage database
- Stronger than scaffold, and any other admin panel. For quick CRUD
-
RENDER_CP
-
Render template using eval (Might have escape issue, if template is complicated)
# Method : eval "echo \"$variable\"" -
Sample
- databag
local var="Hello World"
- template (${$CONFIG_FOLDER}/yourowntemplate_file)
This is $var- function
RENDER_CP ${$CONFIG_FOLDER}/yourowntemplate_file /SomeWhere/somewhere- result (/SomeWhere/somewhere)
This is Hello World
-
-
RENDER_CP_SED
-
Render template using sed (BETTER method for rendering template)
# Method : cat template | sed 's/\{\{var\}\}/$var/g' -
Sample
- databag
local var="Hello World"
- template (${$CONFIG_FOLDER}/yourowntemplate_file)
This is {{var}}- function
RENDER_CP_SED ${$CONFIG_FOLDER}/yourowntemplate_file /SomeWhere/somewhere- result (/SomeWhere/somewhere)
This is Hello World
-
-
SAFE_DELETE
-
Check file names and path before rm any dangerous files, preventing from destoying whole server
-
check for the following dangerous key words
.
..
*
/
.*
*.*
"$(echo "$(find / -maxdepth 1 ; readlink -m /* )" | sort -n | uniq)"
-
-
Sample
# --- Should be failed ---
DELETE_FILE="/root/delete_me/.*"
# --- safe delete command usage ---
SAFE_DELETE "${DELETE_FILE}"
-
-
(Git) stash list
$ git stash list stash@{0}: WIP on redmine_4.0.7: a853fc0 Fix sort projects table by custom field (#32769). stash@{1}: WIP on redmine_4.0.6: 22ebc68 tagged version 4.0.6- redmine_4.0.6 / redmine_4.0.7, these mean branch name
- if you want to restore data, you'd better checkout the the related branch
-
Display all stash contents
git stash list | cut -d':' -f1 | xargs -I{} bash -c "\
  echo; \
  echo ----------------------------------------------- {} -----------------------------------------------;\
  git stash show -p {}; echo\
"
-
Push git
commitsto remotegit push -
Push git
tagsto remotegit push --tags -
Fetch git
commitsto localgit fetch -
Fetch git
tagsto localgit fetch --tags -
Fetchgitcommitsto local and thenMERGEto Working Directorygit pull
- Database
mysqldump -u {db_user} -p --lock-all-tables --skip-tz-utc redmine > redmine_$(date +"%Y%m%d")_skip-tz-utc.sql
- Application & files
cp -a redmine redmine_bak
- plugins
/home/rubyuser/rails_sites/redmine/plugins/redmine_*
- themes
/home/rubyuser/rails_sites/redmine/public/themes/{a1,circle,PurpleMine2}
- session token
/home/rubyuser/rails_sites/redmine/config/initializers/secret_token.rb
- uploaded files
/home/rubyuser/rails_sites/redmine/files/
-
Stop puma server
puma-systemd-mgr -p -i redmine
-
Go to the Redmine root directory and run the following command:
cd redmine
git stash
git checkout master git fetch git fetch --tags git pull
sometimes
git pullwill not fetch tags,instead, we need to fetch tags bygit fetch --tagsespecially when
tags nameortags <-> commit, has beenchangedgit co 4.0.7 -b redmine_4.0.7 git stash pop git status |grep 'both modified:' |awk '{print $3}' |xargs -I{} bash -c "echo --- git reset HEAD {} ---; git reset HEAD {}"
-
Fix conflicts
-
Perform the upgrade
# gemset name using redmine version
echo "gemset_redmine_4.1.0" > .ruby-gemset

# switch to the new gemset
cd
cd -

# Update gem / bundler for this gemset
gem update --system
gem install bundler

# Install the required gems by running the following command
bundle update

# Update the database
bundle exec rake db:migrate RAILS_ENV=production
bundle exec rake redmine:plugins RAILS_ENV=production

# Clean up
bundle exec rake tmp:cache:clear RAILS_ENV=production
-
Start puma server
puma-systemd-mgr -s -i redmine
-
Go to "Admin -> Roles & permissions" to check/set permissions for the new features, if any.
-
Finally, clear browser's cached data (To avoid strange CSS error)
- Chrome -> History -> Clear History -> Choose ONLY "Cached images and files"
-
Stop puma server
puma-systemd-mgr -p -i redmine
-
Backup current redmine
-
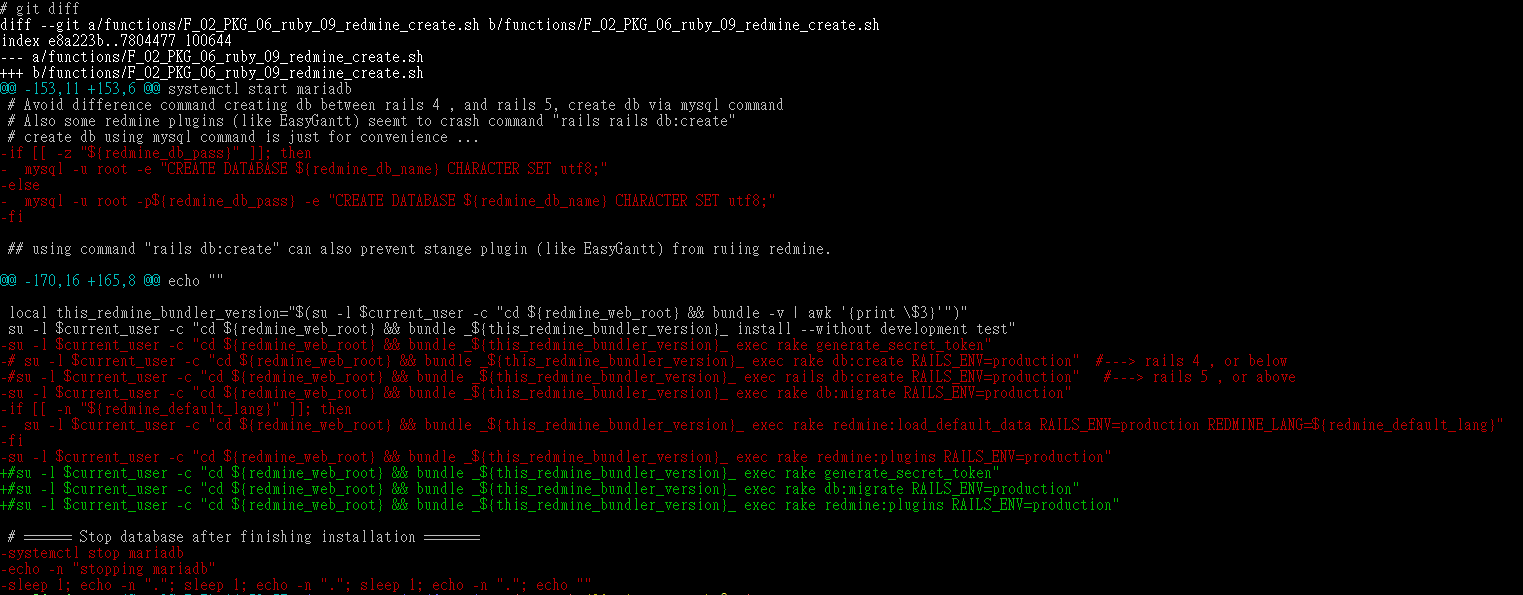
Remove the following lines from script
functions/F_02_PKG_06_ruby_09_redmine_create.sh(F_02_PKG_06_ruby_09_redmine_create_diff.png)if [[ -z "${redmine_db_pass}" ]]; then mysql -u root -e "CREATE DATABASE ${redmine_db_name} CHARACTER SET utf8;" else mysql -u root -p${redmine_db_pass} -e "CREATE DATABASE ${redmine_db_name} CHARACTER SET utf8;" fi
su -l $current_user -c "cd ${redmine_web_root} && bundle _${this_redmine_bundler_version}_ exec rake generate_secret_token"
if [[ -n "${redmine_default_lang}" ]]; then
  su -l $current_user -c "cd ${redmine_web_root} && bundle _${this_redmine_bundler_version}_ exec rake redmine:load_default_data RAILS_ENV=production REDMINE_LANG=${redmine_default_lang}"
fi
-
Perform the fresh installation
./start -i F_02_PKG_06_ruby_09_redmine_create
-
Restore files from backup
redmine/config/initializers/secret_token.rbredmine/files/
-
Start puma server
puma-systemd-mgr -s -i redmine
-
Go to "Admin -> Roles & permissions" to check/set permissions for the new features, if any.
-
Finally, clear browser's cached data (To avoid strange CSS error)
- Chrome -> History -> Clear History -> Choose ONLY "Cached images and files"
For some cases, we need to upgrade MariaDB without data lost. Here is my note about this.
-
Backup current database
# mysqldump -u root -p --lock-all-tables --skip-tz-utc -A > all_`date +"%Y%m%d"`_skip-tz-utc.sql -
Stop MariaDB
# systemctl stop mariadb -
Uninstall the old version of MariaDB
dnf remove -y MariaDB-common MariaDB-client MariaDB-shared MariaDB-server MariaDB-devel
-
Modify the repository configuration to newer version
-
Install the new version of MariaDB
dnf install -y MariaDB-common MariaDB-client MariaDB-shared MariaDB-server MariaDB-devel
-
Make any desired changes to configuration options in option files, such as my.cnf. This includes removing any options that are no longer supported.
# cat /etc/my.cnf.d/server.cnf | grep -B1 '127.0.0' [mysqld] bind-address = 127.0.0.1 -
Start MariaDB
# systemctl start mariadb -
Run
mysql_upgrade- mysql_upgrade does two things:
- Ensures that the system tables in the#mysql database are fully compatible with the new version.
- Does a very quick check of all tables and marks them as compatible with the new version of MariaDB .
mysql_upgrade -u root -p-
After this command, there would be a file generated for letting you know this database has already been upgraded. (owner of the file is root)
$ ls /var/lib/mysql | grep upgrade
-rw-r--r--  1 root  root    15 Sep  9 14:24 mysql_upgrade_info
$ cat mysql_upgrade_info 10.5.5-MariaDB
-
- mysql_upgrade does two things:
-
Restart MariaDB - Done
-
It would be better to restart MariaDB, if it's allowed.
# systemctl restart mariadb
-
-
2017/03/02
- Add Nginx req limit to avoid DDOS.
-
2017/05/25
- Update MariaDB to 10.2
-
2017/05/26
- Due to compatibility issue of ruby gem mysql2 - 0.4.6
- Change default version of MariaDB to 10.1
- Move MariaDB YUM baseurl to databag config file for easy install configuration
-
2017/07/29
- For Rails 5.1 support. Install yarn for default npm packages management
-
2017/09/15
- Add bash prompt for git detail information into bashrc (Some symbol format might not fit on all terminals)
-
2018/01/07
- Laravel 5.3
- MariaDB 10.1
- Update NodeJS from 6 to 8
-
2018/03/22
- Laravel 5.6
- MariaDB 10.2
- Ruby 2.5.0
-
2018/04/11
- Ruby 2.5.1
- Ruby on Rails 5.2
-
2018/06/22
- MariaDB 10.3
-
2018/07/18
- Important changes
- Feature
- Totally migrate rails ap server from passenger to puma
- This means nginx is installed through Nginx repo, not passenger-install-nginx-module anymore!
- Nginx config default config is moving from /opt/nginx/ back to default /etc/nginx/
- User root will no longer be used as a php(laravel) / ruby(rails) developer
- Totally use socket files instead of tcp socket, for monolithic server structure
- php-fpm sock file (Instead of tcp 9000)
- puma sock file
- Totally migrate rails ap server from passenger to puma
- Files
- {rails_app}/config/puma/production.rb
- puma-mgr command added
- systemd -> puma.service -> puma-mgr
- logrotate for all rails / laravel projects
- Developer user accound
- phpuser
- composer installed (for laravel)
- rubyuser
- rvm installed (for rails)
- phpuser
- Feature
- Important changes
-
2018/07/27
- Install Docker
- docker-ce
- Disable docker daemon onboot by default (systemd-docker disabled)
- docker-compose
- docker-ce
- Install Docker
-
2018/07/28
- Install Redmine 3.4.6(ruby 2.4.1, rails 4.2)
- Redmine plugins: redmine_agile, redmine_lightbox2
- Install Redmine 3.4.6(ruby 2.4.1, rails 4.2)
-
2019/01/05
- Update NodeJS from 8.x LTS to 10.x LTS
-
2018/12/12
- Some changes for nginx Nginx WAF
-
2019/02/27
- Laravel 5.8
- Redmine - add 3.4.9 , 4.0.2 version
-
2019/03/12
- Ruby 2.5.3
-
2019/04/07
- Enhanced tail - multitail
- Enhanced grep - ack
-
2019/04/26
- Redmine - 4.0.2 ---> 4.0.3
-
2019/06/01
- RVM - 1.29.6 ---> 1.29.8
- Ruby - 2.5.3 ---> 2.6.3
-
2019/08/03
- MariaDB 10.4
- Important effect
- The unix_socket authentication plugin is now default
- Login using password is not nesseccary
- Insecure default empty password '' is disabled
- the open-for-everyone all-powerful root account is finally gone
- The unix_socket authentication plugin is now default
- Important effect
- RVM - 1.29.8 ---> 1.29.9
- Redmine - 4.0.3 ---> 4.0.4
- For Rails 6+ use
- Preview - Video
- ffmpeg
- ffmpeg-devel
- Preview - PDF
- poppler
- poppler-devel
- muPDF (not installed - payment required)
- Generate - PDF files
- wkhtmltopdf
- wkhtmltopdf-devel
- Preview - Video
- MariaDB 10.4
-
2019/08/20
- Ruby on Rails 6.0
-
2019/08/26
- php 7.2
- Laravel 6.0
-
2019/11/15
- Add tmux installation & configuration setup
-
2019/11/27
- Update NodeJS from 10.x LTS to 12.x LTS
- Redmine - 4.0.4 ---> 4.0.5
-
2019/12/06
- tag: v0.1.0
-
2019/12/07
- tag: v0.1.1
-
2019/12/08
- tag: v0.1.2
-
2019/12/08
- tag: v0.1.3
-
2019/12/09
- tag: v0.1.4
-
2019/12/10
- tag: v0.1.5
-
2019/12/10
- tag: v0.1.6
-
2019/12/13
- tag: v0.1.7
- changelog: https://github.com/charlietag/os_preparation/compare/v0.1.6...v0.1.7
- redmine_plugin : redmine_agile 1.5.0 -> 1.5.1
- tag: v0.1.7
-
2019/12/19
- Ruby - 2.6.3 ---> 2.6.0
- Redmine
- Ruby - 2.6.3 ---> 2.5.1
- Bundler - 2.0.2 ---> 2.1.1
- tag: v0.1.8
-
2019/12/22
- Redmine : 4.0.5 -> 4.0.6
- Redmine : Bundler - 2.1.1 ---> 2.1.x
-
2020/01/10
- Add vim plugin : gitgutter
- Parallel downloading vim / redmine plugins
- Improve yum installation by reducing the frequency of using command "yum install"
-
2020/01/10
- tag: v0.2.0
-
2020/01/13
- Add document for upgrading redmine
-
2020/01/27
- tag: v0.2.1
- changelog: https://github.com/charlietag/os_preparation/compare/v0.2.0...v0.2.1
- Stop spring before running rails server
- tag: v0.2.1
-
2020/02/18
- tag: v0.2.2
- changelog: https://github.com/charlietag/os_preparation/compare/v0.2.1...v0.2.2
- Redmine
- 4.0 -> 4.1
- Redmine plugins
- redmine_issue_templates
- 0.3.7 -> 1.0.0
- redmine_agile
- 1.5.1 -> 1.5.2
- redmine_checklists
- 3.1.16 -> 3.1.17
- redmine_issues_tree
- 4.0.x -> 4.1.x
- redmine_issue_templates
- Redmine themes
- PurpleMine2
- v2.8.0 -> v2.9.0
- a1_theme
- 2.0.0 -> 3.0.0
- circle_theme
- 2.1.3 -> 2.1.5
- PurpleMine2
- Redmine
- changelog: https://github.com/charlietag/os_preparation/compare/v0.2.1...v0.2.2
- tag: v0.2.2
-
2020/03/17
- tag: v0.2.3
- changelog: https://github.com/charlietag/os_preparation/compare/v0.2.2...v0.2.3
- Laravel
- 6.0 -> 7.1
- Laravel
- changelog: https://github.com/charlietag/os_preparation/compare/v0.2.2...v0.2.3
- tag: v0.2.3
-
2020/04/04
- tag: v0.2.4
- changelog: https://github.com/charlietag/os_preparation/compare/v0.2.3...v0.2.4
- Laravel
- 7.1 -> 7.x
- vim - set number by default
- Laravel
- changelog: https://github.com/charlietag/os_preparation/compare/v0.2.3...v0.2.4
- tag: v0.2.4
-
2020/06/10
- tag: v1.0.0
- changelog: https://github.com/charlietag/os_preparation/compare/v0.2.4...v1.0.0
- CentOS 8 - changes for CentOS 8
-
Rename all centos7 related to centos8 in all config files (Readme / hostname /...)
-
Reorganize /etc/hosts and add current hostname into /etc/hosts after os_preparation
127.0.0.1 original content
::1       original content
127.0.0.1 $(hostname)
::1       $(hostname)
-
Command "yum" -> "dnf"
-
For DNF performance - alias dnf -> /root/bin/dnf.sh (update cache within 2 days)
-
DNF automatic update enabled(dnf-automatic)
-
NTP packages
- ntpdate -> chronyd (chronyd -q 'pool pool.ntp.org iburst')
-
Enable service - NetworkManager
- nmcli / nmtui
-
Remove packages by default after os_preparation
- bash-completion
- cockpit
-
Will not be installed by default (docker-ce / docker-compose)
-
DNF enabled repo
- remi
- nodesource
- nginx-stable
- mariadb
- rpmfusion-free-updates
- yarn
- PowerTools
- epel
- epel-modular
- So unstable, this repo is why I rewrite dnf with alias /root/bin/dnf.sh
-
DNF module enabled by default
- perl-DBI (required by MariaDB)
- perl (required by perl-DBI)
- If this is not enabled manually, dnf will show dependency warning message
- php:remi-7.4
- ruby:2.6
- Just for the convience for rvm required packages
-
Packages installed
- PHP 7.4 REMI
- RVM 1.29.9 -> 1.29.10
- Redmine 4.1.0 -> 4.1.1
- Redmine plugins
- redmine_issue_templates 1.0.0 -> 1.0.2
- redmine_agile 1.5.2 -> 1.5.3
- Redmine themes
- PurpleMine2 2.9.0 -> 2.10.2
- Redmine plugins
- pcre / pcre-devel
- For Nginx HTTP rewrite module while compiling nginx related tools (ModSecurity / headers-more-nginx-module)
-
- CentOS 8 - changes for CentOS 8
- changelog: https://github.com/charlietag/os_preparation/compare/v0.2.4...v1.0.0
- tag: v1.0.0
-
2020/06/14
- tag: v1.0.1
- changelog: https://github.com/charlietag/os_preparation/compare/v1.0.0...v1.0.1
- Fix tmux version to 3.1b
- Change default config in .tmux.conf
- Make sure php-fpm is not wanted by Nginx , while starting Nginx server (
/usr/lib/systemd/system/nginx.service.d/php-fpm.conf)
- changelog: https://github.com/charlietag/os_preparation/compare/v1.0.0...v1.0.1
- tag: v1.0.1
-
2020/06/15
- tag: v1.0.2
- changelog: https://github.com/charlietag/os_preparation/compare/v1.0.1...v1.0.2
- Disable / Stop service "cups" by defalt
- changelog: https://github.com/charlietag/os_preparation/compare/v1.0.1...v1.0.2
- tag: v1.0.3
- changelog: https://github.com/charlietag/os_preparation/compare/v1.0.2...v1.0.3
- Service "CUPS" is not installed by default (
Disable / Stop service "cups" by defalt). - It's added after os_preparation (should be for generating PDF).
- Service "CUPS" is not installed by default (
- changelog: https://github.com/charlietag/os_preparation/compare/v1.0.2...v1.0.3
- tag: v1.0.2
-
2020/06/16
- tag: v1.0.4
- changelog: https://github.com/charlietag/os_preparation/compare/v1.0.3...v1.0.4
- Add bandwith into tmux themes
- changelog: https://github.com/charlietag/os_preparation/compare/v1.0.3...v1.0.4
- tag: v1.0.4
-
2020/06/17
- tag: v1.0.5
- changelog: https://github.com/charlietag/os_preparation/compare/v1.0.4...v1.0.5
- ruby default version 2.6.0 -> 2.7.0
- changelog: https://github.com/charlietag/os_preparation/compare/v1.0.4...v1.0.5
- tag: v1.0.6
- changelog: https://github.com/charlietag/os_preparation/compare/v1.0.5...v1.0.6
- fix dnf issue after dnf is upgraded (CentOS 8.2)
- changelog: https://github.com/charlietag/os_preparation/compare/v1.0.5...v1.0.6
- tag: v1.0.5
-
2020/06/18
- tag: v1.0.7
- changelog: https://github.com/charlietag/os_preparation/compare/v1.0.6...v1.0.7
- Changes for CentOS 8.2
- changelog: https://github.com/charlietag/os_preparation/compare/v1.0.6...v1.0.7
- tag: v1.0.8
- changelog: https://github.com/charlietag/os_preparation/compare/v1.0.7...v1.0.8
- perf tune dnf.sh
- changelog: https://github.com/charlietag/os_preparation/compare/v1.0.7...v1.0.8
- tag: v1.0.7
-
2020/06/30
- tag: v1.0.9
- changelog: https://github.com/charlietag/os_preparation/compare/v1.0.8...v1.0.9
- .tmux.conf for tmux-theme dark mode
- some changes of aliases for rubyuser
- changelog: https://github.com/charlietag/os_preparation/compare/v1.0.8...v1.0.9
- tag: v1.0.9
-
2020/07/08
- tag: v1.0.10
- changelog: https://github.com/charlietag/os_preparation/compare/v1.0.9...v1.0.10
- .tmux.conf
- .vimrc
- auto retab - tab to spaces
- auto remove trailing spaces
- changelog: https://github.com/charlietag/os_preparation/compare/v1.0.9...v1.0.10
- tag: v1.0.11
- changelog: https://github.com/charlietag/os_preparation/compare/v1.0.10...v1.0.11
- .vimrc
- Use for emmet-vim when FileType is html,css,scss,eruby(erb)
- vim plugins
- mattn/emmet-vim
- tomtom/tcomment_vim
- tpope/vim-surround
- .vimrc
- changelog: https://github.com/charlietag/os_preparation/compare/v1.0.10...v1.0.11
- tag: v1.1.0
- changelog: https://github.com/charlietag/os_preparation/compare/v1.0.11...v1.1.0
- Fix typo
- changelog: https://github.com/charlietag/os_preparation/compare/v1.0.11...v1.1.0
- tag: v1.1.1
- changelog: https://github.com/charlietag/os_preparation/compare/v1.1.0...v1.1.1
- mattn/emmet-vim
- Add FileType php
- mattn/emmet-vim
- changelog: https://github.com/charlietag/os_preparation/compare/v1.1.0...v1.1.1
- tag: v1.1.2
- changelog: https://github.com/charlietag/os_preparation/compare/v1.1.1...v1.1.2
- vim plugin
- tpope/vim-endwise
- vim plugin
- changelog: https://github.com/charlietag/os_preparation/compare/v1.1.1...v1.1.2
- tag: v1.1.3
- changelog: https://github.com/charlietag/os_preparation/compare/v1.1.2...v1.1.3
- Move vim config(nginx syntax) out , apply nginx syntax / colorscheme as VIM plugin
- Plugins
- vim-ruby/vim-ruby
- ap/vim-css-color
- changelog: https://github.com/charlietag/os_preparation/compare/v1.1.2...v1.1.3
- tag: v1.0.10
-
2020/07/10
- tag: v1.1.4
- changelog: https://github.com/charlietag/os_preparation/compare/v1.1.3...v1.1.4
- Move vim tmux settings out to another git repo
- changelog: https://github.com/charlietag/os_preparation/compare/v1.1.3...v1.1.4
- tag: v1.1.4
-
2020/07/11
- tag: v1.1.5
- changelog: https://github.com/charlietag/os_preparation/compare/v1.1.4...v1.1.5
- Add more descriptions during installation
- changelog: https://github.com/charlietag/os_preparation/compare/v1.1.4...v1.1.5
- tag: v1.1.5
-
2020/07/26
- tag: v1.1.6
- changelog: https://github.com/charlietag/os_preparation/compare/v1.1.5...v1.1.6
- Avoid ESC key (4 times) triggers command completion
- Enable bash option
shopt -s no_empty_cmd_completion
- Avoid ESC key (4 times) triggers command completion
- changelog: https://github.com/charlietag/os_preparation/compare/v1.1.5...v1.1.6
- tag: v1.1.6
-
2020/09/08
- tag: v1.1.7
- changelog: https://github.com/charlietag/os_preparation/compare/v1.1.6...v1.1.7
- refine doc - remove deprecated messages
- MariaDB 10.5
- changelog: https://github.com/charlietag/os_preparation/compare/v1.1.6...v1.1.7
- tag: v1.1.7
-
2020/09/09
- tag: v1.1.8
- changelog: https://github.com/charlietag/os_preparation/compare/v1.1.7...v1.1.8
- Laravel 8.x
- Redmine
- Plugins
- redmine_issue_templates 1.0.2 -> 1.1.0
- redmine_agile 1.5.3 -> 1.5.4
- redmine_checklists 3.1.17 -> 3.1.18
- Themes
- PurpleMine2 2.10.2 -> 2.12.1
- Plugins
- changelog: https://github.com/charlietag/os_preparation/compare/v1.1.7...v1.1.8
- tag: v1.1.9
- changelog: https://github.com/charlietag/os_preparation/compare/v1.1.8...v1.1.9
- Add notes for Upgrading MariaDB
- changelog: https://github.com/charlietag/os_preparation/compare/v1.1.8...v1.1.9
- tag: v1.1.8
-
2020/09/09
- tag: v1.1.10
- changelog: https://github.com/charlietag/os_preparation/compare/v1.1.9...v1.1.10
- Make some changes for alias command
- changelog: https://github.com/charlietag/os_preparation/compare/v1.1.9...v1.1.10
- tag: v1.1.10
-
2020/09/14
- tag: v1.1.11
- changelog: https://github.com/charlietag/os_preparation/compare/v1.1.10...v1.1.11
- Fix unpredictable issues (ie. rvm env) while use rvm under tmux
- Add alias command 'gpull', for
git fetch && git fetch --tags && git pull
- changelog: https://github.com/charlietag/os_preparation/compare/v1.1.10...v1.1.11
- tag: v1.1.11
-
2020/09/15
- tag: v1.1.12
- changelog: https://github.com/charlietag/os_preparation/compare/v1.1.11...v1.1.12
- Fix - failed installing redmine (os_preparation)
- changelog: https://github.com/charlietag/os_preparation/compare/v1.1.11...v1.1.12
- tag: v1.1.13
- changelog: https://github.com/charlietag/os_preparation/compare/v1.1.12...v1.1.13
- Fix - rvm path error, when no .rvmrc, .ruby-version, .ruby-gemset found
- changelog: https://github.com/charlietag/os_preparation/compare/v1.1.12...v1.1.13
- tag: v1.1.14
- changelog: https://github.com/charlietag/os_preparation/compare/v1.1.13...v1.1.14
- Fix - failed installing redmine (os_preparation)
- changelog: https://github.com/charlietag/os_preparation/compare/v1.1.13...v1.1.14
- tag: v1.1.12
-
2020/09/23
- tag: v1.1.15
- changelog: https://github.com/charlietag/os_preparation/compare/v1.1.14...v1.1.15
-
Add 256-color code into PS1 (terminal)
-
Ref. https://unix.stackexchange.com/questions/124407/what-color-codes-can-i-use-in-my-ps1-prompt
#!/bin/bash
color=16;
while [ $color -lt 245 ]; do
  echo -e "$color: \\033[01;38;5;${color}mhello\\033[48;5;${color}mworld\\033[0m"
  ((color++));
done
-
-
Change default color of PS1 for rubyuser
-
- changelog: https://github.com/charlietag/os_preparation/compare/v1.1.14...v1.1.15
- tag: v1.1.15
-
2021/01/26
-
tag: v2.0.0
- changelog: https://github.com/charlietag/os_preparation/compare/v1.1.15...v2.0.0
- Migrate to CentOS Stream release 8
- No need to use 3rd dnf repo below anymore, built-in AppStream contains all the latest version of packages
- MariaDB (yum.mariadb.org)
- NodeJS (nodejs.org)
- Nginx (nginx.org)
- PHP (remi)
- No need to use 3rd dnf repo below anymore, built-in AppStream contains all the latest version of packages
- Tmux 3.1b -> 3.1c
- NodeJs 12 -> 14
- rvm 1.29.10 -> 1.29.11
- Ruby 2.7 -> 3.0
- Rails 6.0 -> 6.1
- Puma 4.x -> Puma 5.x
- Systemd(type=notify) integated
- Puma management command, systemd integrated
puma-mgrpuma-systemd-mgr
- Puma 4.x -> Puma 5.x
- Migrate to CentOS Stream release 8
- changelog: https://github.com/charlietag/os_preparation/compare/v1.1.15...v2.0.0
-
tag: v2.0.1
- changelog: https://github.com/charlietag/os_preparation/compare/v2.0.0...v2.0.1
-
Redmine bundler
bundle install --without development test
===>
bundle config set --local without 'development test'
bundle install
-
- changelog: https://github.com/charlietag/os_preparation/compare/v2.0.0...v2.0.1
-
-
2021/01/27
- tag: v2.0.2
- changelog: https://github.com/charlietag/os_preparation/compare/v2.0.1...v2.0.2
- Add function F_91_MA_disable_service to make sure that unused services are disabled
- changelog: https://github.com/charlietag/os_preparation/compare/v2.0.1...v2.0.2
- tag: v2.0.3
- changelog: https://github.com/charlietag/os_preparation/compare/v2.0.2...v2.0.3
- puma-production config file - mkdir if pids folder does not exist
- changelog: https://github.com/charlietag/os_preparation/compare/v2.0.2...v2.0.3
- tag: v2.0.2
-
2021/01/31
- tag: v2.0.4
- changelog: https://github.com/charlietag/os_preparation/compare/v2.0.3...v2.0.4
- add command alias for listing TCP listening ports , Unix sockets
- llnn
netstat -palunt | grep -i listen ; lsof | grep '\.sock '
- ssnn
ss -palunt | grep -i listen ; lsof | grep '\.sock '
- llnn
- add command alias for listing TCP listening ports , Unix sockets
- changelog: https://github.com/charlietag/os_preparation/compare/v2.0.3...v2.0.4
- tag: v2.0.4
-
2021/02/02
- tag: v2.0.5
- changelog: https://github.com/charlietag/os_preparation/compare/v2.0.4...v2.0.5
- Fix module version definition issue
- Rename function name to make sure the installation order
- changelog: https://github.com/charlietag/os_preparation/compare/v2.0.4...v2.0.5
- tag: v2.0.5
-
2021/02/03
- tag: v2.0.6
- changelog: https://github.com/charlietag/os_preparation/compare/v2.0.5...v2.0.6
- Make sure Installed Environment Groups are the same on each installation (rsyslog is removed from env groups "Server")
dnf groupinstall -y "Minimal Install"dnf groupinstall -y "Server"
- Fix dnf.sh arguments passing issue
- such as :
dnf groupinstall "Server" "Minimal Install"
- such as :
- Make sure Installed Environment Groups are the same on each installation (rsyslog is removed from env groups "Server")
- changelog: https://github.com/charlietag/os_preparation/compare/v2.0.5...v2.0.6
- tag: v2.0.7
- changelog: https://github.com/charlietag/os_preparation/compare/v2.0.6...v2.0.7
- Make sure rsyslog is enabled and started
- changelog: https://github.com/charlietag/os_preparation/compare/v2.0.6...v2.0.7
- tag: v2.0.8
- changelog: https://github.com/charlietag/os_preparation/compare/v2.0.7...v2.0.8
- display more messages while installing rsyslog
- changelog: https://github.com/charlietag/os_preparation/compare/v2.0.7...v2.0.8
- tag: v2.0.9
- changelog: https://github.com/charlietag/os_preparation/compare/v2.0.8...v2.0.9
- Make sure use systemd target "multi-user.target"
- Change sample command - swapfile 2G -> 4G
- display detail messages while installing rsyslog
- use git pull --no-rebase for os_preparation_lib
- changelog: https://github.com/charlietag/os_preparation/compare/v2.0.8...v2.0.9
- tag: v2.0.6
-
2021/02/04
- tag: v2.0.10
- changelog: https://github.com/charlietag/os_preparation/compare/v2.0.9...v2.0.10
- Add warning if under graphical.target (Server with GUI)
- More services specified to be disabled
- Unused environment groups will be removed
- "Server with GUI"
- "Workstation"
- "KDE Plasma Workspaces"
- "Virtualization Host"
- "Custom Operating System"
- Add how to: remove booting spinning ico in 'graphical.target -> multi-user.target'
- changelog: https://github.com/charlietag/os_preparation/compare/v2.0.9...v2.0.10
- tag: v2.0.10
-
2021/02/06
- tag: v2.0.11
- changelog: https://github.com/charlietag/os_preparation/compare/v2.0.10...v2.0.11
- fix conflicts between pkg "selinux-policy-targeted" and "mariadb-server"
- changelog: https://github.com/charlietag/os_preparation/compare/v2.0.10...v2.0.11
- tag: v2.0.12
- changelog: https://github.com/charlietag/os_preparation/compare/v2.0.11...v2.0.12
- small script changes
- changelog: https://github.com/charlietag/os_preparation/compare/v2.0.11...v2.0.12
- tag: v2.0.13
- changelog: https://github.com/charlietag/os_preparation/compare/v2.0.12...v2.0.13
- small changes for command alias
- changelog: https://github.com/charlietag/os_preparation/compare/v2.0.12...v2.0.13
- tag: v2.0.14
- changelog: https://github.com/charlietag/os_preparation/compare/v2.0.13...v2.0.14
- small changes for README document
- changelog: https://github.com/charlietag/os_preparation/compare/v2.0.13...v2.0.14
- tag: v2.0.11
-
2021/06/19
- tag: v2.0.15
- changelog: https://github.com/charlietag/os_preparation/compare/v2.0.14...v2.0.15
- RVM
- 1.29.11 ---> 1.29.12
- Redmine
- 4.1.1 ---> 4.2.1
- Redmine bundler version
- 2.1.x ---> 2.2.x
- Redmine Plugins
- redmine_agile
- 1.5.4 ---> 1.6.1
- redmine_checklists
- 3.1.18 ---> 3.1.19
- redmine_agile
- RVM
- changelog: https://github.com/charlietag/os_preparation/compare/v2.0.14...v2.0.15
- tag: v2.0.15
-
2021/06/21
- tag: v2.0.16
- changelog: https://github.com/charlietag/os_preparation/compare/v2.0.15...v2.0.16
- Fix rvm wrapper issue (gem install gem-wrappers failed)
- changelog: https://github.com/charlietag/os_preparation/compare/v2.0.15...v2.0.16
- tag: v2.0.17
- changelog: https://github.com/charlietag/os_preparation/compare/v2.0.16...v2.0.17
- add DNS config into network-scripts to make sure DNS will not override by DHCP
- changelog: https://github.com/charlietag/os_preparation/compare/v2.0.16...v2.0.17
- tag: v2.0.16
-
2021/09/20
- tag: v2.0.18
- changelog: https://github.com/charlietag/os_preparation/compare/v2.0.17...v2.0.18
- small change for vim - open multiple files in vim tab by default
- changelog: https://github.com/charlietag/os_preparation/compare/v2.0.17...v2.0.18
- tag: v2.0.18
-
2021/10/10
- tag: v2.1.0
- changelog: https://github.com/charlietag/os_preparation/compare/v2.0.18...v2.1.0
- Nodejs
- 14 ---> 16
- Nginx
- 1.18 ---> 1.20
- Tmux
- 3.1c ---> 3.2a
- Redmine
- 4.2.1 ---> 4.2.2
- Nodejs
- changelog: https://github.com/charlietag/os_preparation/compare/v2.0.18...v2.1.0
- tag: v2.1.1
- changelog: https://github.com/charlietag/os_preparation/compare/v2.1.0...v2.1.1
- ruby (os default)
- 2.7 ---> 3.0
- ruby (os default)
- changelog: https://github.com/charlietag/os_preparation/compare/v2.1.0...v2.1.1
- tag: v2.1.0
-
2021/10/12
- tag: v2.1.2
- changelog: https://github.com/charlietag/os_preparation/compare/v2.1.1...v2.1.2
- Redmine
- 4.2.2 ---> 4.2.3
- Redmine
- changelog: https://github.com/charlietag/os_preparation/compare/v2.1.1...v2.1.2
- tag: v2.1.2
-
2021/11/01
- tag: v2.1.3
- changelog: https://github.com/charlietag/os_preparation/compare/v2.1.2...v2.1.3
- rvm
- move gpg server source to databag, it seems changing all the time
- ruby
- exit rvm installation if prefered ruby version exists in OS
- rvm
- changelog: https://github.com/charlietag/os_preparation/compare/v2.1.2...v2.1.3
- tag: v2.1.4
- changelog: https://github.com/charlietag/os_preparation/compare/v2.1.3...v2.1.4
- ruby
- always exec rvm installation even if prefered ruby version exists in OS, because general user (rubyuser) doesn't have permission using OS gem path while install gems
- ruby
- changelog: https://github.com/charlietag/os_preparation/compare/v2.1.3...v2.1.4
- tag: v2.1.5
- changelog: https://github.com/charlietag/os_preparation/compare/v2.1.4...v2.1.5
- ruby
- back to 3.0.0 (for compaitable with rails 6.1)
- ruby
- changelog: https://github.com/charlietag/os_preparation/compare/v2.1.4...v2.1.5
- tag: v2.1.6
- changelog: https://github.com/charlietag/os_preparation/compare/v2.1.5...v2.1.6
-
ruby
- upgrade to 3.0.2 (compaitability with rails 6.1 is OK)
-
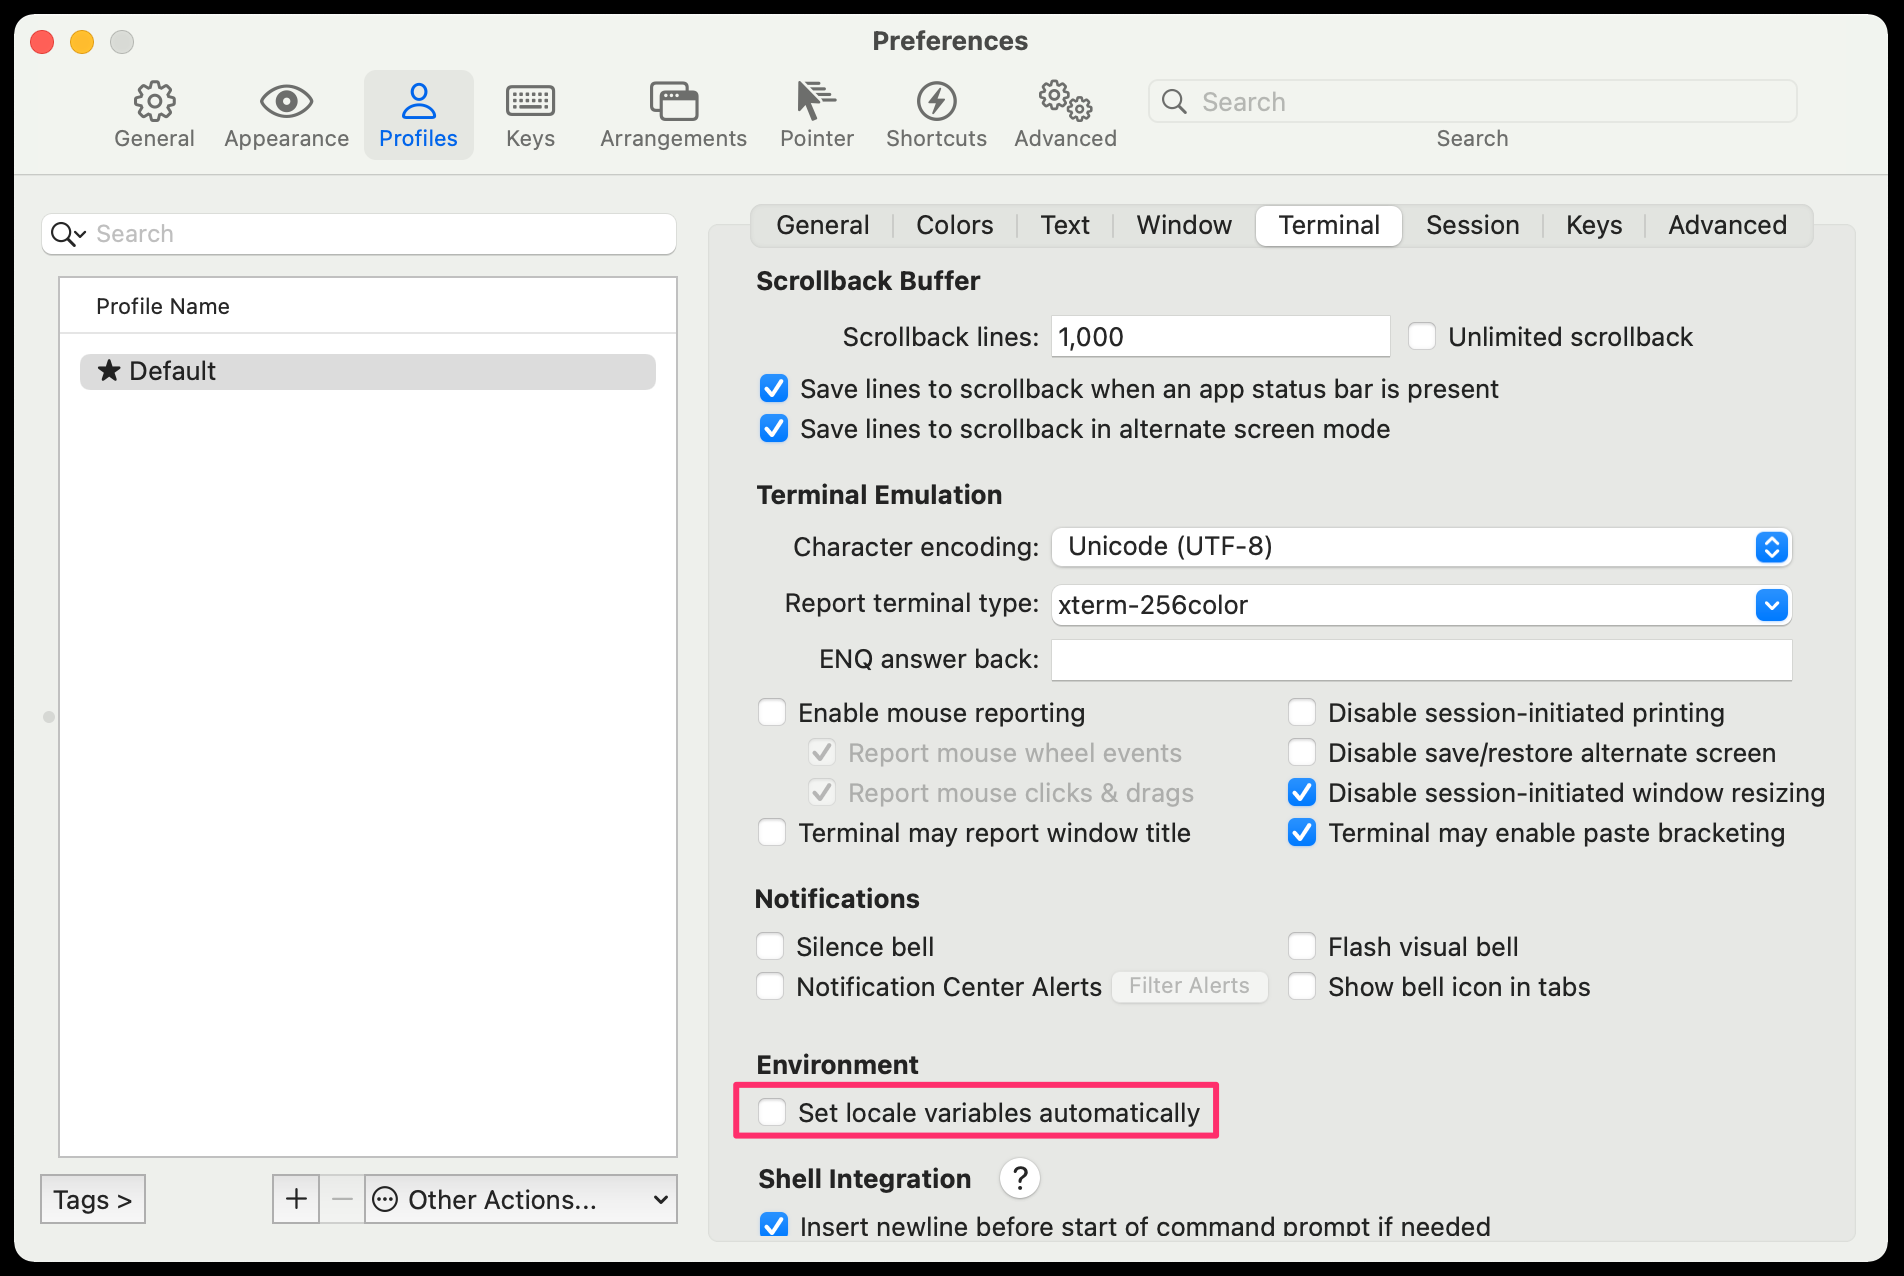
make sure locale (LC_ALL, LANG) is set to "en_US.UTF-8" to avoid errors while compiling programs
export LC_ALL="en_US.UTF-8"
export LANG="en_US.UTF-8"
-
- changelog: https://github.com/charlietag/os_preparation/compare/v2.1.5...v2.1.6
- tag: v2.1.3
-
2021/11/02
- tag: v2.1.7
- changelog: https://github.com/charlietag/os_preparation/compare/v2.1.6...v2.1.7
- locale (LC_ALL, LANG)
- ask user to disable terminal locale setting
- locale (LC_ALL, LANG)
- changelog: https://github.com/charlietag/os_preparation/compare/v2.1.6...v2.1.7
- tag: v2.1.8
- changelog: https://github.com/charlietag/os_preparation/compare/v2.1.7...v2.1.8
- ruby
- add pkg
ruby-devel
- add pkg
- ruby
- changelog: https://github.com/charlietag/os_preparation/compare/v2.1.7...v2.1.8
- tag: v2.1.9
- changelog: https://github.com/charlietag/os_preparation/compare/v2.1.8...v2.1.9
- rvm
- install gpg keys from rvm.io web server
- rubygems
- Do not
gem update --system&&gem updatemanually- for instance, this time I'm facing issue that pathname upgraded from
0.1.0to0.2.0and this cause rails 6.1.4.1 failed to start
- for instance, this time I'm facing issue that pathname upgraded from
- Do not
- rvm
- changelog: https://github.com/charlietag/os_preparation/compare/v2.1.8...v2.1.9
- tag: v2.1.7
-
2021/11/02
- tag: v2.1.10
- changelog: https://github.com/charlietag/os_preparation/compare/v2.1.9...v2.1.10
- remove pkg cloud-init if exists
- changelog: https://github.com/charlietag/os_preparation/compare/v2.1.9...v2.1.10
- tag: v2.1.10
-
2021/11/28
- tag: v2.2.0
- changelog: https://github.com/charlietag/os_preparation/compare/v2.1.10...v2.2.0
- Add default nginx config for perf (ex. gzip)
- changelog: https://github.com/charlietag/os_preparation/compare/v2.1.10...v2.2.0
- tag: v2.2.0
-
2022/01/22
- tag: v2.3.0
- changelog: https://github.com/charlietag/os_preparation/compare/v2.2.0...v2.3.0
- PHP 7.4 ---> 8.0
- Ruby 3.0.2 ---> 3.1.0
- Rails 6.1 ---> 7.0
- changelog: https://github.com/charlietag/os_preparation/compare/v2.2.0...v2.3.0
- tag: v2.3.1
- changelog: https://github.com/charlietag/os_preparation/compare/v2.3.0...v2.3.1
- php 8.0 has removed php-xmlrpc, and move it to pecl
- changelog: https://github.com/charlietag/os_preparation/compare/v2.3.0...v2.3.1
- tag: v2.3.0
-
2022/01/29
- tag: v2.4.0
- changelog: https://github.com/charlietag/os_preparation/compare/v2.3.1...v2.4.0
- Install libvips through repo
remifor rails 7 - Action Text (Active Storage - gem: ruby-vips)
- Install libvips through repo
- changelog: https://github.com/charlietag/os_preparation/compare/v2.3.1...v2.4.0
- tag: v2.4.1
- changelog: https://github.com/charlietag/os_preparation/compare/v2.4.0...v2.4.1
- No need to
skip-springwhilerails new project, spring is not included by Rails 7
- No need to
- changelog: https://github.com/charlietag/os_preparation/compare/v2.4.0...v2.4.1
- tag: v2.4.0
-
2022/01/29
- tag: v2.5.0
- changelog: https://github.com/charlietag/os_preparation/compare/v2.4.1...v2.5.0
- Add alias for rails 7 command
- changelog: https://github.com/charlietag/os_preparation/compare/v2.4.1...v2.5.0
- tag: v2.5.0
-
2022/02/01
- tag: v2.5.1
- changelog: https://github.com/charlietag/os_preparation/compare/v2.5.0...v2.5.1
- Change alias for rubyuser (rails 7 command)
- changelog: https://github.com/charlietag/os_preparation/compare/v2.5.0...v2.5.1
- tag: v2.5.1
-
2022/02/09
- tag: v2.6.0
- changelog: https://github.com/charlietag/os_preparation/compare/v2.5.1...v2.6.0
- Laravel
8.x--->9.x
- Laravel
- changelog: https://github.com/charlietag/os_preparation/compare/v2.5.1...v2.6.0
- tag: v2.6.0
-
2022/04/17
- tag: v2.7.0
- changelog: https://github.com/charlietag/os_preparation/compare/v2.6.0...v2.7.0
- Ruby default version 3.1.0 ---> 3.1.1
- Redmine 4 ---> 5.0.0
- ruby 3.1.1
- rails 6.1.4.7
- Only enable Redmine plugins, themes below (disabled other Redmine plugins)
- Plugins
- redmine_agile
- redmine_checklists
- Themes
- PurpleMine2
- a1_theme
- circle_theme
- Plugins
- changelog: https://github.com/charlietag/os_preparation/compare/v2.6.0...v2.7.0
- tag: v2.7.0
-
2022/04/27
- tag: v2.7.1
- changelog: https://github.com/charlietag/os_preparation/compare/v2.7.0...v2.7.1
- Ruby default version 3.1.1 ---> 3.1.2
- changelog: https://github.com/charlietag/os_preparation/compare/v2.7.0...v2.7.1
- tag: v2.7.2
- changelog: https://github.com/charlietag/os_preparation/compare/v2.7.1...v2.7.2
- By default do the following to make sure using the latest version of commands "gem , bundle" to avoid rails compatibility
- gem update --system
- gem install bundler
- By default do the following to make sure using the latest version of commands "gem , bundle" to avoid rails compatibility
- changelog: https://github.com/charlietag/os_preparation/compare/v2.7.1...v2.7.2
- tag: v2.7.1
-
2022/05/16
- tag: v2.7.3
- changelog: https://github.com/charlietag/os_preparation/compare/v2.7.2...v2.7.3
- Fix typo
- changelog: https://github.com/charlietag/os_preparation/compare/v2.7.2...v2.7.3
- tag: v2.7.3
-
2022/05/27
- tag: v2.7.4
- changelog: https://github.com/charlietag/os_preparation/compare/v2.7.3...v2.7.4
- Redmine 5.0.1
- changelog: https://github.com/charlietag/os_preparation/compare/v2.7.3...v2.7.4
- tag: v2.7.4
-
2022/08/07
- tag: v2.7.5
- changelog: https://github.com/charlietag/os_preparation/compare/v2.7.4...v2.7.5
- Change git default branch name from
mastertomain - Redmine 5.0.2
- Change git default branch name from
- changelog: https://github.com/charlietag/os_preparation/compare/v2.7.4...v2.7.5
- tag: v2.7.5
-
2022/10/09
- tag: v2.7.6
- changelog: https://github.com/charlietag/os_preparation/compare/v2.7.5...v2.7.6
- Fix bash prompt - os version (rhel 9 does not support lsb_release command)
- changelog: https://github.com/charlietag/os_preparation/compare/v2.7.5...v2.7.6
- tag: v2.7.6
-
2022/10/10
- tag: v3.0.0
- changelog: https://github.com/charlietag/os_preparation/compare/v2.7.6...v3.0.0
- Migrate to CentOS Stream 9
- No need to use 3rd dnf repo below anymore, built-in AppStream contains all the latest version of packages
- MariaDB (
yum.mariadb.org)- 10.5
- NodeJS (
nodejs.org)- 16
- Nginx (
nginx.org)- 1.20
- PHP (
remi)- 8.1
- Tmux (
manually compile)- 3.2a
- MariaDB (
- No need to use 3rd dnf repo below anymore, built-in AppStream contains all the latest version of packages
- [ssh] GSSAPIAuthentication disabled
- rvm 1.29.12
- Rails 7.0.4
- Laravel 9
- Redis 6.2
- Container Management installed
- podman buildah skopeo
- podman-compose
- runc conmon criu udica container-selinux
- Add dev users
- pythonuser (alias pu)
- jsuser (alias ju)
- Migrate to CentOS Stream 9
- changelog: https://github.com/charlietag/os_preparation/compare/v2.7.6...v3.0.0
- tag: v3.0.0
-
2022/10/11
- tag: v3.0.1
- changelog: https://github.com/charlietag/os_preparation/compare/v3.0.0...v3.0.1
- Add
GeoIPGeoIP-develback, install through remi-safe repo
- Add
- changelog: https://github.com/charlietag/os_preparation/compare/v3.0.0...v3.0.1
- tag: v3.0.2
- changelog: https://github.com/charlietag/os_preparation/compare/v3.0.1...v3.0.2
- pythonuser -> vim , tabline = 2
- changelog: https://github.com/charlietag/os_preparation/compare/v3.0.1...v3.0.2
- tag: v3.0.3
- changelog: https://github.com/charlietag/os_preparation/compare/v3.0.2...v3.0.3
- Add disabled service 'dnsmasq', installed through podman-compose dep
- changelog: https://github.com/charlietag/os_preparation/compare/v3.0.2...v3.0.3
- tag: v3.0.4
- changelog: https://github.com/charlietag/os_preparation/compare/v3.0.3...v3.0.4
- pythonuser -> vim , tabline = 2
- changelog: https://github.com/charlietag/os_preparation/compare/v3.0.3...v3.0.4
- tag: v3.0.1
-
2022/10/13
- tag: v3.0.5
- changelog: https://github.com/charlietag/os_preparation/compare/v3.0.4...v3.0.5
- vultr or some other VPS will still use
network-scriptsto manage network throughcloud-init
- vultr or some other VPS will still use
- changelog: https://github.com/charlietag/os_preparation/compare/v3.0.4...v3.0.5
- tag: v3.0.5
-
2022/10/18
- tag: v3.0.6
- changelog: https://github.com/charlietag/os_preparation/compare/v3.0.5...v3.0.6
- fix logged on user count prompt for screen / tmux
- changelog: https://github.com/charlietag/os_preparation/compare/v3.0.5...v3.0.6
- tag: v3.0.6
-
2023/01/13
- tag: v3.0.7
- changelog: https://github.com/charlietag/os_preparation/compare/v3.0.6...v3.0.7
- xargs
-iis deprecated, use-I{}instead
- xargs
- changelog: https://github.com/charlietag/os_preparation/compare/v3.0.6...v3.0.7
- tag: v3.0.7

