We provide installation guides of LCModel-VESPA and other software requirements of our MRS education for macOS, Linux and Windows.
- Linux Installation
- LCModel key 210387309
- Windows Installation
- VM password 123456789
- LCModel key 210387309
- macOS Installation
- LCModel key 210387309
- VM password 123456789
Lets start with the easiest one Linux!
Firstly open a new terminal. Then copy-paste the commands highlighted below respectively.
sudo apt-get install git
git clone https://github.com/Computational-Imaging-LAB/MRS_Education.git
cd MRS_Education
bash manual-install
There will be a LCModel GUI pop-upped
Then exit from that GUI after showing the plots.
We will set up PATH variable to reach lcmgui anywhere we want! Cool huh?
PATH="$PATH:$HOME/.lcmodel/"
touch $HOME/.lcmodel/license
Yoowwza! Everything is all set-up. Now you can easily call lcmgui
lcmgui
First run the command below. It will wait some inputs from you, hence please wait for those inputs in front of the terminal until it is finished (5-10 mins).
bash req-install.sh
After finishing the install process close the current terminal. Open it again and first type
conda activate mrs_course
if everything seems ok then type following command to install vespa.
bash vespa-install.sh
After the installation you can check if everything is allright by typing
python -m vespa.check_dependencies
Now restart the terminal and start to use. It is all for Linux. Tested on WSL and Ubuntu 20.04. If you face any issues please open an issue -recommended- or email us.
Only use if you dont prefer to use our scripts -not a wise choice but it is up to you-. Now time is for vespa. If you dont have conda installed in your system please type:
wget -q --show-progress https://repo.anaconda.com/miniconda/Miniconda3-latest-Linux-x86_64.sh
bash Miniconda3-latest-Linux-x86_64.sh -- Choosing the default path is recommended. If you change the installation path please save it for next steps.
conda --init
Then close the terminal and open new-one.
echo "deb http://cz.archive.ubuntu.com/ubuntu bionic main universe" | sudo tee -a /etc/apt/sources.list
sudo apt-get update && sudo apt-get upgrade
sudo apt install make gcc libgtk-3-dev libwebkitgtk-dev libwebkitgtk-3.0-dev libgstreamer-gl1.0-0 freeglut3 / freeglut3-dev python-gst-1.0 python3-gst-1.0 libglib2.0-dev ubuntu-restricted-extras / libgstreamer-plugins-base1.0-dev
conda create --name mrs_course python=3.7
conda activate mrs_course
conda install numpy scipy matplotlib wxpython configobj packaging
conda install -c conda-forge lmfit pydicom pypubsub
pip install pygamma vespa-suite - You must have pip install if you dont have then type sudo apt-get install python3-pip
Now it is the time for checking the dependencies.
python -m vespa.check_dependencies
If it shows ok then you need only to manipulate path issues.
sudo apt-get install mlocate
path=locate vespa/analysis/main.py``
echo "alias vespa_analysis='python $path'" | sudo tee -a ~/.bashrc
path=locate vespa/datasim/main.py``
echo "alias vespa_datasim='python $path'" | sudo tee -a ~/.bashrc
path=locate vespa/pulse/main.py``
echo "alias vespa_pulse='python $path'" | sudo tee -a ~/.bashrc
path=locate vespa/simulation/main.py``
echo "alias vespa_simulation='python $path'" | sudo tee -a ~/.bashrc
There are three ways to install on Windows. If you are lazy -as me- you can use WSL2. If you prefer virtual machine you can use windows-install.ps1 file to install virtualbox and other things without harming your comfort. Then few steps by your own There is a third way which is to downloading all the required tools by yourself manually. But forget about it don't do please.
The Second Way Virtual Box powered Linux
For the sake of the course we created all-set up iso file to use lcmodel on virtual box. First of all download the zip file of this repo.
Firstly download the zip file of this repo as following;

Now after downloading zip file unzip it and right-click to windows-install.ps1 and click "Run with PowerShell". It will download the iso file and the VirtualBox and run the setup. Then follow the steps showed on the following GIF.

After setting up the Virtual Box you should load iso file into virtualbox. Find the Virtual Box in your computer it should create a shortcut file on the desktop. Double-click it. After opening the VirtualBox get a deep breath and calm down you almost there!
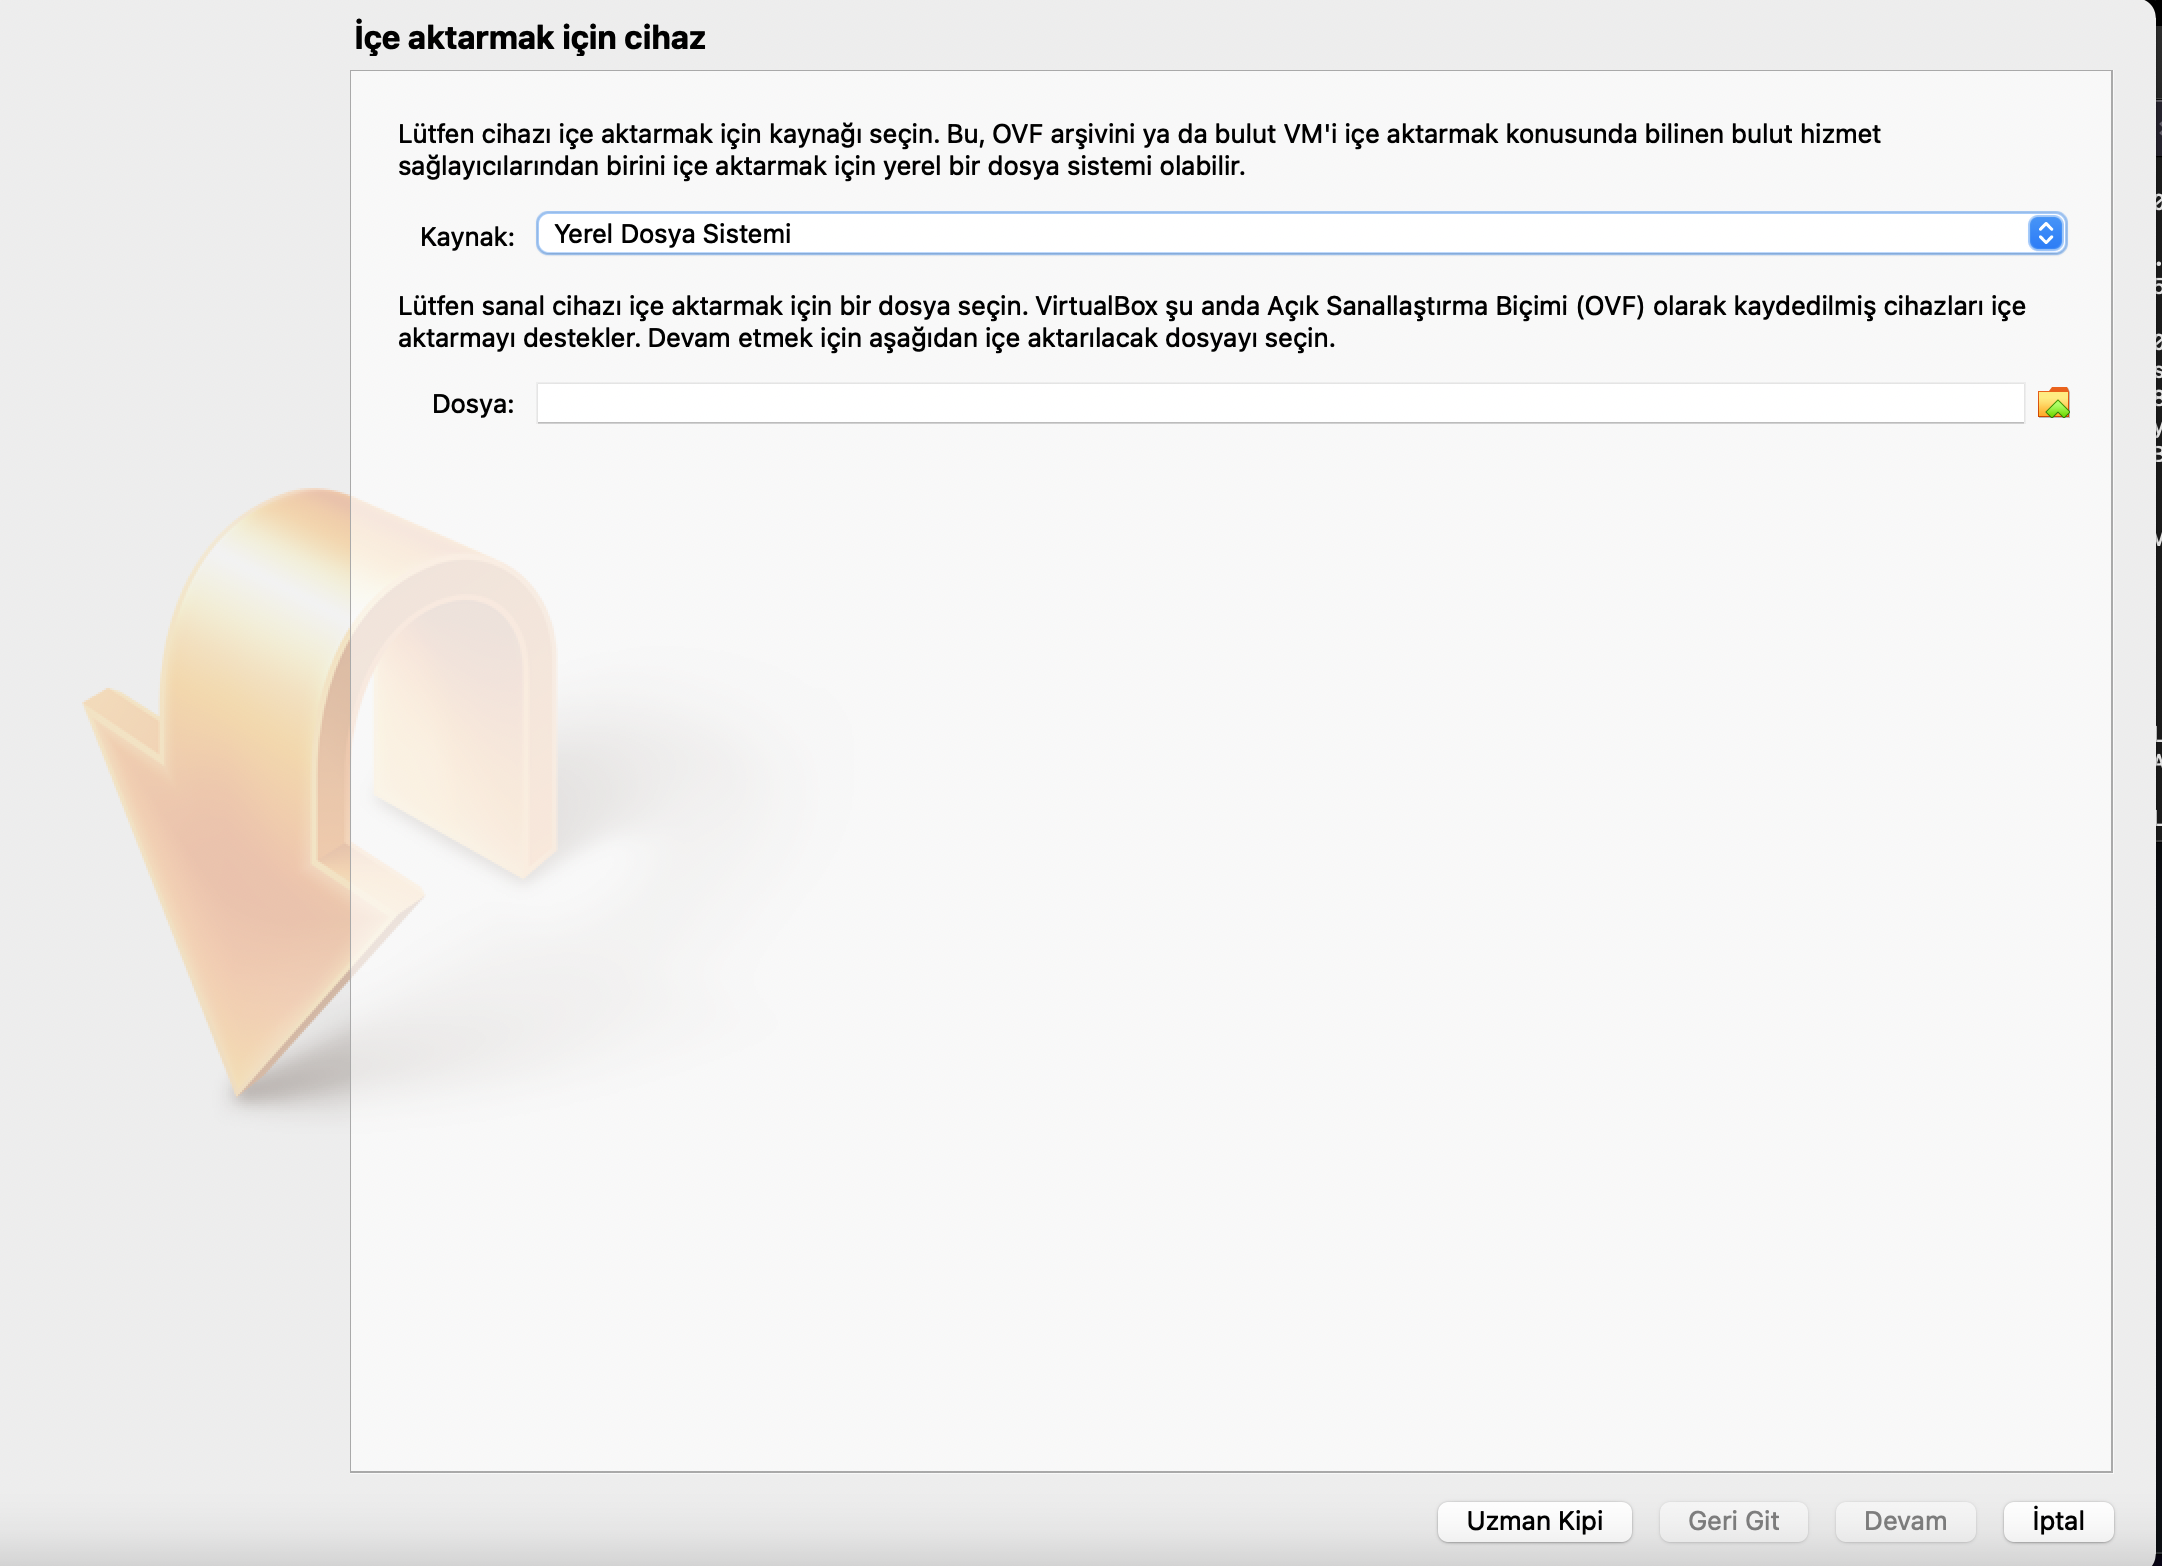
Push the "File Button-(Dosya)" and then there will be drop-down menu opened like showed in the following screenshot. Select the "Import-(İçe Aktar)-The orange arrow".

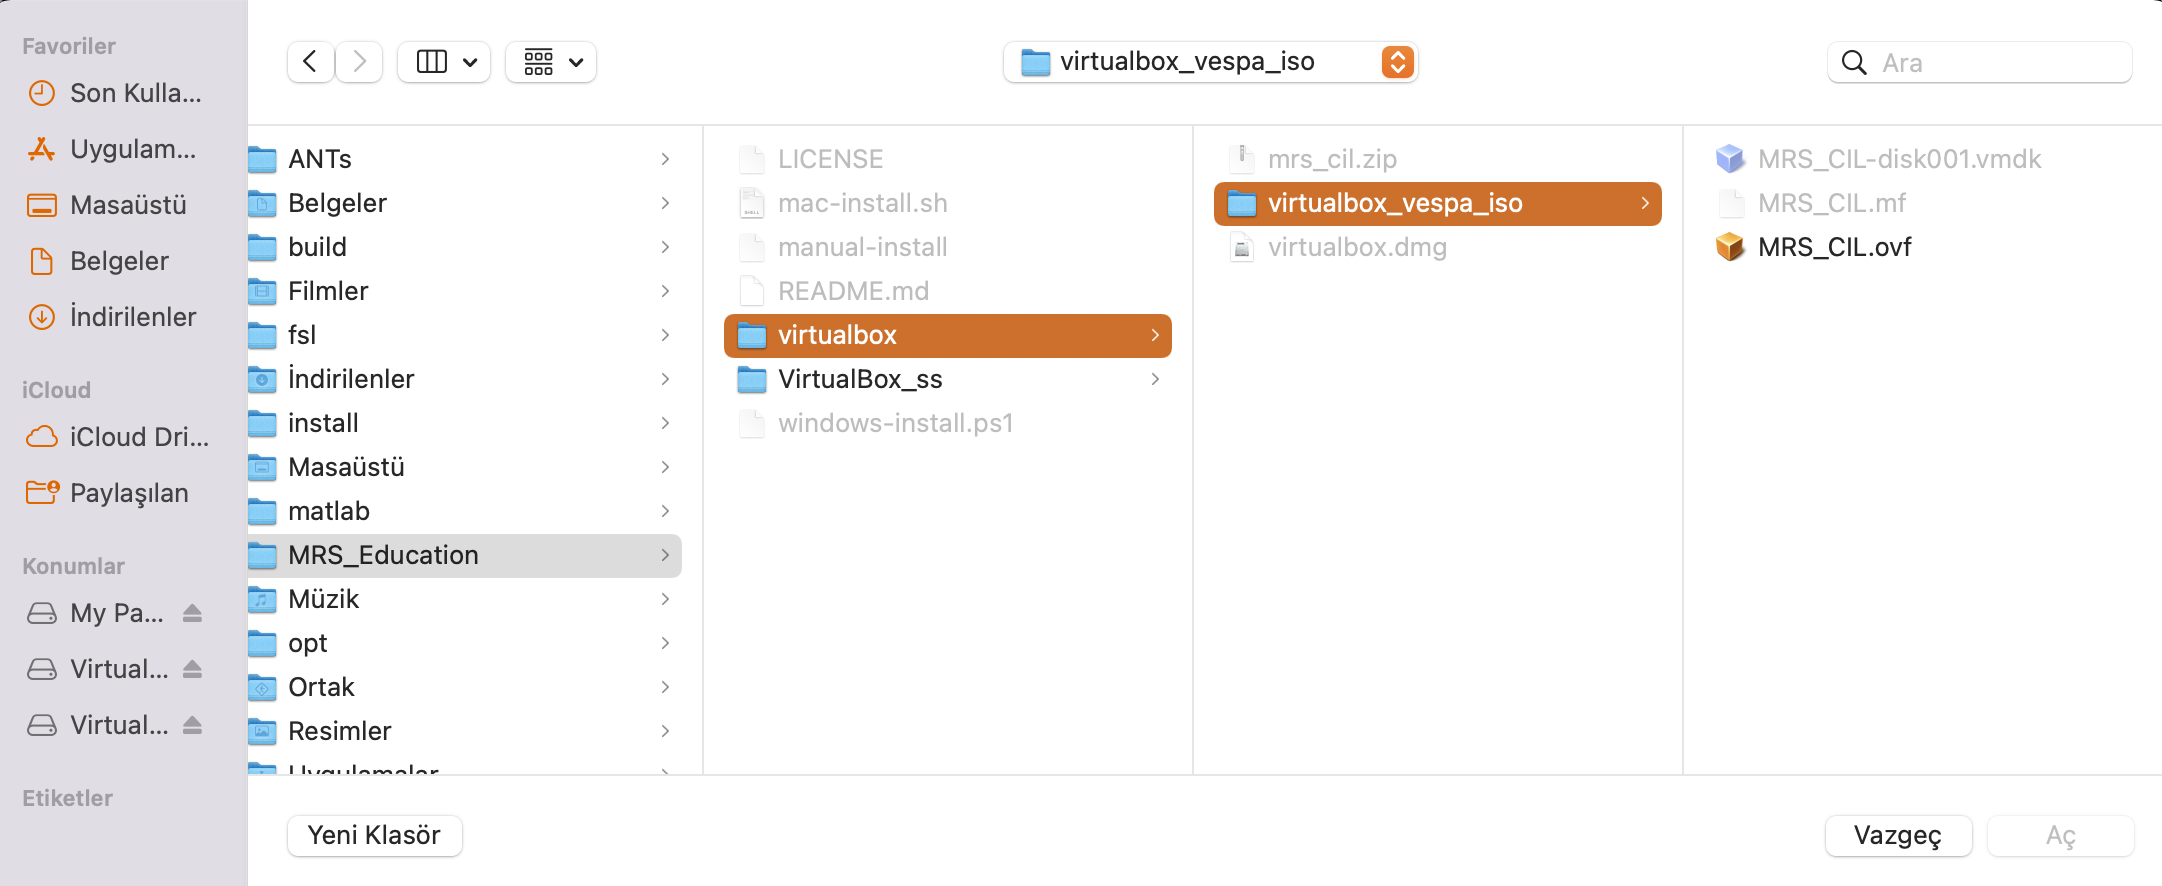
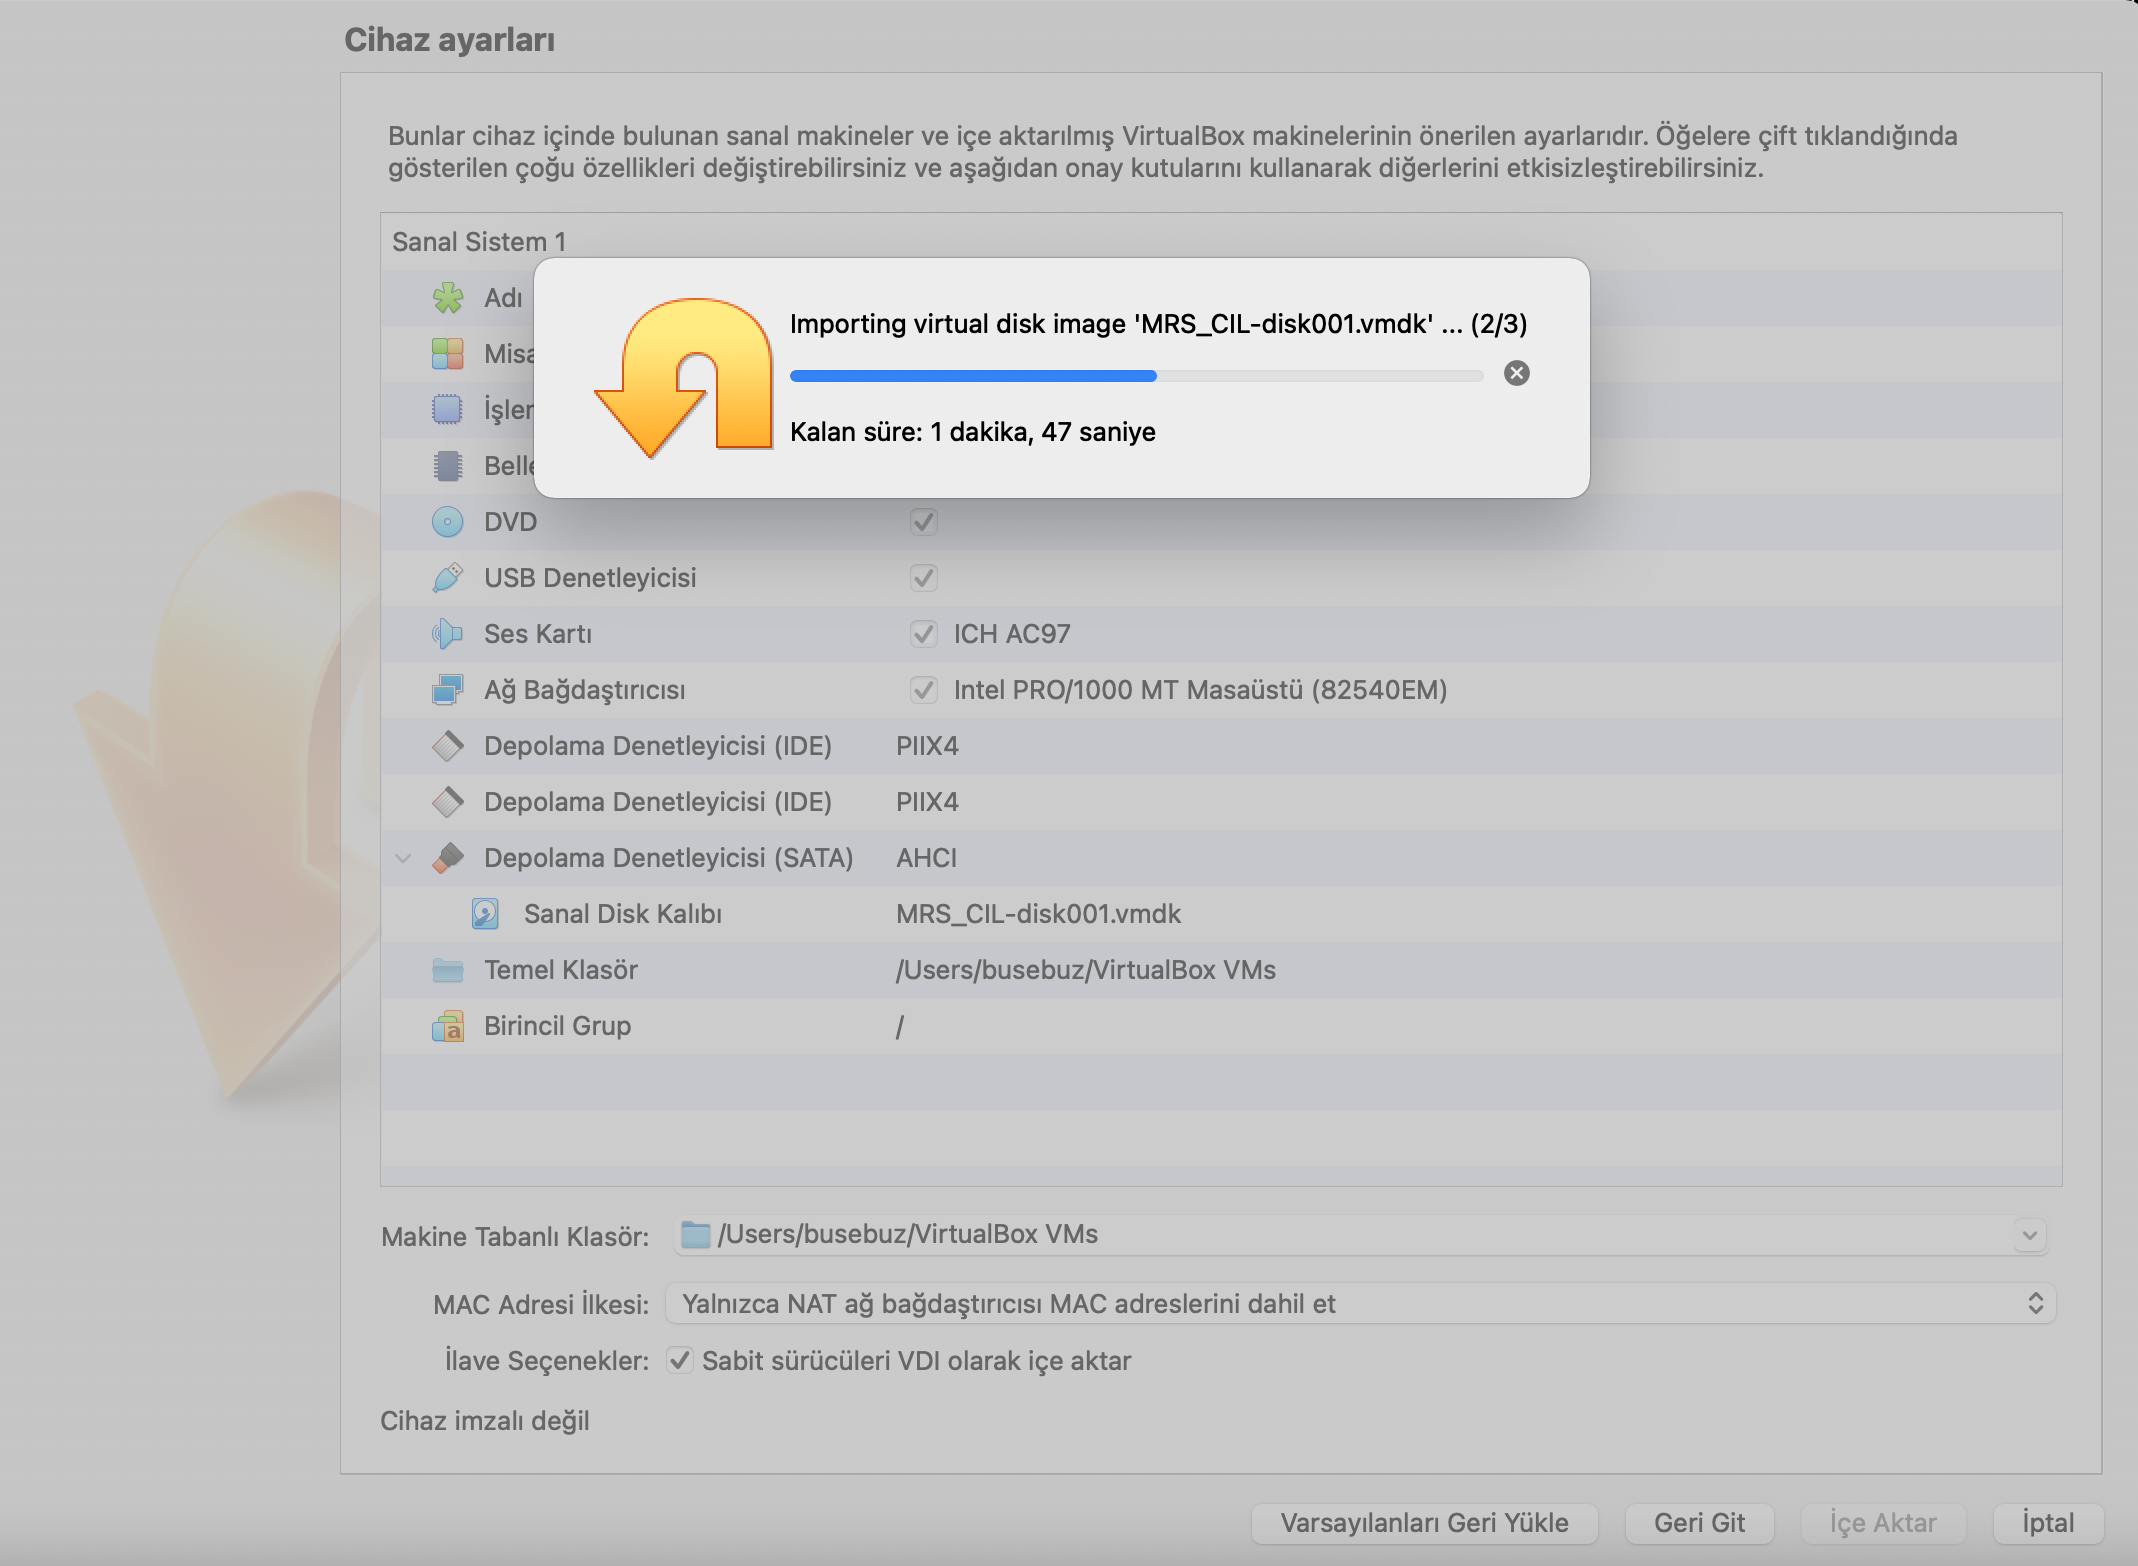
After that push the folder icon to browse ovf file that windows-install.bat downloaded for you. It is MRS-CIL.ovf which is shown in the second ss. After push "Next-İleri" button. Then push "Import-İçe Aktar" button which is shown in following third ss. If everything is ok there will be a pop-up like in fourth ss for importing.


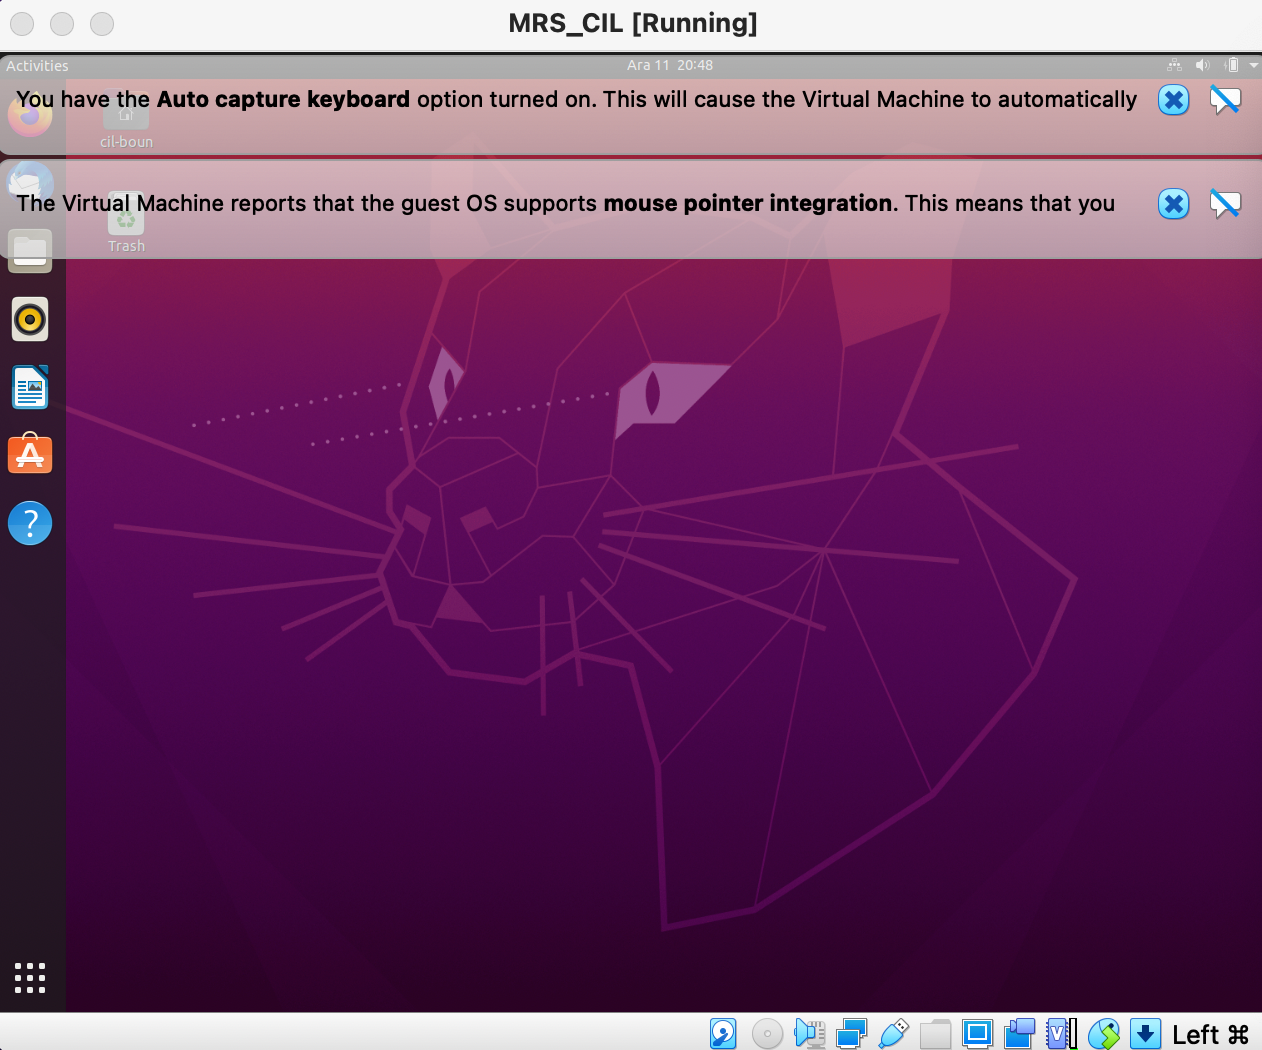
Yowwzaa! You made it. Now only thing is starting the VM. Open VirtualBox and start the machine like in the following by pressing "Start-Başlat- Yellow arrow". After pressing a window will open wait until that window becomes like the following second ss.

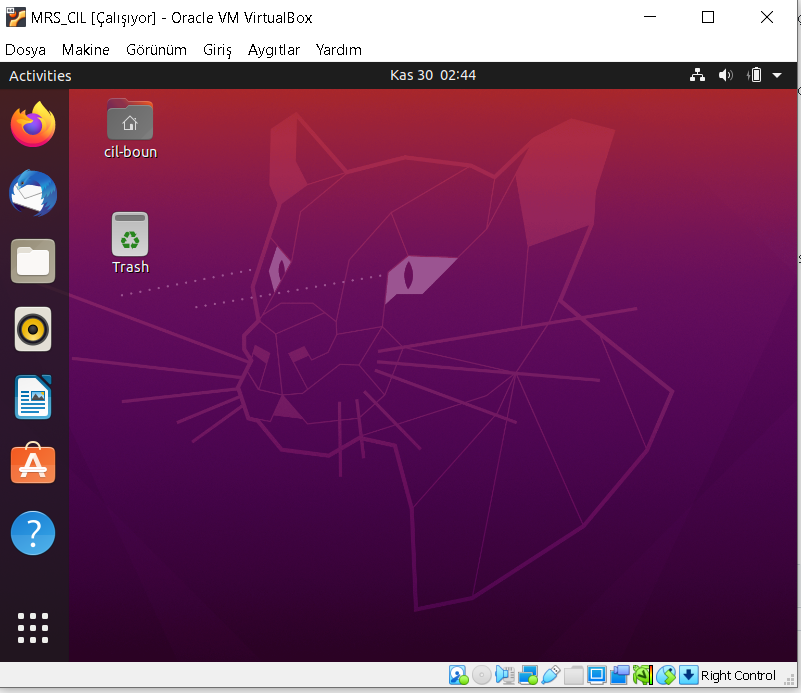
Now you can open lcmodel from that window.Click the window then press CTRL+ALT+T then type lcmgui on the terminal opened.
Here is the final OS. It will be easy don't worry. Firstly we will start by cloning the repo.
If you dont have homebrew installed then type the following;
ruby -e "$(curl -fsSL https://raw.githubusercontent.com/Homebrew/install/master/install)"
After that we need git and wget to run our script. Hence install them also.
brew install git
brew install wget
git clone https://github.com/Computational-Imaging-LAB/MRS_Education.git
cd MRS_Education
bash mac-install.sh
After that, push the folder icon to browse ovf file that mac-install.sh downloaded for you. It is MRS-CIL.ovf which is shown in the second ss. After push "Next-İleri" button. Then push "Import-İçe Aktar" button which is shown in following third ss. If everything is ok there will be a pop-up like in fourth ss for importing.
Step by step. Firstly, after our script finishes its job -nearly 3 hour on an average network- you will see a GUI of VirtualBox like the following:

After that you should import our VM into VirtualBox. You can find and add it as follows:
 .
.
.
.
 .
.
.
.
 .
.
.
.
After doing all those steps it will import -roughly 5-10 mins- VM into VirtualBox. If everything is ok then you should see a window like the following. Afterwards push the green arrow to start the VM. It will open a window when VM starts, then it will become as second ss. If you cant reach here please open an issue.:

Second ss
Now you can open lcmodel from that window.Click the window then press CTRL+ALT+T then type lcmgui on the terminal opened.
After making everything right you can face some privacy issues -because it is MAC-. For example if you face an error -probably you will- when you try to start the virtual machine, named "NS_ERROR_FAILURE (0x80004005)" it is because of privacy settings. I opened an issue for that. It is something like the ss below:


If you cant solve it by the followings please write on the issue that created for that error. You should open a menu clicking the apple logo at top left then click System Preferences>Security and Privacy or open a terminal and type
open "x-apple.systempreferences:com.apple.preference.security?Privacy"
it will navigate you to window that we want to go which is as the following. You have to give permission to Oracle-VM to solve that issue.

You can see another error while opening the VM which is the network error but dont worry it can be fixed by only pushing a button on the pop-up menu. It is as following:

Ok it is all set now. Easy peasy! Ok may be not but beleive me this was the easiest way to do it.
If you have any issues or questions please open an issue to ask. If it is not an issue then you can find me from the email below. Dont hesitate to ask anything.
Abdullah Baş
Thanks for the contributions to installation part of requirements of this MRS Course.
Gökçe Hale Hatay
Buse Buz Yaluğ

