We all have our favorite places. It may be your childhood hometown, an exotic place you've visited, or even your college town. Regardless of why a city is your favorite, we all have our favorite sports to visit and want to tell others about, and that's exactly what this new skill template helps you do.
This new template uses AWS Lambda, the Alexa Skills Kit (ASK), and the ASK SDK, in addition to the New York Times Article Search API for news. We provide the business logic, error handling, and help functions for your skill, you just need to provide the data and credentials.
For this example, we will be creating a skill for the city of Seattle, Washington. The user of this skill will be able to ask things like:
- “Alexa, ask Seattle Guide what there is to do.”
- “Alexa, ask Seattle Guide about the Space Needle.”
- “Alexa, ask Seattle Guide for the news.”
You will be able to use your own city in the sample provided, so that users can learn to love your location as much as you do! This might also be a good opportunity to combine the knowledge from this template with our Calendar Reader sample, so that you can provide information about the events in your town, as well as the best places to visit.
After completing this tutorial, you'll know how to do the following:
- Create a city guide skill - This tutorial will walk Alexa skills developers through all the required steps involved in creating a skill that shares information about a city, and can search for news about that location.
- Understand the basics of VUI design - Creating this skill will help you understand the basics of creating a working Voice User Interface (VUI) while using a cut/paste approach to development. You will learn by doing, and end up with a published Alexa skill. This tutorial includes instructions on how to customize the skill and submit for certification. For guidance on designing a voice experience with Alexa you can also watch this video.
- Use JavaScript/Node.js and the Alexa Skills Kit to create a skill - You will use the template as a guide but the customization is up to you. For more background information on using the Alexa Skills Kit please watch this video.
- Manage state in an Alexa skill - Depending on the user's choices, we can handle intents differently.
- Get your skill published - Once you have completed your skill, this tutorial will guide you through testing your skill and sending your skill through the certification process so it can be enabled by any Alexa user. You may even be eligible for some Alexa swag!
Get started and build your first - or next - Alexa skill today.
Skills are managed through the Amazon Developer Portal. You’ll link the Lambda function you created above to a skill defined in the Developer Portal.
-
Navigate to the Amazon Developer Portal. Sign in or create a free account (upper right). You might see a different image if you have registered already or our page may have changed. If you see a similar menu and the ability to create an account or sign in, you are in the right place.
-
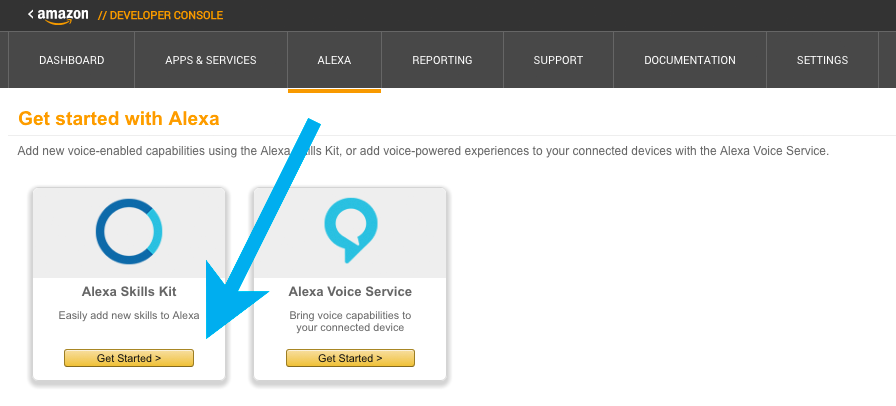
Once signed in, navigate to Alexa and select "Getting Started" under Alexa Skills Kit.
-
Here is where you will define and manage your skill. Select "Add a New Skill"
-
There are several choices to make on this page, so we will cover each one individually.
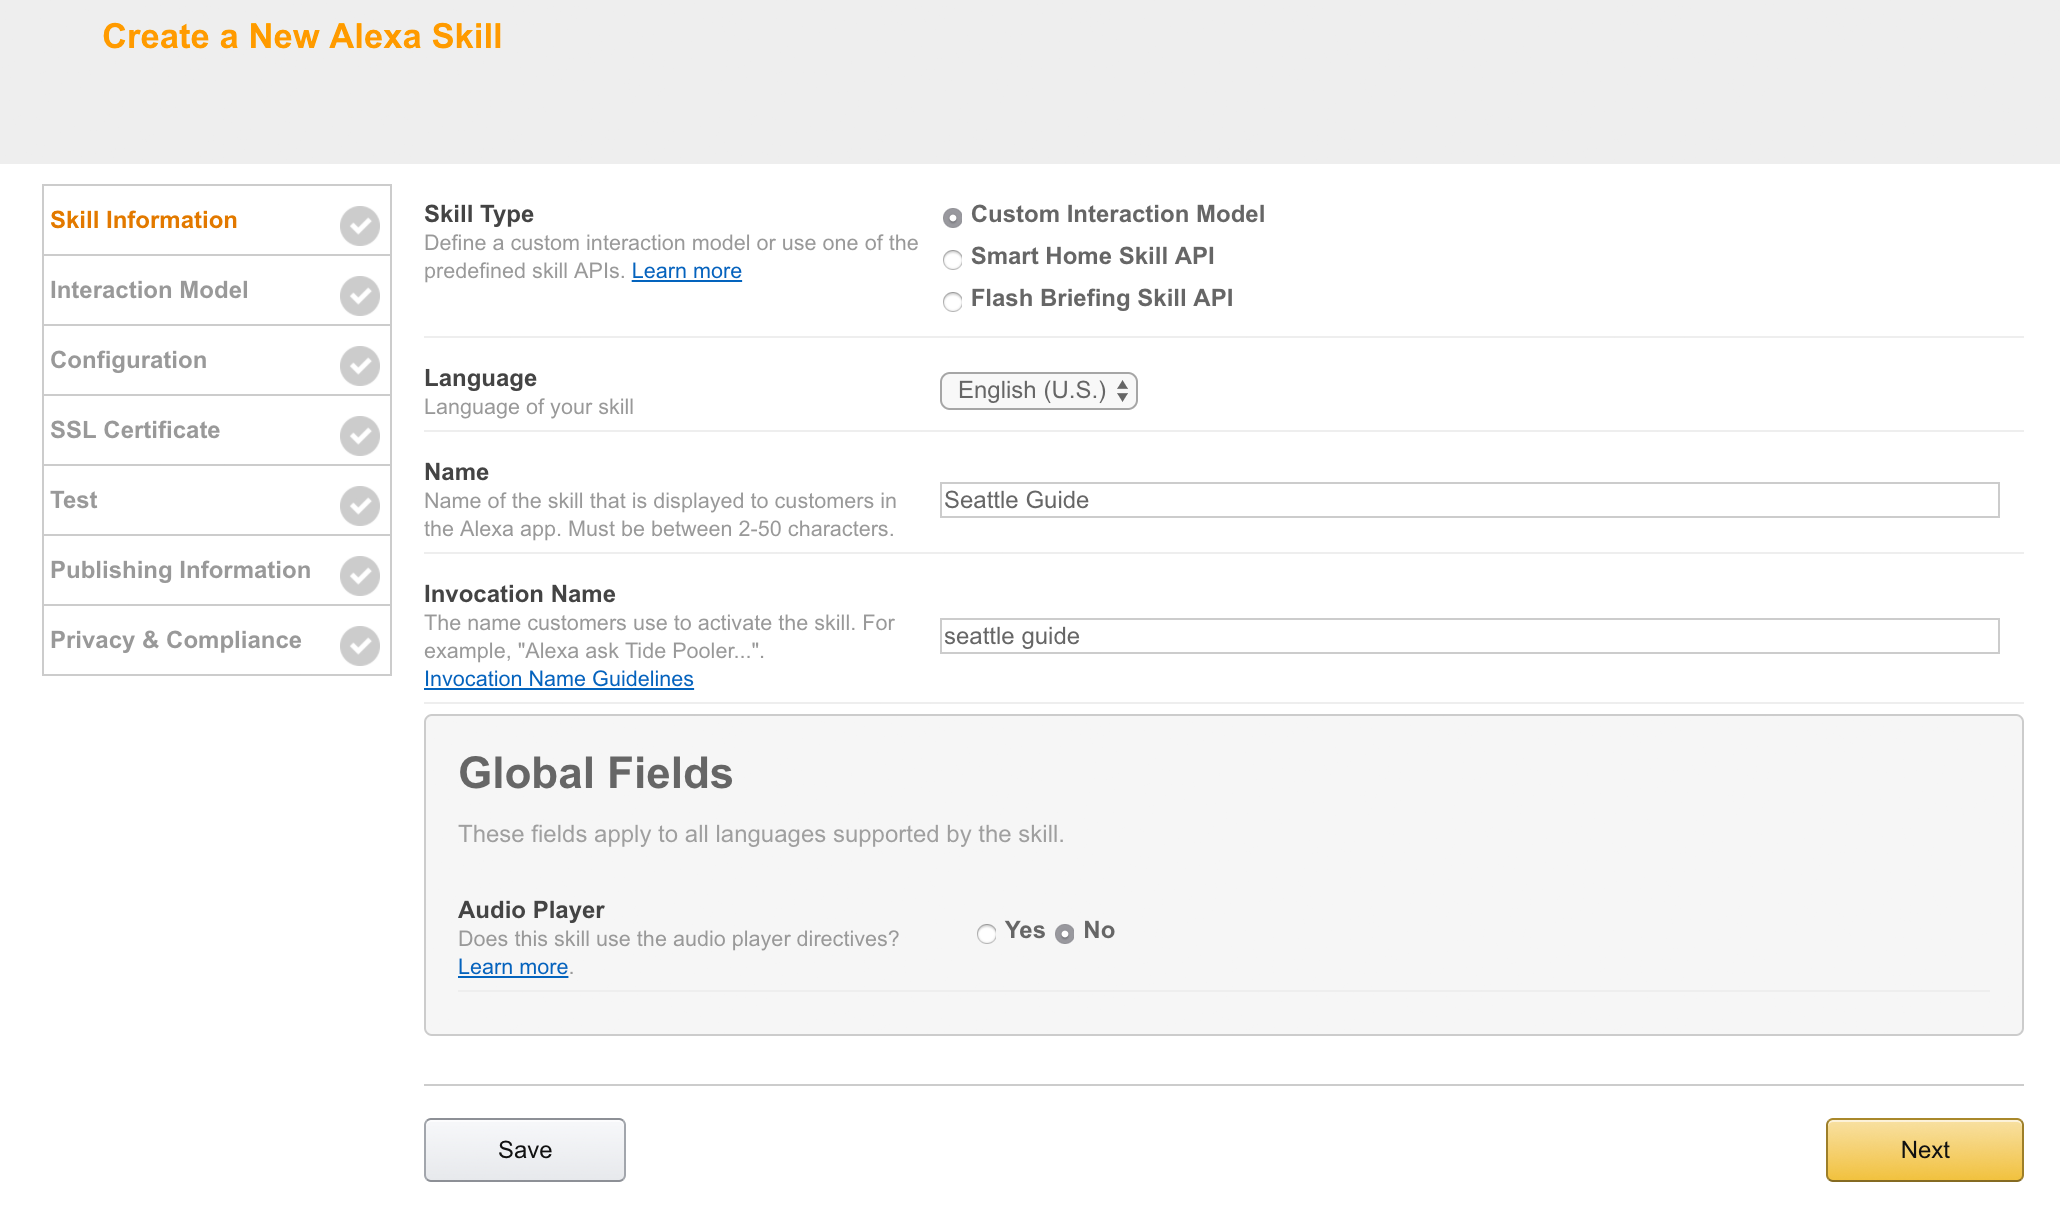
- Choose the language you want to start with. You can go back and add all of this information for each language later, but for this tutorial, we are working with "English (U.S.)"
- Make sure the radio button for the Custom Interaction Model is selected for “Skill Type”.
- Add the name of the skill. Give your skill a name that is simple and memorable, like "Seattle Guide." The name will be the one that shows up in the Alexa App (and now at amazon.com/skills) when users are looking for new skills. (Obviously, don't use Seattle Guide. Use a name that describes the city you plan to use for your skill.)
- Add the invocation name. This is what your users will actually say to start using your skill. We recommend using only two or three words, because your users will have to say this every time they want to interact with your skill.
- Under "Global Fields," select "no" for Audio Player, as our skill won't be playing any audio.
- Select Next.
-
Next, we need to define our skill’s interaction model. Let’s begin with the intent schema. In the context of Alexa, an intent represents an action that fulfills a user’s spoken request.
-
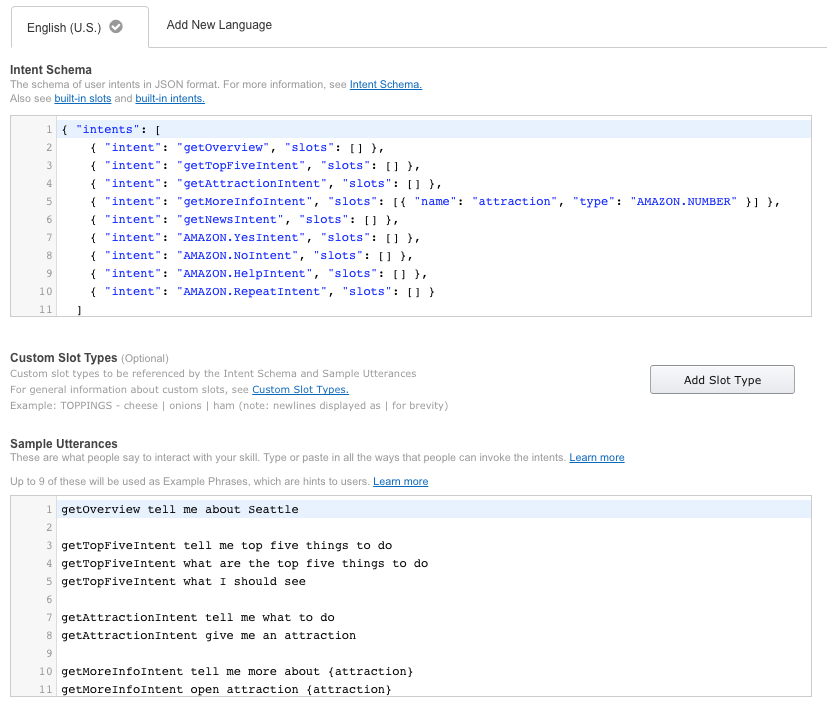
Review the Intent Schema below. This is written in JSON and provides the information needed to map the intents we want to handle programmatically. Copy this from the intent schema in the GitHub repository here.
Below you will see a collection of intents that we expect our users to indicate by voice. They can ask for an overview of your city, they can ask about the Top Five attractions (in addition to asking for more information about those attractions), and they can ask for the news for your city. Intents can optionally have arguments called slots.
Slots are predefined data types that we expect the user to provide. This is not a closed list (like an enum), so you must anticipate that you will receive values that are not in your slot value list.. For example, you could say "tell me about attraction number two," and it would be able to return a specific number to our skill's code. This data also becomes training data for Alexa's Natural Language Understanding (NLU) engine. You will see how this works more clearly when we define our sample utterances below.
For the getMoreInfoIntent, the user will be providing a number, like "Tell me about attraction number one." For more on the use of built-in intents, go here.
{
  "intents": [
    { "intent": "getOverview", "slots": [] },
    { "intent": "getTopFiveIntent", "slots": [] },
    { "intent": "getAttractionIntent", "slots": [] },
    { "intent": "getMoreInfoIntent", "slots": [{ "name": "attraction", "type": "AMAZON.NUMBER" }] },
    { "intent": "getNewsIntent", "slots": [] },
    { "intent": "AMAZON.YesIntent", "slots": [] },
    { "intent": "AMAZON.NoIntent", "slots": [] },
    { "intent": "AMAZON.HelpIntent", "slots": [] },
    { "intent": "AMAZON.StopIntent", "slots": [] },
    { "intent": "AMAZON.CancelIntent", "slots": [] },
    { "intent": "AMAZON.RepeatIntent", "slots": [] }
  ]
}
You can see that we have defined a set of standard built-in intents: Yes, No, Help, Stop, Cancel, and Repeat. These are built-in intents that we can use for common commands our users will indicate.
-
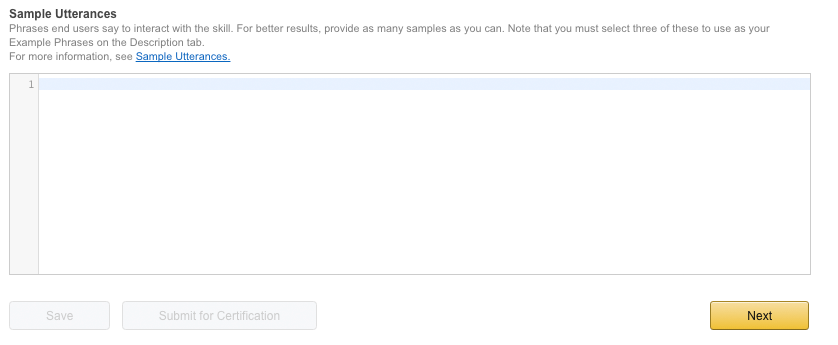
The next step is to build the utterance list. This is meant to be a thorough, well-thought-out list of the ways users will try to interact with your skill. You don't have to get every possible phrase, but it is important to cover a variety of utterances so that the Natural Language Understanding(NLU) engine can best interpret your user's intent.
-
Given the flexibility and variation of spoken language in the real world, there will often be many different ways to express the same request. Providing these different phrases in your sample utterances will help improve voice recognition for the abilities you add to Alexa. It is important to include as wide a range of representative samples as you can -– all the phrases that you can think of that are possible in use (though do not include samples that users will never speak). Alexa also attempts to generalize based on the samples you provide to interpret spoken phrases that differ in minor ways from the samples specified.
Now it is time to add the Utterances. Copy/paste the sample utterances from GitHub. An example of utterances is listed below.
    getOverview more information about seattle
    getOverview what's it like in seattle
    getOverview tell me some facts about seattle
    getOverview facts about seattle
    getOverview overview of seattle
    getOverview seattle facts
    getOverview seattle overview

    getTopFiveIntent tell me the top five things
    getTopFiveIntent top five things to do
    getTopFiveIntent give me the top five
    getTopFiveIntent the top five
    getTopFiveIntent top five
    getTopFiveIntent the top five things to do

    getAttractionIntent tell me a good attraction
    getAttractionIntent where should I go
    getAttractionIntent an attraction
    getAttractionIntent attractions

    getMoreInfoIntent open number {attraction}
    getMoreInfoIntent number {attraction}
    getMoreInfoIntent {attraction}

    getNewsIntent tell me the local news
    getNewsIntent what is the latest news
    getNewsIntent the local news
    getNewsIntent the latest news
    getNewsIntent the news
    getNewsIntent news
    getNewsIntent local news
As you can see in the example above, we are using our custom intents with phrases that our users might use to interact with our skill. Each example is a different way that a user might ask for that intent. getMoreInfoIntent expects an AMAZON.NUMBER slot, so we have specified this in our utterances with {attraction}. (More information on slots can be found here.)
-
Select Save. You should see the interaction model being built (this might take a minute or two). If you select Next, your changes will be saved and you will go directly to the Configuration screen. After selecting Save, it should now look similar to this:


Next we will configure the AWS Lambda function that will host the logic for our skill.
To make the development of skills easier, we have created the ASK SDK for Node.js. We will be using this module to deploy the sample. The alexa-sdk is available on github here and can be deployed as a node package from within your Node.js environment.
-
First, you will need to download the sample repository
- On GitHub, navigate to the City Guide repository. Click download (the green button) to download the repository to your local machine.
-
To leverage the SDK for ASK you will need to install Node.js and update npm. To set this up on your machine, follow these steps.
-
Once you have the source downloaded, node.js installed and npm updated, you are ready to install the ASK-SDK. Install this in the same directory as your City Guide src/index.js file you downloaded earlier. Change the directory to the src directory of your skill, and then on the command line, type:
npm install --save alexa-sdkOnce this is installed you will need to include the node_modules directory with the source code for your skill when you compress the src for uploading to AWS Lambda. Let's do this with the example.
-
Navigate to where you downloaded the sample respository and installed the Alexa SDK in step 3. Select the src directory.
-
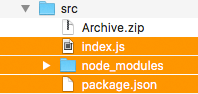
Compress the files inside the src directory into a zip file. Remember, do not compress the src directory itself, just the files within the directory. (The index.js file and the node_modules folder.) Your compressed file should show up in the src directory. You will use this file in a later step.

Note: If you already have an AWS account, you can skip this section. Just sign in to your console.
-
Open aws.amazon.com and then choose ‘Create an AWS Account’
- Follow the online instructions. Do not worry about the IAM role, we will do that later.
- You will need a Valid Credit Card to set up your account (note the AWS Free Tier will suffice however. You can find out more about the free tier here.)
- Part of the sign-up procedure involves receiving a phone call and entering a PIN using the phone keypad.
-
Sign in to the AWS Console
-
It can sometimes take a couple minutes for your new AWS account to go live. You will receive an e-mail when your account is active.
AWS Lambda lets you run code without provisioning or managing servers. You pay only for the compute time you consume - there is no charge when your code is not running. With Lambda, you can run code for virtually any type of application or backend service - all with zero administration. Just upload your code and Lambda takes care of everything required to run and scale your code with high availability.
Note: If you are new to Lambda and would like more information, visit the Lambda Getting Started Guide.
-
IMPORTANT: Select US East (N. Virginia) region, or the EU (Ireland) region (upper right corner). You should choose the region geographically closest to your audience. These are currently the only regions that currently support Alexa skill development.
-
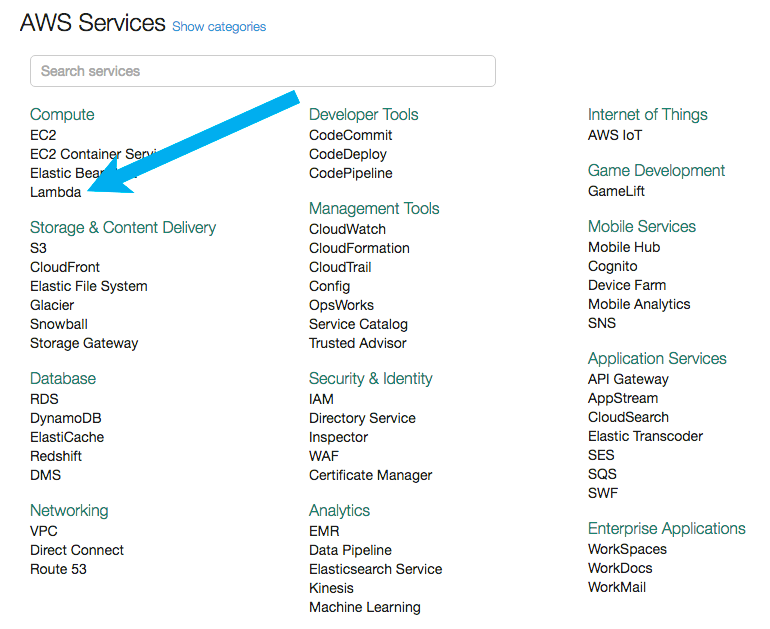
Select Lambda from AWS Services (under Compute)
-
Select “Create a Lambda Function” to begin the process of defining your Lambda function.
-
Select the Blank Function option on the Select Blueprint screen.
-
Now, you need to configure the event that will trigger your function to be called. As we are building skills with the Alexa Skills Kit, click on the gray dash-lined box and select Alexa Skills Kit from the dropdown menu. (If you don't see this option, go back to Step #1 and select the appropriate AWS region). This gives the Alexa service permission to invoke your skill's function.
-
Choose Next to continue.
-
You should now be in the "Configure Function" section. Enter the Name, Description, and Runtime for your skill as in the example below. Your runtime should be "Node.js 4.3."
-
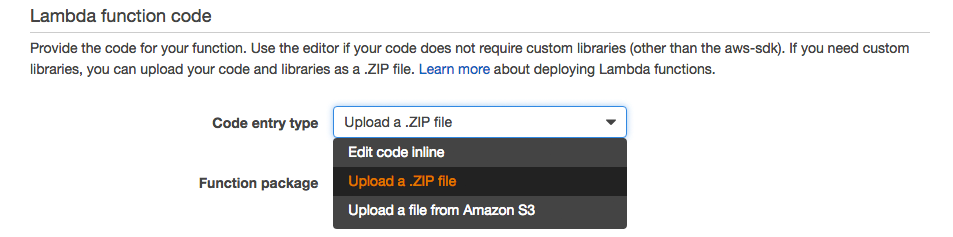
Select the ‘Code Entry Type’ as ‘Upload Zip File’ and upload the zip file containing the example you created in Step 1. Note: This zip file should contain the contents of the src directory, including the node_modules subfolder.
-
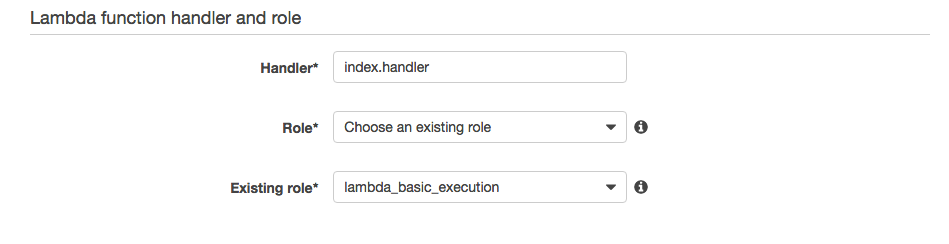
Set your handler and role as follows:
- Keep Handler as ‘index.handler’
- Drop down the “Role” menu and select “Create a custom role”. (Note: if you have already used Lambda you may already have a ‘lambda_basic_execution’ role created that you can use.) This will launch a new tab in the IAM Management Console.
-
You will be asked to set up an Identity and Access Management or “IAM” role if you have not done so. AWS Identity and Access Management (IAM) enables you to securely control access to AWS services and resources for your users. Using IAM, you can create and manage AWS users and groups, and use permissions to allow and deny their access to AWS resources. The IAM role will give your Lambda function permission to use other AWS Services at runtime, such as Cloudwatch Logs, the AWS logs collection and storage service. In the Role Summary section, select "Create a new IAM Role" from the IAM Role dropdown menu. The Role Name and policy document will automatically populate.
-
Select “Allow” in the lower right corner and you will be returned to your Lambda function.
-
Keep the Advanced settings as default. Select ‘Next’ and review. You should see something like below. Then select ‘Create Function’:
-
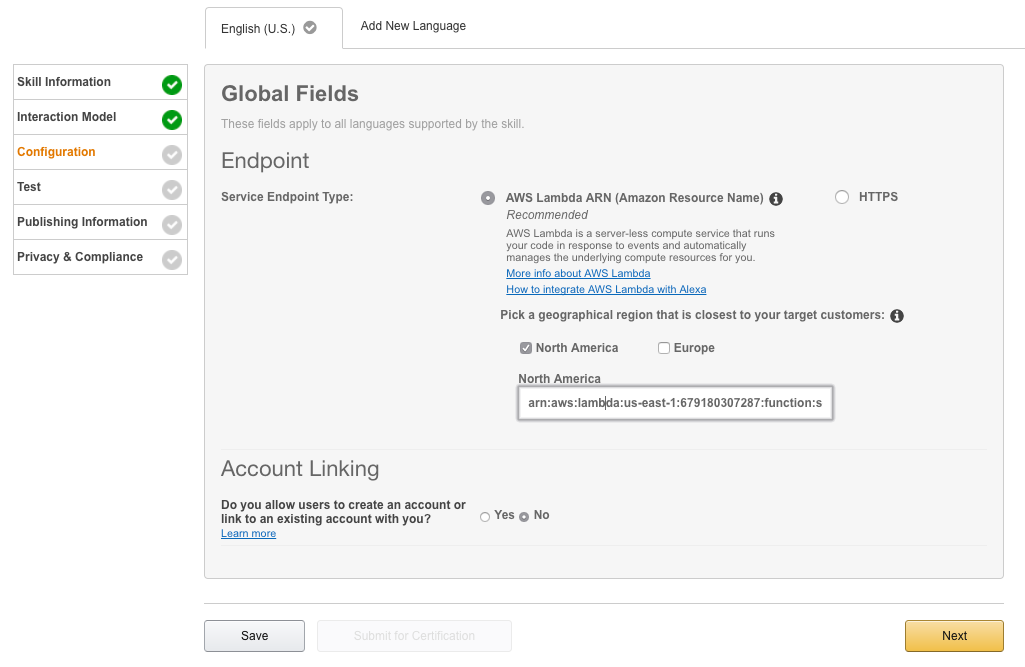
Congratulations, you have created your AWS Lambda function. Copy the Amazon Resource Name (ARN) for use in the Configuration section of the Amazon Developer Portal.


-
Navigate back to developer.amazon.com and select your skill from the list. You can select the skill name or the edit button.
-
Select the Configuration section, and make sure to choose the AWS Lambda ARN region that corresponds to your AWS Lambda function's region. Add the ARN from the Lambda function you created in the AWS Console earlier. Select the Lambda ARN (Amazon Resource Name) radio button. Then, select “No” for account linking since we will not be connecting to an external account for this tutorial. Paste the ARN you copied earlier into the Endpoint field. Then select Next.
-
You will be asked if you want to "Save Global Changes." This happens because you are changing values that would apply to every version of your skill (in every language.) You can click "Yes, Apply" to complete this step.
-
You have now completed the initial development of your skill. Now it is time to test.


-
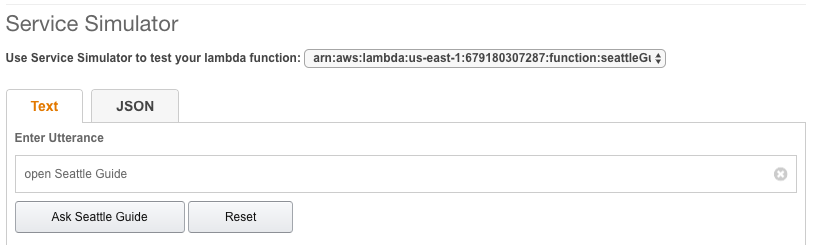
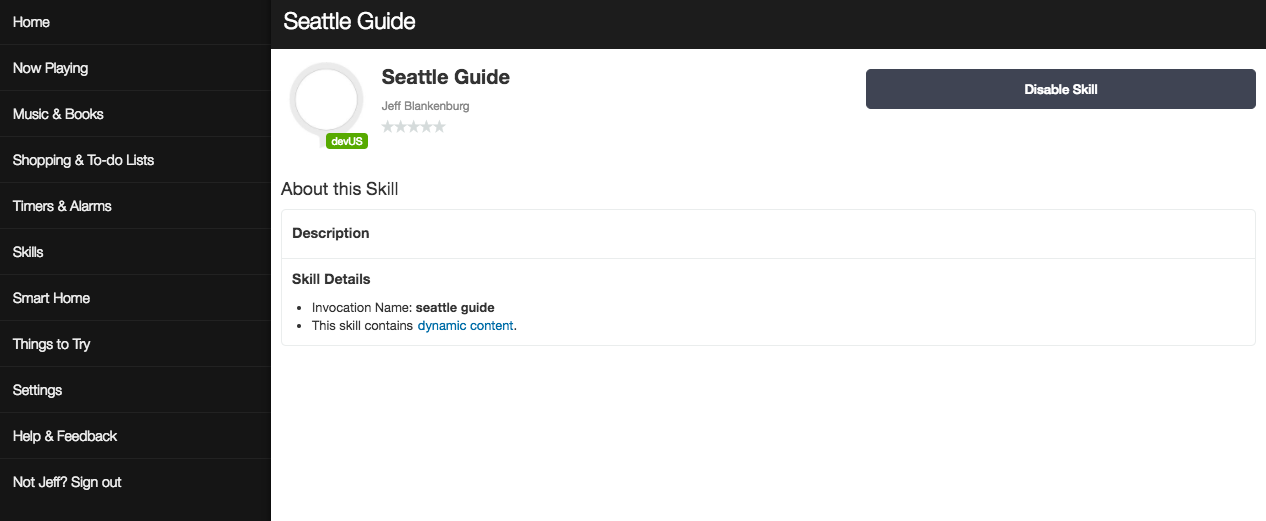
In the Test area, we are going to enter a sample utterance in the service simulator section and see how Alexa will respond. In this example, we have called the skill ‘Seattle Guide,’ because we will be returning information about the city of Seattle. This is the ‘Invocation Name’ we set up on the Skill Information line in the “Skill Information” section.
- In the Service Simulator, type ‘open Seattle Guide’ and click the “Ask Seattle Guide” button.
-
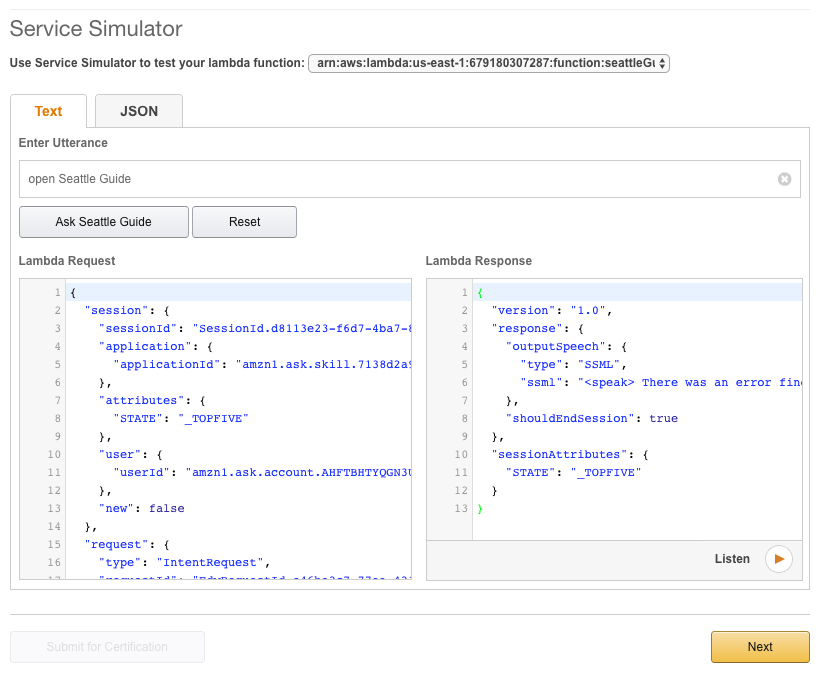
You should see the formatted JSON request from the Alexa service and the response coming back from your Lambda function. Verify that you get a correct Lambda response.
-
(Optional) Testing with your device. This is optional as you can do all the testing in the portal. Assuming your Echo device is on-line (and logged in with the same account as your developer account), you should now see your skill enabled in the Alexa app (under "Your Skills," in the top right corner) and ask Alexa to launch your skill. For more information on testing an Alexa skill and registering an Alexa-enabled device, check here.
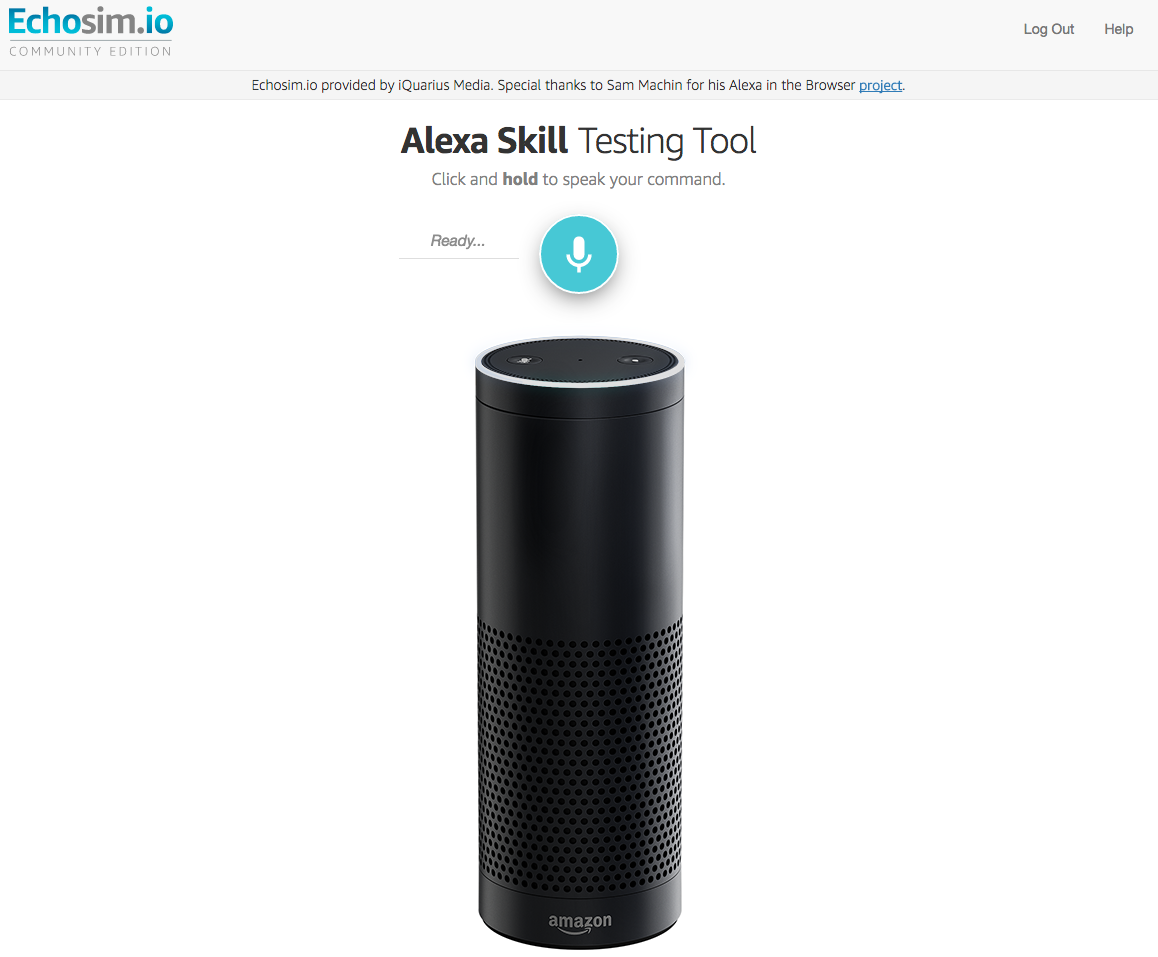
Another option for testing your device with your voice is Echosim.io. This is a virtual Alexa device in your browser, created and hosted by iQuarius Media, that you can speak to and get responses from, just like having a physical device in front of you.
- Do you have the right ARN copied from your Lambda function into your Developer Portal / skill?
- Are you calling the right invocation name?
- Are you saying launch, start or open (followed by your invocation name)?
- Are you sure you have no other skills in your accounts with the same invocation name?
-
In the Skill Information section in the Developer Console, edit the Skill Information Tab to reflect your new city guide skill:
- Provide a skill name that represents the new skill you are creating.
- Come up with a cool Invocation Name that users will use to invoke your skill. Make sure to read the rules for creating invocation names, as this is a common failure point during certification. Ensure that the invocation name you choose stays clear of pitfalls listed in the table below. Column on the right provides examples of invocation names that will definitely fail certification.
-
Create a fun icon. Be sure you have the rights to whatever icons you are uploading – you will need to provide both 108x108px and 512x512px images. Need help finding an image? Try The Noun Project or Pixabay as a possible source for royalty-free images. Use an image editor (such as Paint on Windows or Preview on Mac) to change the size of the image.
Everything else can stay as-is for now in the Developer Portal.
-
Open the source file for your Lambda function, index.js, in an editor of your choice. This is in the src directory of the repository you downloaded earlier. You will see on line 9 the location variable, which is currently set to "Seattle." You will want to replace this with the name of the location you're using for your skill. This name is used in many of the messages that Alexa will respond with, so you will only need to replace it in this one location.
-
On line 13, there is a variable for your New York Times API key. There are several steps required to get this key, and we outline them below.
- Start by heading over to the New York Times Developer Website.
- Create a new API key for the Article Search API. This key will be emailed to the email address you provide.
- Copy your API key from your email, and copy it to line 13 of your index.js file, as the value for the "apiKey" variable.
- If you do not agree to the terms of use applicable to your use of the New York Times API, you can remove the “getNewsIntent” from your Intent Schema and Sample Utterances to easily disable it. You can review the New York Times API Terms of Use here.
-
On line 19, there is a long set of sentences in the locationOverview variable. This is meant to be an introduction to your city, and should include things like population, location, geography, and climate.
var locationOverview = "Seattle is a West Coast seaport city and the seat of King County. With an estimated 684,451 residents as of 2015, Seattle is the largest city in both the state of Washington and the Pacific Northwest region of North America.";
-
On line 47, we have provided an array, named "attractions." You should replace the values we have included with attractions and landmarks that are relevant and popular in your chosen location. You're not limited to only five attractions, but we don't recommend using fewer than five.
var attractions = [
{ name: "Woodland Park Zoo", content: "located just 10 minutes north of downtown Seattle. The zoo's 92-acres and award-winning exhibits are home to more than 1,000 animals representing 300 species from around the world.", location: "There are two zoo entrances. \n West Entrance:\n Cross streets: Phinney Ave. N. between N. 55th St. & N. 56th St.\n Street address: 5500 Phinney Ave. N., Seattle WA 98103\n South Entrance:\n Cross streets: N. 50th Street & Fremont Ave. N.\n Street address: 750 N. 50th Street, Seattle WA 98103", contact: "[email protected]\n 206 548 2500" },
{ name: "EMP Museum", content: "Dedicated to contemporary popular culture, the EMP Museum was established by Microsoft co-founder Paul Allen in 2000.It's home to exhibits, interactive activity stations, sound sculpture, and various educational resources.", location: "325 5th Avenue N, Seattle, Washington", contact: "206 770 2700" },
{ name: "Waterfront Park", content: "Designed by the Bumgardner Partnership and consultants, Waterfront Park is a public park constructed on the site of the former Schwabacher Wharf. you can enjoy excellent views of the surrounding arey, such as the city skyline, ships in drydock, container cranes and the West Seattle Bridge.", location: "1401 Alaskan Way, Seattle, WA 98101, United States", contact: "206 684 4075" },
{ name: "Chihuly Garden and Glass", content: "Opened in 2012 on the former site of the Fun Forest, Chihuly Garden and Glass is an exhibit showcasing the work of Dale Chihuly. It comprises of three primary components: the Garden, the Glasshouse, and the Interior Exhibit. There is also a 90 seat café with additional outdoor dining.", location: "305 Harrison St, Seattle, WA 98109, United States", contact: "206 753 4940" },
{ name: "Woodland Park", content: "A 90 acre public park home to many species of birds and mammals. Woodland park boasts several picnic areas, a formal rose garden, ballfields, a miniature golf range and a play area for children.", location: "1000 N 50th St, Seattle, WA 98103, United States", contact: "206 684 4075" },];
-
On line 55, we have provided another array, named "topFive." This array contains responses about the top 5 things to do in your city. When Alexa provides your list to the user, they will hear the number and the caption for each. If the user requests more information on a specific item, Alexa will read the content in the "more" property.
var topFive = [
{ number: "1", caption: "Visit the Space Needle and see Seattle from  above.", more: "Once the tallest structure west of the Mississippi River, The Space Needle is an observation tower that reaches a height of 605 feet. The observation deck falls slightly below this, offering views at 520 feet.", location: "400 Broad St. Seattle, WA 98109", contact: "400 Broad St. Seattle, WA 98109" },
{ number: "2", caption: "Get shopping at Pike Place Market.", more: "One of the oldest farmer's markets in America, Pike Place Market is Seattle’s historic arcade of various vendors, winding alleys and stairways to lower levels. The market plays host to more than 10 million visitors annually.", location: "Pike Place Market PDA, 85 Pike Street, Room 500, Seattle, WA 98101", contact: "[email protected] \n 206 682 7453" },
{ number: "3", caption: "Earn your  wings at the Museum  of Flight.", more: "This museum is a non-profit air and space museum located at the southern end of King County International Airport . It's the largest private museum of its kind in the world and attracts over 500,000 visitors every year", location: "9404 East Marginal Way South Seattle, WA 98108-4097", contact: "206 764 5700" },
{ number: "4", caption: "Breathe in the culture  at the Seattle Art  Museum.", more: "Also known as \"SAM\", the Seattle Art Museum maintains three major facilities: its main museum in downtown Seattle; the Seattle Asian Art Museum, and the Olympic Sculpture Park. The flagship museum is host to several great exhibitions and collections for you to experience.", location: "1300 First Ave Seattle, WA 98101", contact: "206 654 3100" },
{ number: "5", caption: "Take a spin on the  Seattle Great Wheel.", more: "See Seattle's skyline from the giant Ferris wheel situated on Pier 57. The Seattle Great Wheel is the largest observation wheel on the west coast, standing 175 feet tall.", location: "1301 Alaskan Way, Seattle, Washington 98101", contact: "[email protected] \n 206 623 8607" }];
-
Log back into your AWS console and upload the changes you have just made. First you will need to zip up the files into a new archive. You can do this by selecting the files that you need in the src directory (the node_modules directory and your updated index.js) into a new archive. Be sure that you compress the files in the folder, not the folder itself.
-
Select your Lambda function and on the Code tab, select “Upload” to add the archive you just created.
-
Once you have successfully added the file you will see it on the screen, then select “Save”.
-
Repeat the tests you performed earlier to ensure your changes are functioning properly. See Step #4 for a review of how to perform functional tests.


Now we need to go back to our Developer Portal to test and edit our skill and we will be ready for certification.
-
In your skill's Test section, enter your Utterances into the Simulator to make sure everything is working with your new calendar events.
-
Optionally, you can test with your Alexa-enabled device to make sure everything is working correctly. You may find a few words that need to be changed for a better user experience.
Some things to think about:
- Does every word in Alexa's responses sound correct?
- Do you need to change any words to make them sound correct?
Since we get to choose our locations, make sure that Alexa pronouces the names of those locations properly. You can use the Voice Simulator in the Test section to simulate Alexa’s responses. In the Voice Simulator, type in each location name that you are using to test how Alexa will say it. Use additional punctuation or possibly SSML if you need to better control how Alexa responds. You can find out more about SSML here.
Read more about functional testing for Alexa skills.
Read more about building effective voice user interfaces (VUI).
-
Select the Publishing Information area of your skill next:
For other publishing information:

- Spend some time coming up with an enticing, succinct description. This is the only place you have to attract new users. These descriptions show up on the list of skills available in the Alexa app.
- In your example phrases, be sure that the examples you use match the utterances that you created in the Interaction Model section. Remember, there are built-in intents such as help and cancel. You can learn more about built-in intents here. You can also review the list of supported phrases to begin a conversation.
An incorrect example phrase is the most likely reason why your skill submission may fail. Here are the four most important failure points for example phrases.
 1. Example phrases do not adhere to supported phrases.</br>
    *Example: Alexa start over (You cannot use wake word without the invocation name. Further, start over can be a response from the user when the stream is open, in which case, wake word and invocation name do not make sense.)</br>*
    *Example: Alexa, Social Headline (A supported format would be Alexa, launch Social Headline)*
 2. Example phrases are not modeled on sample utterances specified in skill’s intent schema
 3. First example phrase does not contain wake word and invocation name</br>
    *Example: Incorrect example phrase - Alexa, where can I eat (Missing invocation name)*
 4. Example phrases do not provide a contextual response. These are the invariably the phrases users are most likely to try the first time they interact with the skill. Therefore, make sure that they work well and provide a good user experience.
- Be sure you have the rights to whatever icons you are uploading – you will need to provide both 108x108px and 512x512px images. If there is any question the Amazon certification team will fail your Alexa skill submission.

-
IMPORTANT: Add the text “This is based on the City Guide Template” to the Testing Instructions section. This alerts the Certification team of your submission using this standardized template, smoothing the road to a faster certification process. Finally, select Next.
-
Privacy and Compliance.
-
On the Privacy and Compliance section, make sure to consider each answer.
- Since our skill does not require purchases or spending of money, choose "No" for the first question.
- We don't collect any personal data from our users, so you can also choose "No" for the second question.
- If your city guide is not directed to children under the age of 13 or is not intended to target children under the age of 13, choose ‘No’ for the third question as well.
- Choose to certify that your skill can be imported to and exported from the countries and regions that you operate the skill.
- Privacy and Terms URL’s are optional, but recommended.
-
Select “Save”.
-
Select “Submit for Certification”
-
Finally, confirm your submission. Select “Yes” to submit your skill.
-


Congratulations! You have successfully submitted your skill for publication. You will receive progress e-mails and possibly other suggestions from the Alexa certification team on how you can make your skill even better. You will typically receive news back from the certification team within 4-5 business days. You can update your skills at any time, except while they are being reviewed for certification.
Did you like this tutorial? You can find more on our Alexa Skills Kit training page


