Reminder to self: comment out framebuffer part of /boot/config.txt, this is only used for testing via vnc viewer
\
\
\
I'm using a ipod classic from 2004 (A1059)
This is a Fork of the Spotify Ipod by Guy Dupont
This code is meant to accompany my own version of this project in which a Spotify client is built into an iPod "Classic" from 2004. In my version everything is meant to run on a Raspberry Pi Zero 2 W.
I used a Raspberry Pi zero 2 W. This guide uses the newest version of raspotify, which is not available to the older Rpi Zero models. You can still try with older versions of raspotify, but your mileage may vary.
Since we are using the lite version of raspbian, some extra packages need to be installed:
And if you need to configure wifi to enable ssh & vnc, you can edit /etc/wpa_supplicant/wpa_supplicant.conf
sudo apt-get update
sudo apt-get upgrade
sudo apt-get install midori

sudo apt-get install python-pip python-dev

sudo apt-get install python3-pip python-dev

sudo apt-get install realvnc-vnc-server

sudo apt install python-pigpio python3-pigpio

sudo apt install python-setuptools python3-setuptools

sudo apt install python3-pip

sudo apt-get install python3-tk

sudo apt-get install python3-pil
sudp apt-get install python3-pil.imagetk

sudo apt-get install redis-server

sudo apt-get install openbox

sudo apt install xorg

sudo apt-get install lightdm

sudo apt-get install x11-xserver-utils
then set redis-server to start on boot, which it does automatically but on some devices it don't:
sudo systemctl enable redis-server
& do this:
sudo service redis-server start
do the same for raspotify in later steps after it has been installed:
sudo systemctl enable raspotify \
NOTICE: the pins on the clickwheel ribbon cable should face down on the breakout board The schematics for clickwheel wiring is at the bottom of the README
Install PiGPIO for clickwheel
wget https://github.com/joan2937/pigpio/archive/master.zip
unzip master.zip
cd pigpio-master
make
sudo make install
run
gcc -Wall -pthread -o click click.c -lpigpio -lrt
to compole click.c
then run sudo ./click & so you can test the clickwheel (assuming the wiring is done)
now just make sure the pigpio daemon that the spotifypod.py script will need is the one that is started by sudo ./click & do not manually start or enable it with systemctl etc. that would cause multiple instances of pigpiod
I used a 2 inch model waveshare ST7789V display wiring for display also below.
I used this guide which links to this solution on github
basically this is how to setup:
Edit /boot/config.txt & comment dtoverlay=vc4-kms-v3d & add:
hdmi_group=2
hdmi_mode=87
hdmi_cvt=320 240 60 1 0 0 0
hdmi_force_hotplug=1
restart the pi, then
sudo apt install cmake git
cd ~
git clone https://github.com/juj/fbcp-ili9341.git
cd fbcp-ili9341
then edit st7735r.h & change #define DISPLAY_NATIVE HEIGHT 240 to #define DISPLAY_NATIVE HEIGHT 320 in line 20
Then edit st7735r.cpp and comment out the line starting with SPI_TRANSFER (around line 100) then add SPI_TRANSFER(0x37, 0, 0); & save
then type
mkdir build
cd /build
Depending on what gpio pins you've soldered (refer to pinout below) to TFT_DATA_CONTROL, TFT_RESET_PIN and TFT_BACKLIGHT might be different.
for my case I used:
cmake -DST7789=ON -DGPIO_TFT_DATA_CONTROL=24 -DGPIO_TFT_RESET_PIN=25 -DGPIO_TFT_BACKLIGHT=18 -DSPI_BUS_CLOCK_DIVISOR=30 -DSTATISTICS=0 -DDISPLAY_BREAK_ASPECT_RATIO_WHEN_SCALING=ON -DUSE_DMA_TRANSFERS=OFF ..
in case you need to flip the screen, include this option before the two dots at the end:
-DDISPLAY_ROTATE_180_DEGREES=ON
afterwards run
sudo make -j
you can now test the driver in that same folder with
sudo ./fbcp-ili9341
but since the driver should start automatically on boot we have to do one last thing.
Open /etc/rc.local with a text editor with sudo privileges (e.g.):
sudo nano /etc/rc.local if you don't know what you're doing, personally I prefer using vim
Add these lines before exit in the file:
# Start display driver
/home/pi/fbcp-ili9341/build/fbcp-ili9341 &
#in here also make pigpio daeomon run on startup
sudo pigpiod
Now just save and close. Thats it, now the driver should be installed and run on boot.
NOTICE: since we are using the default openbox desktop environment, the display might still be black.
To to test if its working, you can log onto your Pi using vnc, you should be able to right click to open certain apps. These actions should also be visible on the your display.
TL:DR is Create a Spotify developer account, then create an app to get a client id and client secret, afterwars you can create your redirect URI
Detailed API setup
The steps above as pictures
After loggin in you get to the dashboard. Here you want to create a new app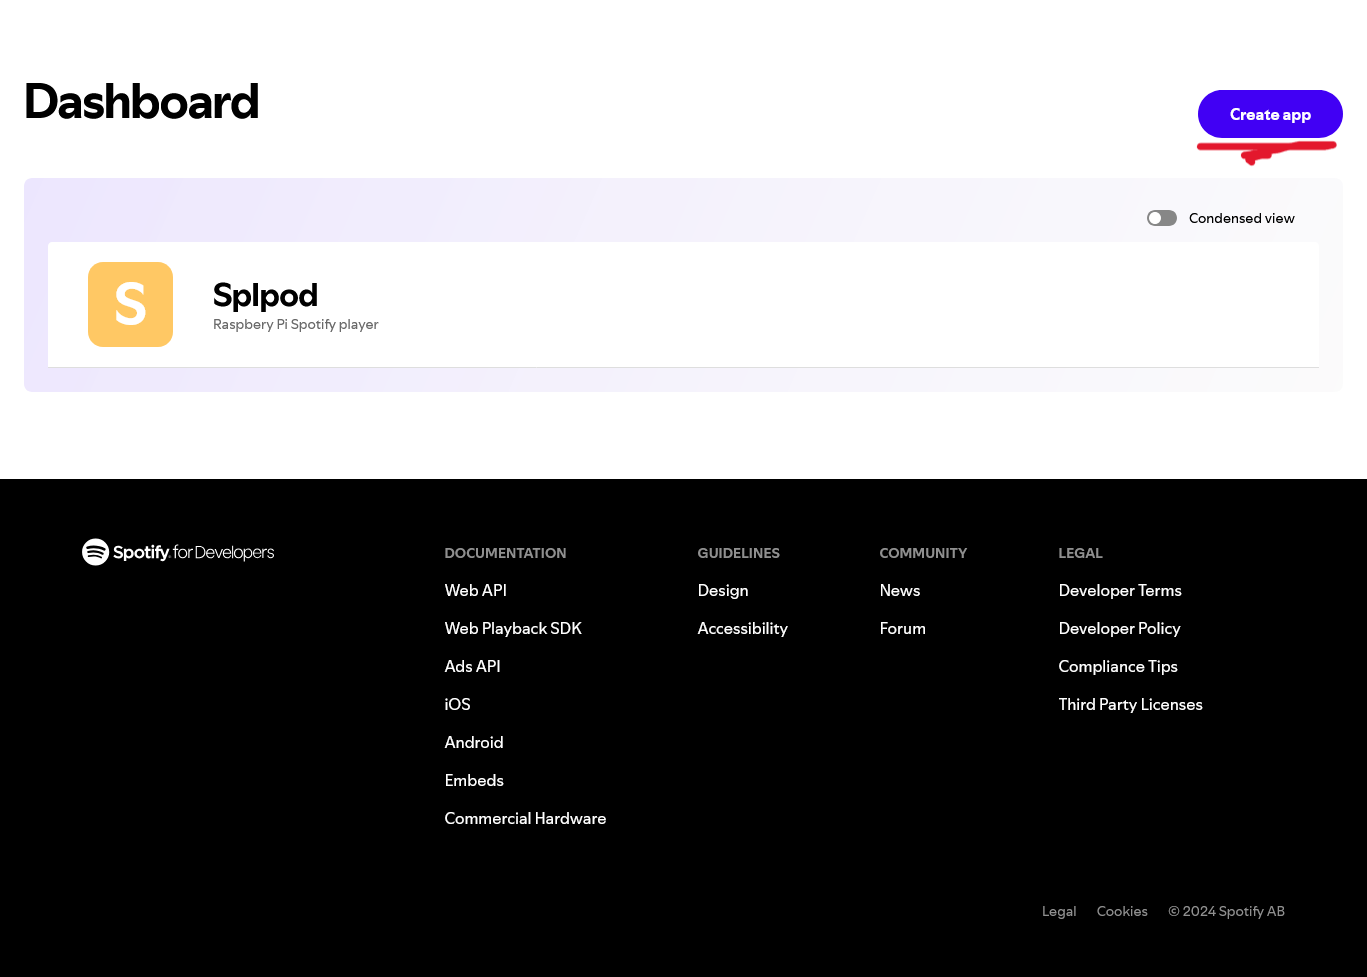 Then you fill out all required fields as detailed above
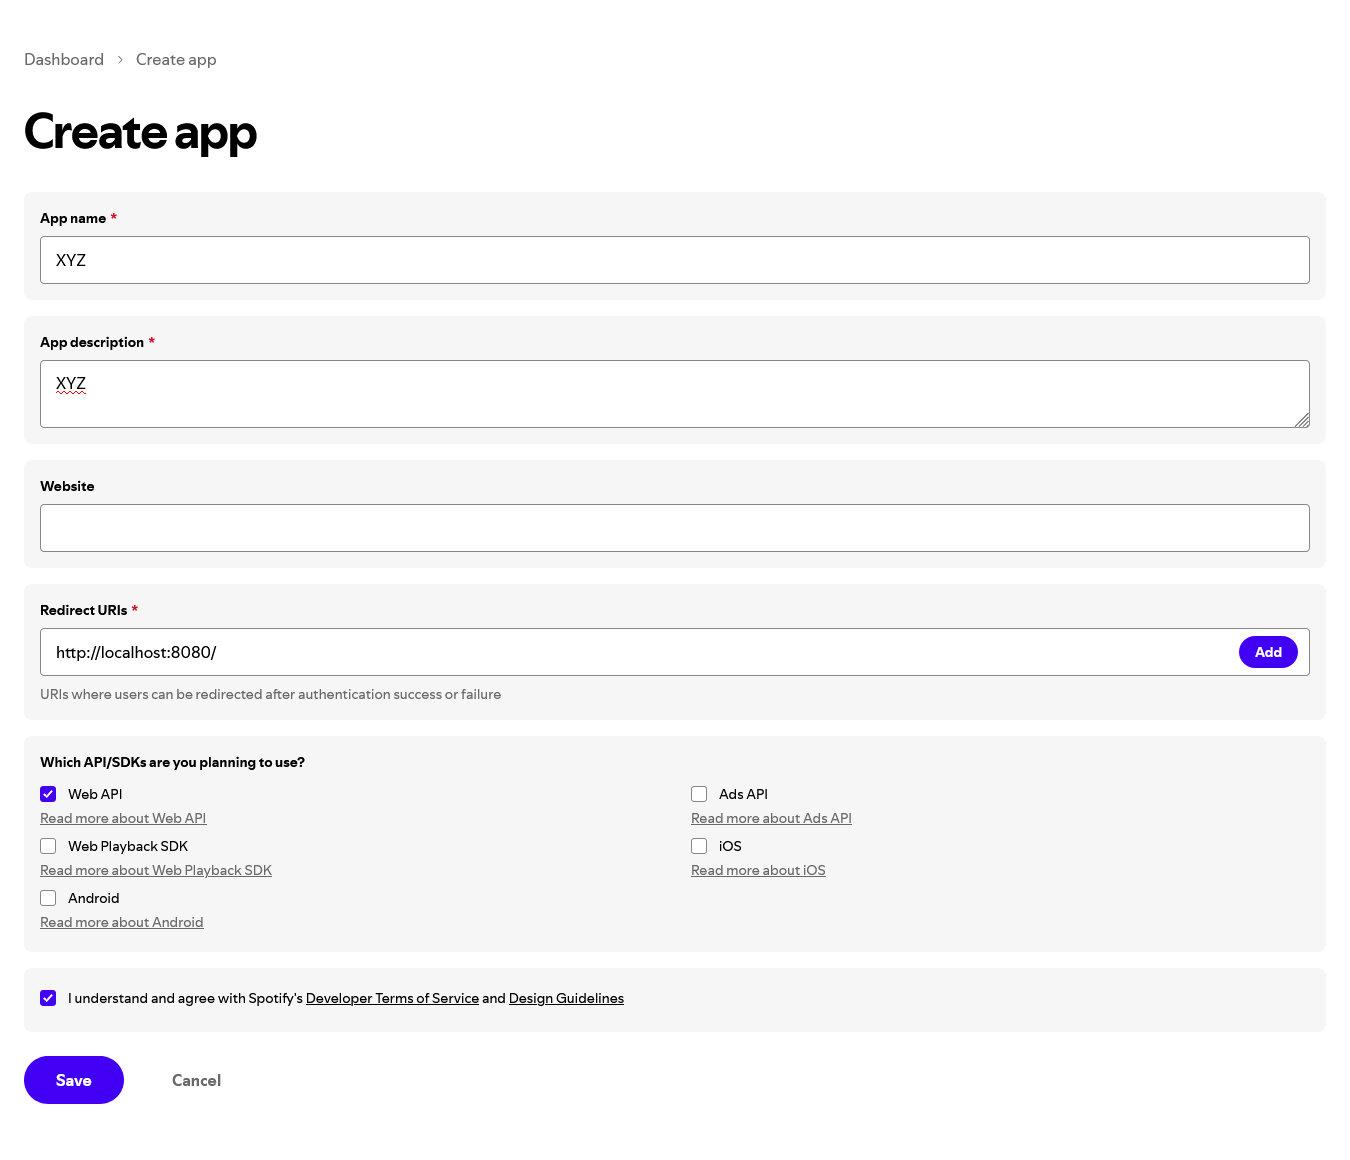
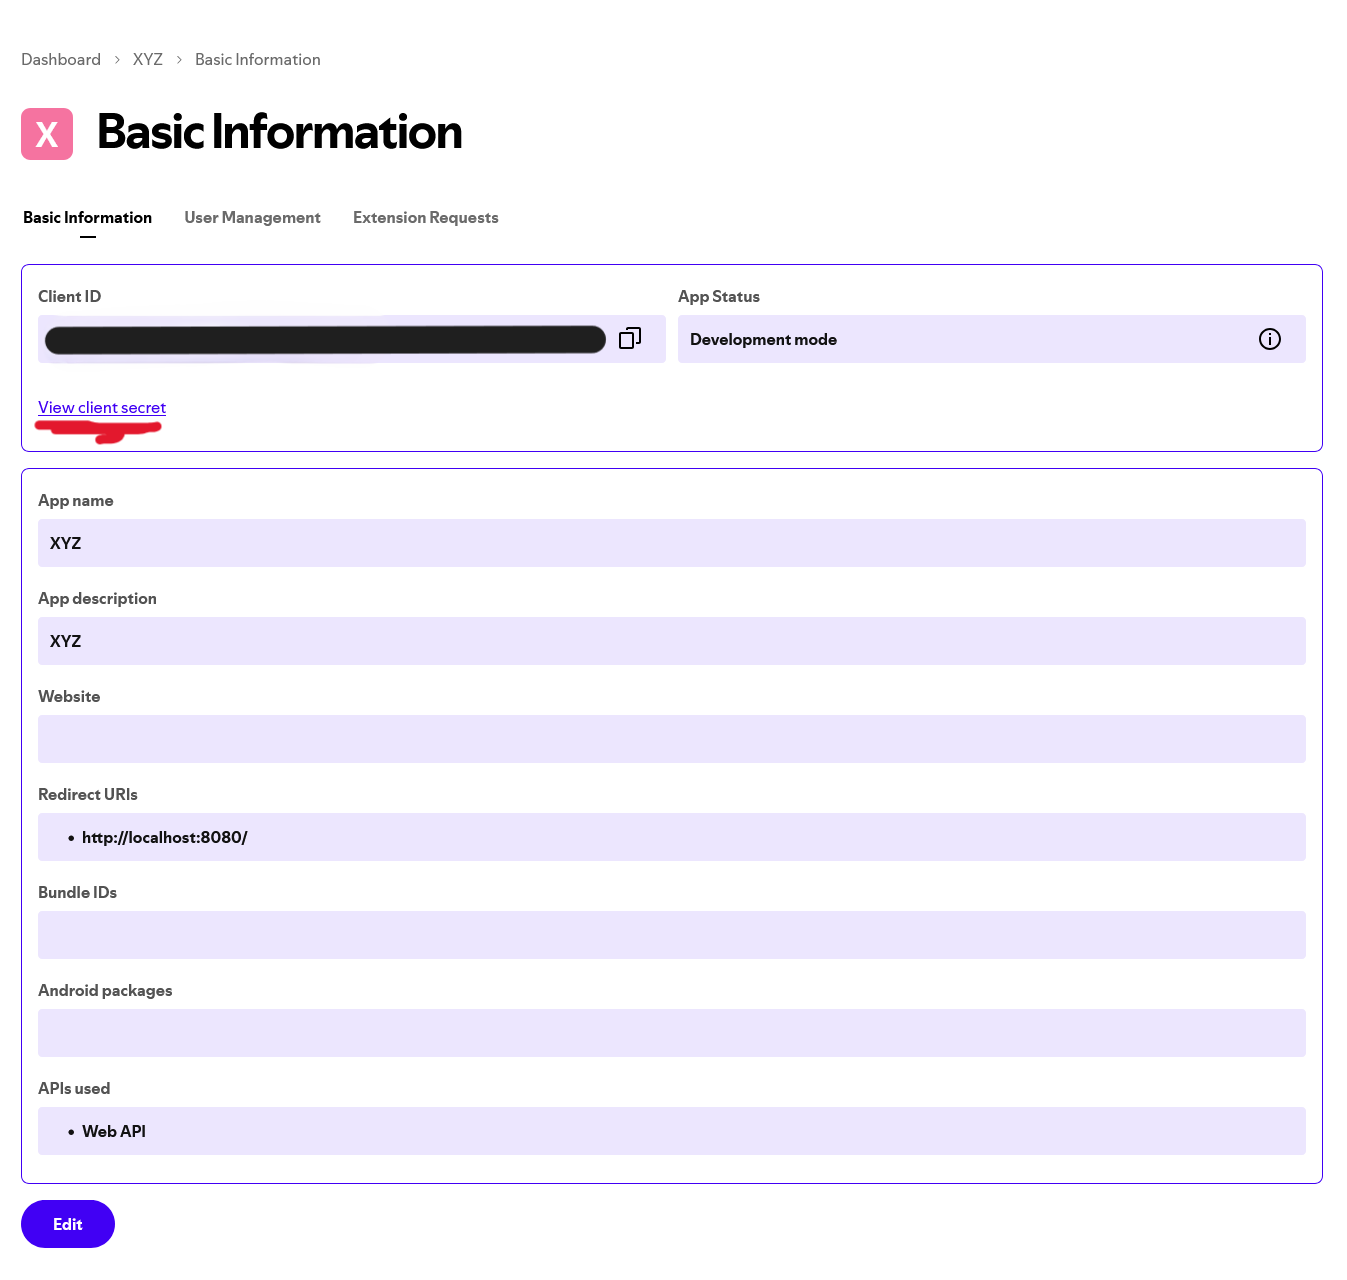 After creating the app you can now enter the settings and view the Client ID and Client Secret. These will be used later
install raspotify
sudo apt-get -y install curl && curl -sL https://dtcooper.github.io/raspotify/install.sh | sh
edit the raspotify configuration to your liking (all settings listed here: https://github.com/dtcooper/raspotify/wiki/Configuration).
The most importaint labels to fill out are LIBRESPOT_USERNAME="" and LIBRESPOT_PASSWORD="" these should be your spotify username/email and password.
\ Also, comment out the line that says LIBRESPOT_DISABLE_AUDIO_CACHE=.
In addition you can also set a custom directory for your credential cache with the flag
Librespot_SYSTEM_CACHE= (i set mine to /var/cache/raspotify) but this
shouldn't be nescesarry for it to work
Also enable the raspotify service to cover the odd case, where it doesn't enable automatically: \
sudo systemctl enable raspotify
sudo systemctl restart raspotify
other common values that might need changing are LIBRESPOT_FORMAT=, LIBRESPOT_SAMPLE_RATE=, LIBRESPOT_DEVICE= \ these 3 need to be configured, so that they work with your desired alsa audio output device (headphone jack for example)
Devices can be checked by running librespot --device ? and fill out the 3 params accordingly to the output of this command
run pip install -r requirements inside of SpIpod/frontend/
if you get an error while its installing Pillow e.g.
The headers or library files could not be found for jpeg, a required dependency when compiling Pillow from source.
or something similair like for example:
ERROR: Failed building wheel for Pillow
try installing these: sudo apt install libjpeg-dev zlib1g-dev and attempt to install the python modules from above again
- Install Required Packages.
Installation for python3-pip, raspotify, python3-tk, openbox
sudo apt install python-setuptools python3-setuptools

sudo apt install python3-pip

sudo curl -sL https://dtcooper.github.io/raspotify/install.sh | sh

sudo apt-get install python3-tk

sudo apt-get install redis-server

sudo apt-get install openbox

sudo apt install xorg

sudo apt-get install lightdm

sudo apt-get install x11-xserver-utils
- Install Dependencies
pip3 install -r requirements.txt
- Install pi-btaudio
git clone https://github.com/bablokb/pi-btaudio.git
cd pi-btaudio
sudo tools/install
NOTICE: the pins on the clickwheel ribbon cable should face down on the breakout board
5. Install PiGPIO for clickwheel
wget https://github.com/joan2937/pigpio/archive/master.zip
unzip master.zip
cd pigpio-master
make
sudo make install
run gcc -Wall -pthread -o click click.c -lpigpio -lrt to compole click.c, then sudo ./click & to test
- Setup Spotify API
First Create an App at https://developer.spotify.com/dashboard/applications/
https://accounts.spotify.com/authorize?client_id=XXXXXXXXXXXXXXXXXXXXXXXXXXXXX&response_type=code&redirect_uri=http%3A%2F%2F127.0.0.1&scope=user-read-playback-state%20user-modify-playback-state%20user-read-currently-playing%20 app-remote-control%20streaming%20playlist-modify-public%20playlist-modify-private%20playlist-read-private%20playlist-read-collaborative
- raspi-config
sudo raspi-config
Console Autologin
Display Option -> Screen Blanking -> Off if you want to avoid the screen turning black after a few seconds.
- bash_profile
In .bash_profile added the following (if the file is not htere, you must create it)
#!/bin/bash

[[ -z $DISPLAY && $XDG_VTNR -eq 1 ]] && startx -- -nocursor

# Disable any form of screen saver / screen blanking / power management

xset s off

xset s noblank
- Configure xinitrc
sudo nano /etc/X11/xinit/xinitrc
Inside, make sure the following is there:
#!/bin/sh

# /etc/X11/xinit/xinitrc

# global xinitrc file, used by all X sessions started by xinit (startx)

# invoke global X session script

#. /etc/X11/Xsession

exec openbox-session #-> This is the one that launches Openbox ;)
- Run "spotifypod.py" with autostart
sudo nano /etc/xdg/openbox/autostart
and add the following command to launch spotifypod.py:
cd /home/pi/fork/retro-ipod-spotify-client/frontend/

sudo -H -u pi python3 spotifypod.py &

sudo /home/pi/fork/retro-ipod-spotify-client/clickwheel/click &
Make sure that the paths are ok with your setup!!
in sudo nano /etc/xdg/openbox/environment all the variables needed to run spotifypod.py are set( SPOTIPY_CLIENT_ID, SPOTIPY_CLIENT_SECRET,SPOTIPY_REDIRECT_URI)
export SPOTIPY_CLIENT_ID='your_SPOTIPY_CLIENT_ID'

export SPOTIPY_CLIENT_SECRET='your_SPOTIPY_CLIENT_SECRET'

export SPOTIPY_REDIRECT_URI='your_SPOTIPY_REDIRECT_URI'
- Synchronizing Spotify data! Last but not least, if you want to make sure all your playlists artists, etc are synchronized every time you turn on your Spotypod, you can simply modify the script view_model.py with the following at line 16:
#spotify_manager.refresh_devices()
spotify_manager.refresh_data()
instead of calling refresh_device, you can execute refresh_data. This will sync all your data and then will eceute refresh.devices. This will make the boot up way slower! but it will synchronize every single time you switch on :).
If you dont run at least once refresh_data() no playlist, artist or anything related with your account will be displayed!
- Configure Raspotify
sudo nano /etc/default/raspotify
Uncomment and fill the following line:
OPTIONS="--username <USERNAME> --password <PASSWORD>"
And add whichever of the following options you want:
# The displayed device type in Spotify clients.

# Can be "unknown", "computer", "tablet", "smartphone", "speaker", "tv",

# "avr" (Audio/Video Receiver), "stb" (Set-Top Box), and "audiodongle".

DEVICE_TYPE="smartphone"
then turn off discovery, so only devices logged into the same spotify account can interact with SpIpod (like for example managing queue)
LIBRESPOT_DISABLE_DISCOVERY=1
Here is the wiring of the hardware, as of revision 1. Note that the pin numbers correlate to those referenced in click.c\
RPI Zero 2 W pinout
 Clickwheel wiring
 Display wiring


