An image recognition pipeline in AWS, using two parallel EC2 instances, S3, SQS, and Rekognition.
Goal: The purpose of this individual assignment is to learn how to use the Amazon AWS cloud platform and how to develop an AWS application that uses existing cloud services. Specifically, you will learn:
- How to create VMs (EC2 instances) in the cloud.
- How to use cloud storage (S3) in your applications.
- How to communicate between VMs using a queue service (SQS).
- How to program distributed applications in Java on Linux VMs in the cloud, and
- How to use a machine learning service (AWS Rekognition) in the cloud.
Description: You have to build an image recognition pipeline in AWS, using two EC2 instances, S3, SQS, and Rekognition. The assignment must be done in Java on Amazon Linux VMs. For the rest of the description, you should refer to the figure below:
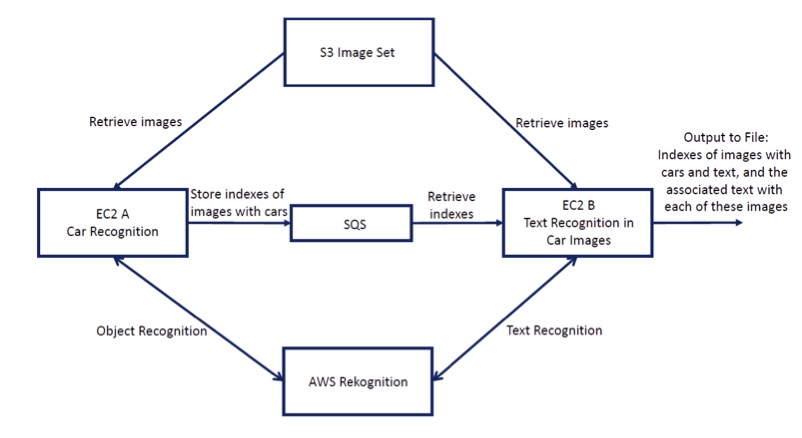
Your have to create 2 EC2 instances (EC2 A and B in the figure), with Amazon Linux AMI, that will work in parallel. Each instance will run a Java application. Instance A will read 10 images from an S3 bucket that we created (https://njit-cs-643.s3.us-east-1.amazonaws.com) and perform object detection in the images. When a car is detected using Rekognition, with confidence higher than 90%, the index of that image (e.g., 2.jpg) is stored in SQS. Instance B reads indexes of images from SQS as soon as these indexes become available in the queue, and performs text recognition on these images (i.e., downloads them from S3 one by one and uses Rekognition for text recognition). Note that the two instances work in parallel: for example, instance A is processing image 3, while instance B is processing image 1 that was recognized as a car by instance A. When instance A terminates its image processing, it adds index -1 to the queue to signal to instance B that no more indexes will come. When instance B finishes, it prints to a file, in its associated EBS, the indexes of the images that have both cars and text, and also prints the actual text in each image next to its index.
- Login to your Student AWS account through the link sent by the Professor.
You will need the AWS account and the free AWS credits for this programming assignment. Goto the AWS Academy course (created by your professor); signup using your NJIT email. If you don't have yet an account for Amazon's cloud (AWS), please create one using the links you received in the invite.
- Once you login to your AWS Lab under Courses > Modules, select Learner Lab.
- Start Lab and follow the Readme tab (located on top-right along with Start Lab, End Lab, AWS Details, and Reset buttons) to start your AWS environment. To start the AWS console make sure you click the AWS button with the green circle. Red circle means the lab is inactive and green circle means the lab is active.
- Make sure you copy the AWS access_key, secret_key, and session_token (can be found in AWS details button) and paste it on your ~/.aws/credentials file. Along with that download the PEM file under SSH key to authenticate later when you access the EC2 instances through terminal.
- Head over to the AWS Management console and search for EC2. Once you head over to EC2 Dashboard follow the following steps to create two instances.
- Click on Launch instance.
- Enter the name of the EC2 instance you want to create.
- Under the AMI select Amazon Linux 2 AMI (HVM) - Kernel 5.10, SSD Volume Type.
- Select Instance type to be t2.micro. T2 instances are a low-cost, general purpose instance type that provides a baseline level of CPU performance with the ability to burst above the baseline when needed.
- Select vockey as a Key-Pair value which should be pre-populated.
- Under Network Settings, select Create security group and check the below settings.
- Allow SSH traffic from
- Allow HTTPs traffic from the internet
- Allow HTTP traffic from the internet
- And instead of Anywhere, select My IP to only send traffic from your IP address.
- It is recommended to not change settings under Configure storage and Advanced details unless you know what you are doing.
Note: You have to follow the above step twice to create two instances. My instances are named EC2-A and EC2-B and looks like this:
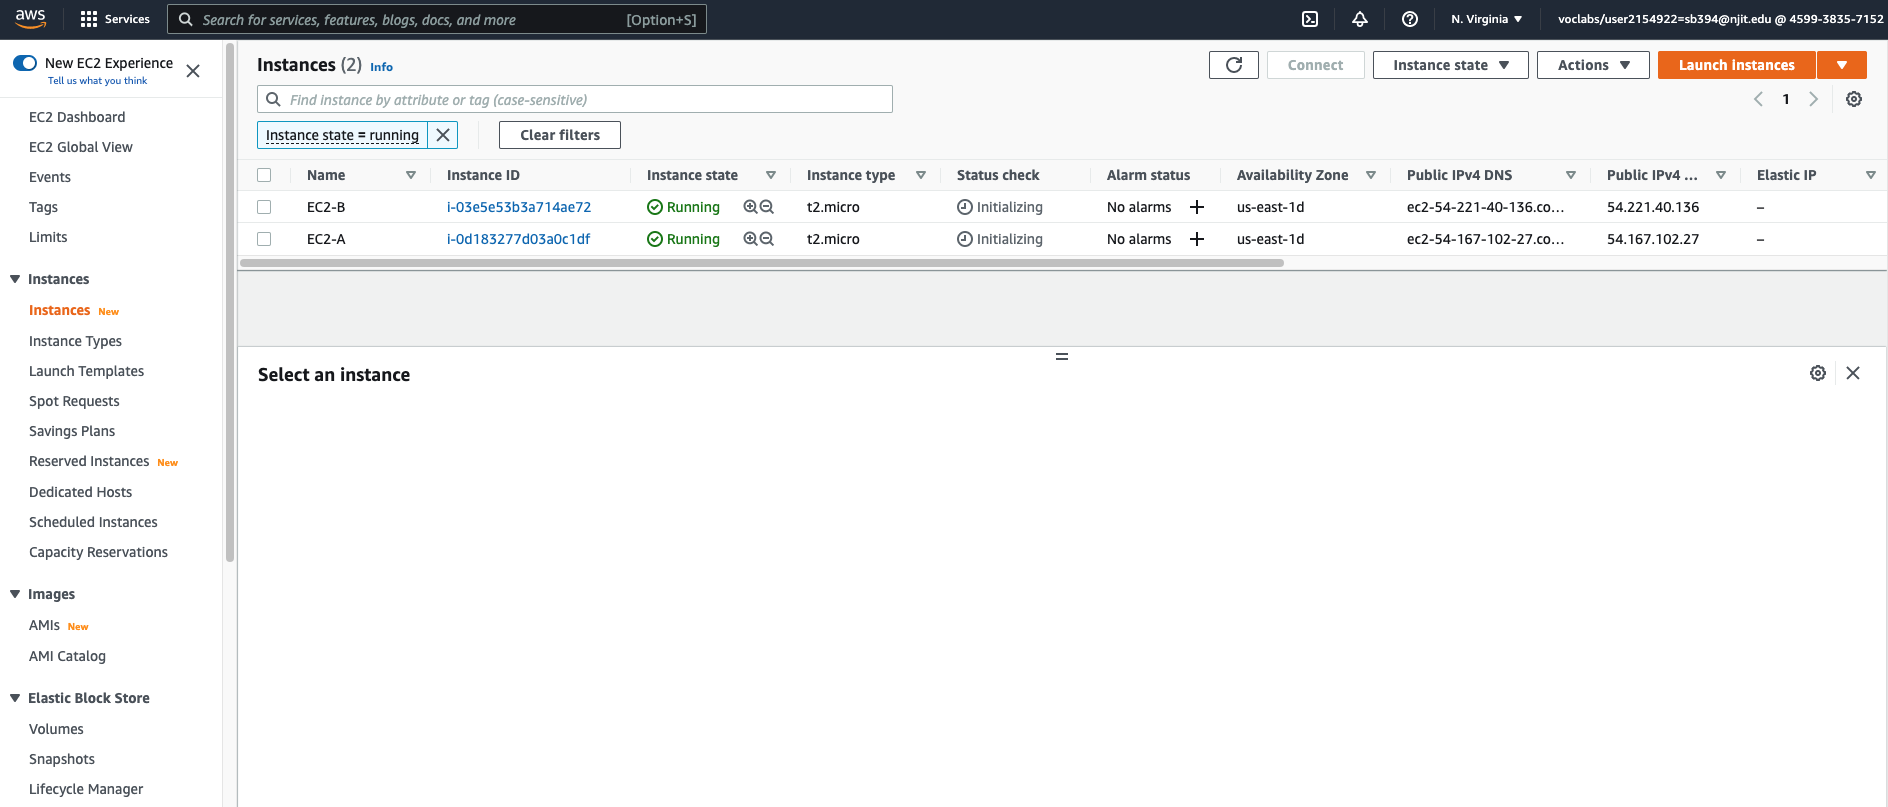
- Once you create your instances, head over to EC2 instances to see your instances. If your instances aren't running select an instance, click on Instance state dropdown and Start instance.
- Once instances are running, select an instance (one-by-one) head over to Actions > Security > Modify IAM role.
- From the dropdown select the LabInstanceProfile which is pre-populated. Please note, this role might not have access to S3, SQS, or Rekognition which is required for the project). And update the IAM role.
- If the IAM role doesn't have access to S3, SQS, or Recognition, head over to IAM > Roles > LabRole and provide the following permissions as policies:
- Once the policies are attached you are all set to access the EC2 instances.
-
We will have two different programs, one is to recognize Object and the other is to recognize Text. Please read the project description to understand why we need two programs.
-
The object detection program will run on the first instance while the second instance will run the text detection program.
-
Please make sure you have the executable JAR files for each of the programs, as we will upload the JAR files in the instances.
In simple words, a JAR file is a file that contains a compressed version of .class files, audio files, image files, or directories.
-
Once you have the JAR files ready you can upload it to the respective EC2 instances using Cyberduck (Mac) or WinSCP (Windows). I am using Cyberduck for the project since I'm working with a Mac system.
- If you want to learn how to upload file in EC2 instance using Cyberduck, follow the link - FTP into your EC2-instance with Cyberduck
- Note: The username while you FTP to your EC2 instance using Cyberduck should be 'ec2-user'.
We will now SSH from Mac to access both our EC2 instances.
Note: These instructions are for Mac/Linux users only.
-
Read through the two bullet points in this step before you start to complete the actions, because you will not be able see these instructions when the AWS Details panel is open.
- Choose the AWS Details link above these instructions.
- Choose the Download PEM button and save the labsuser.pem file. (Typically your browser will save it to the Downloads directory.)
-
Open a terminal window, and change directory
cdto the directory where the .pem file was downloaded. For example, run this command, if it was saved to your Downloads directory:cd ~/Downloads -
Change the permissions on the key to be read only, by running this command:
chmod 400 labsuser.pem -
Return to the AWS Management Console, and in the EC2 service, choose Instances. Check the box next to the instance you want to connect to.
-
In the Description tab, copy the IPv4 Public IP value.
-
Return to the terminal window and run this command (replace with the actual public IP address you copied):
ssh -i <filename>.pem ec2-user@<public-ip> -
Type
yeswhen prompted to allow a first connection to this remote SSH server. Because you are using a key pair for authentication, you will not be prompted for a password.
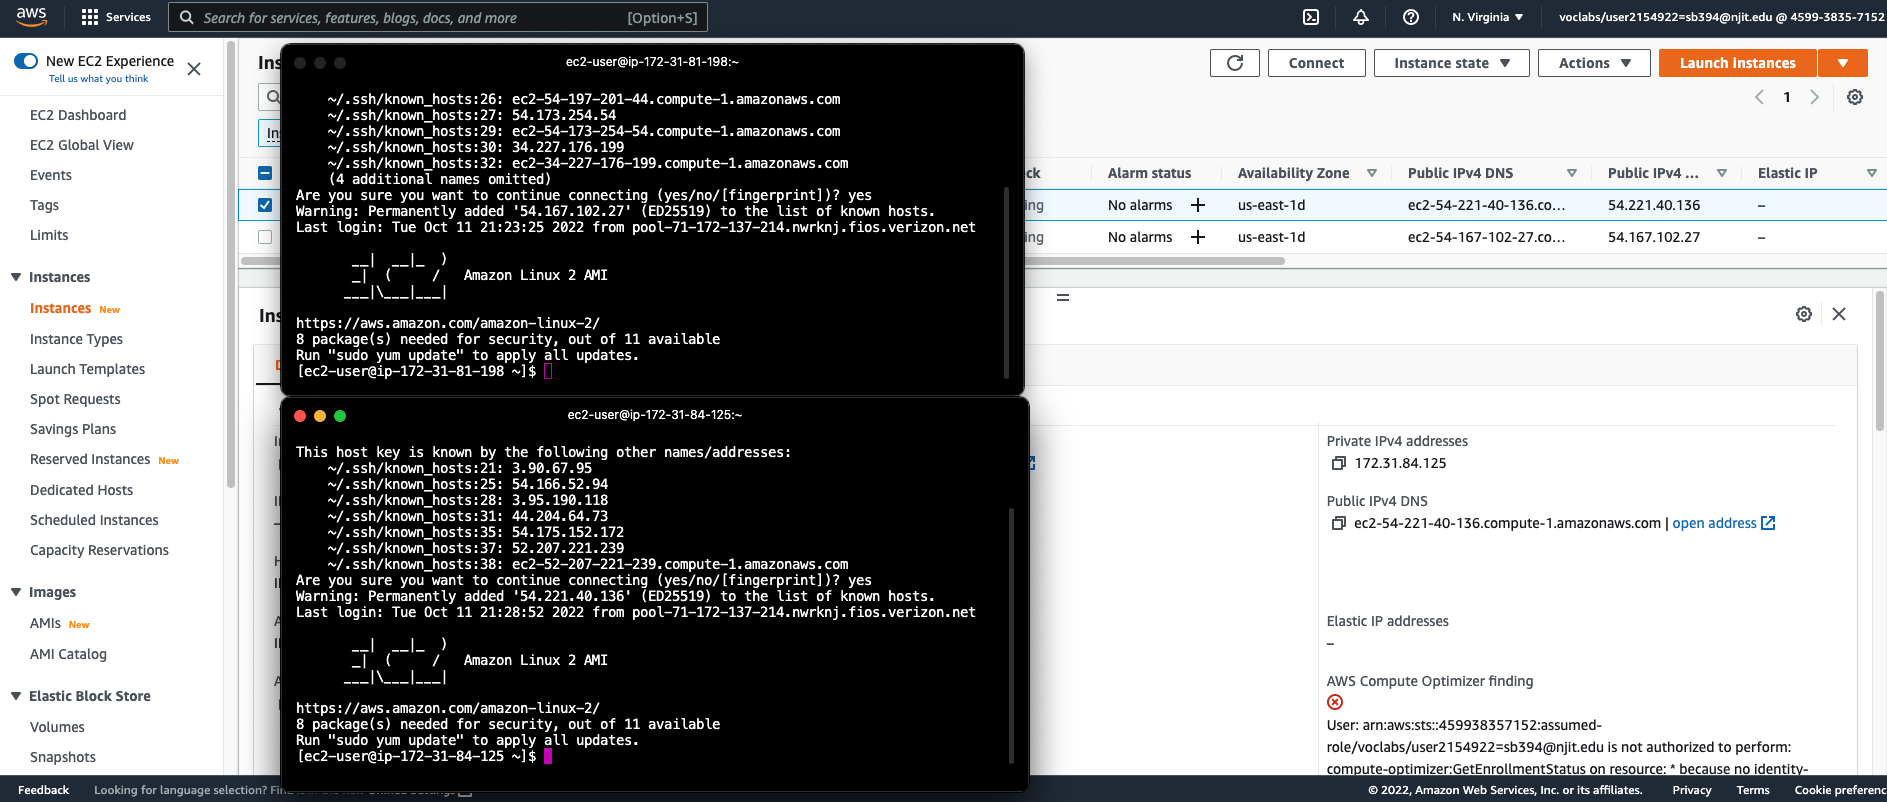
Once we SSH to the two EC2 instances we will have something like this:
- Make sure to update your access_key, secret_key, and default_region on your AWS terminal.
- To update the above information, type
aws configureon the AWS terminal. - The default region should be us-east-1.
- To update the above information, type
- Once you are done with the configuration, run the programs using the command
java -jar <NAME_OF_YOUR_JAR_FILE>.jar. - For the second program since we want to output the result in a text file, we can use the command
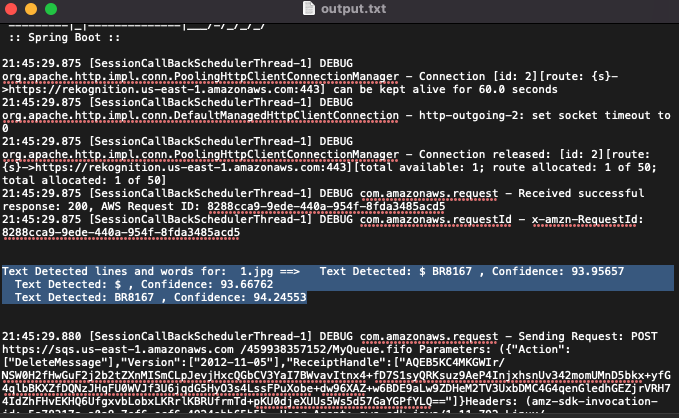
java -jar <NAME_OF_YOUR_JAR_FILE>.jar > output.txt.- An output.txt file will be created and the output of the second program (running on the second instance) will be recorded on the file.
- The file will have the necessary data about the indexes of the images that have both cars and text, and also prints the actual text in each image next to its index.
-
Once you run the AWSObjectDetection.jar on EC2-A instance the images that satisfies the condition will be pushed to the SQS (Queue).


-
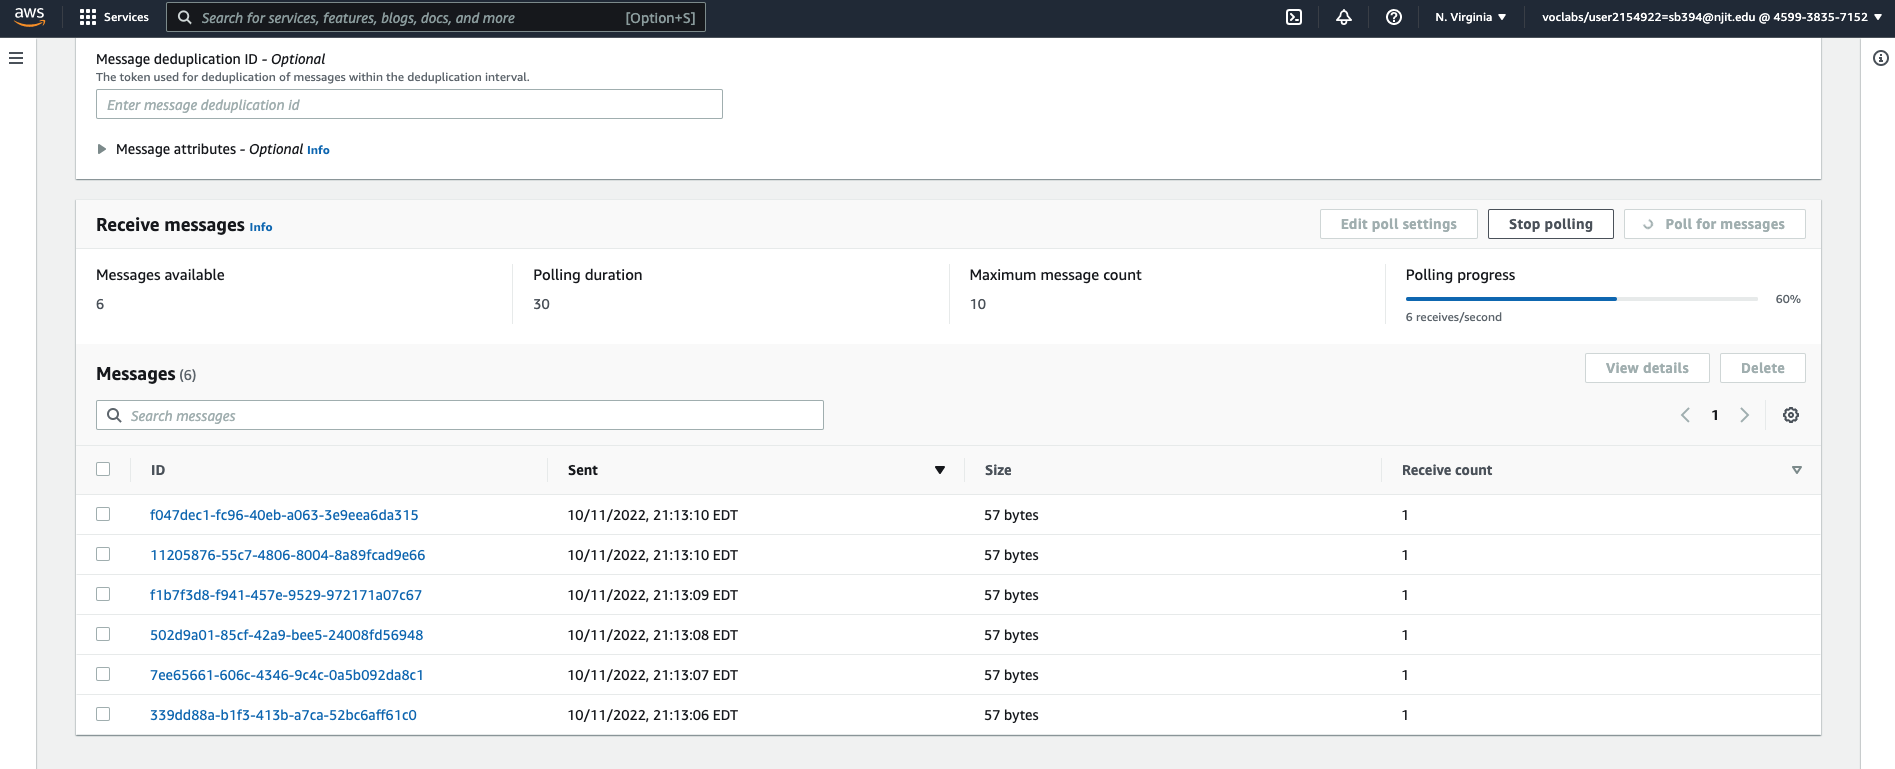
We have 6 items that are pushed to the queue, since only 6 items satisfies the condition ( Label = "Car" and Confidence > 90).
-
The queue is created like so:
-
And the contents of the queues can be obtained by long polling:
Once we populate the queues we can see how does it look when we run the AWSTextRekognition program on EC2-B instance.
-
We run the AWSTextRekognition.jar on EC2-B instance like so:

-
When instance B finishes, it prints to a file (output.txt), the indexes of the images that have both cars and text, and also prints the actual text in each image next to its index.
-
The final output stored in output.txt looks like this: