
![]()
Nosso Challenge é dividido em 3 fases, que são distribuídas entre 4 semanas;
Neste Challenge, vamos criar o Back-End a partir da abstração do Front-End ao desenvolver o Adopet, uma plataforma para conectar pessoas que desejam adotar animais de estimação a abrigos.
-
Semana 01: Criação de API e integração com Banco de Dados.
-
Semana 02: Relacionamento entre entidades e engenharia de software.
-
Semanas 03 & 04: Autenticação, testes e deploy.
Este projeto está sendo desenvolvido utilizando Java 17, String Boot 3, Maven, MySQL 8 e Docker.
Para clonar e usar o projeto instale as ferramentas abaixo:
Java 17: Adoptium.Maven: Maven.Docker: Docker.IDE: Uma IDE ou editor de texto de sua escolha, eu utilizo o VS CODE.
- Primeiro clone ou baixe o projeto.
- Após importar o projeto na IDE ou editor de texto, rode o comando abaixo na pasta raíz do projeto para baixar as dependências:
mvn install
- Após baixar as dependências crie um arquivo chamado
init-script.sqlpara criar um usuário que irá manipular o banco seguindo o modelo abaixo:
CREATE USER 'SEU_USUARIO'@'%' IDENTIFIED BY 'SUA_SENHA';
GRANT ALL ON adopet.* TO 'SEU_USUARIO'@'%';
FLUSH PRIVILEGES;
- crie um arquivo
.envna raíz do projeto com as seguintes informações:
# Variáveis para o docker
DB_DATA_LOCATION=LOCALIZAÇÃO_DO_PONTO_DE_MONTAGEM_DO_BANCO_NO_PC
INIT_SCRIPT_LOCATION=LOCALIZAÇÃO_DO_INIT_SCRIPT_SQL
MYSQL_ROOT_PASSWORD=USE_UMA_SENHA_FORTE_ALEATÓRIA_MAIOR_QUE_14_CARACTERES
MYSQL_TCP_PORT=PORTA_QUE_SERÁ_UTILIZADA_NO_MYSQL

# Variáveis para o projeto. Use as mesmas informações do docker.
# Geralmente os IPs do docker são 172.17.0.2
# *** No Windows deixe como localhost ***
FLYWAY_URL=jdbc:mysql://IP_DO_CONAINER_DOCKER:PORTA_UTILIZADA_NO_MYSQL_TCP_PORT/adopet?createDatabaseIfNotExist=true
FLYWAY_USER=USUARIO_CADASTRADO_NO_INIT_SCRIPT_SQL
FLYWAY_PASSWORD=SENHA_CADASTRADA_NO_INIT_SCRIPT_SQL
JWT_SECRET=SUA_SENHA_SUPER_SECRETA_PRO_TOKEN
- Agora crie o container docker do banco com o comando abaixo:
docker compose --env-file .env up -d
- Verifique se o container foi startado corretamente com o comando abaixo:
docker ps
-
Pronto, uma vez iniciado o container é só iniciar o Spring Boot e testar os endpoints.
-
Para testar os endpoints digite no navegador
http://localhost:8080/swagger-ui/index.htmle irá abrir a tela abaixo:

OBS: Os endpoints que tem um cadeado exigem um token que é dado ao logar no sistema.
- Para testa-los no
swaggersiga os seguintes passos, primeiro crie um abrigo ou tutor para poder logar no sistema, aqui vamos criar um abrigo no endpoint abaixo:

-
Clicando em
try outvocê poderá enviar uma requisição com as informações de cadastro seguindo o modelo demonstrado no próprio endpoint. -
Com o abrigo criado vá no endpoint de login e faça uma requisição e na resposta receberá um token:

- Com o token em mãos vá para o topo da tela e clique no botão
Authorizeque irá abrir um modal com o campo para incluí-lo:
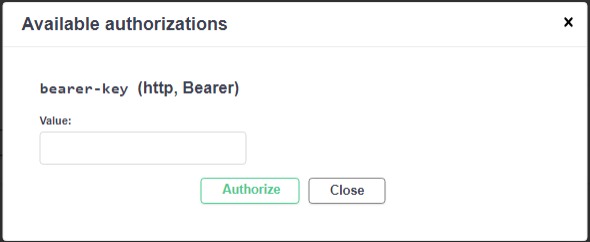
- Após incluir o token no campo clique em
Authorizee pronto! Agora você poderá testar todos os endpoints.
![]()
The Challenge is divided in three phases, that is distributed between 4 weeks.
In this challenge, we're gonna create a backend from the abstraction of the frontend developing Adopet, a platform to connect people that wants to adopt pets to shelters.
-
Week 01: API creation and database integration.
-
Week 02: Relation between entities and software engineering.
-
Week 03 & 04: Authentication, tests and deploy.
This project are been developed using Java 17, Spring Boot 3, Maven, MySQL 8 and Docker.
To clone and use this project install the tools below:
Java 17: Adoptium.Maven: Maven.Docker: Docker.IDE: Choose an IDE or Text Editor of your choice, I use VS CODE.
- First clone or download the project.
- After importing the project in the IDE or text editor run the command below in the root folder to download the dependencies:
mvn install
- After downloading the dependencies create a file
init-script.sqlto create a user for manipulate the database with following content:
CREATE USER 'YOUR_USER'@'%' IDENTIFIED BY 'YOUR_PASSWORD';
GRANT ALL ON adopet.* TO 'YOUR_USER'@'%';
FLUSH PRIVILEGES;
- create a
.envfile in the root folder of the project with the following:
# Docker variables
DB_DATA_LOCATION="Localization to database mounting point"
INIT_SCRIPT_LOCATION="Localization to init-script.sql file"
MYSQL_ROOT_PASSWORD="Strong random password higher than 14 characters"
MYSQL_TCP_PORT="MySQL port of your choice"

# Project variables. Use the same as docker.
# Usually docker's IPs are 172.17.0.2
# *** In Windows leave as localhost ***
FLYWAY_URL=jdbc:mysql://DOCKER_CONAINER_IP:USED_PORT_IN_MYSQL_TCP_PORT/adopet?createDatabaseIfNotExist=true
FLYWAY_USER="User created in init-script.sql"
FLYWAY_PASSWORD="Password created in init-script.sql"
JWT_SECRET="Your super secret JWT password"
- Now get docker container up with the command below:
docker compose --env-file .env up -d
- Check if was started correctly:
docker ps
-
Done, once the container has started, just start the Spring Boot and test the endpoints.
-
To test the endpoints enter this address in the browser
http://localhost:8080/swagger-ui/index.htmlthen will show up on the screen below:
PS: The endpoints that have a locker demand a token that is given when you login into the system.
- To test them on
swaggerfollow this, first sign up as a shelter or a tutor to log into the system, here we're gonna sign up as a shelter in the endpoint below:
-
Click on
try outto send a requisition with info that is necessary to create one, as the model shown in the endpoint. -
With the shelter created, then go to the login endpoint and do a requisition with the registered info and you'll receive a token:
- With the token in hands go to the top of screen then click on the
Authorizebutton that will show a modal with a field to fill it:
- After paste the token in the field click on the
Authorizebutton and thats it! Now you can test all the endpoints without any problems.