This is an experimental, community-maintained branch led by Fabian Tschopp (@naibaf7). It is a work-in-progress.
For error reports, please run and include the result of ./build/test/test_all.testbin --gtest_filter=*OpenCLKernelCompileTest* X where X is the OpenCL device to test (i.e. 0). This test is available after a build with make all, make runtest.
This branch of Caffe contains an OpenCL backend and additional layers for fast image segmentation. This work is partially supported by:
- AMD
- HHMI Janelia
- UZH, INI
- ETH Zurich
- Intel
For a C++ frontend and models to use for image segmentation with this fork, see:
- Frontend: https://github.com/naibaf7/caffe_neural_tool
- Models: https://github.com/naibaf7/caffe_neural_models
The backend is supposed to work with all vendors. Note however there may be problems with libOpenCL.so provided by nVidia. It is therefore recommended to install another OpenCL implementation after installing nVidia drivers. Possibilities are:
- Intel OpenCL, see https://github.com/01org/caffe/wiki/clCaffe for details.
- AMD APP SDK (OpenCL), recommended if you have an AMD GPU or CPU.
Available on arXiv: http://arxiv.org/abs/1509.03371
This is an experimental, communtity based branch led by Guillaume Dumont (@willyd). It is a work-in-progress.
This branch of Caffe ports the framework to Windows.

AppVeyor (Windows build)
Prebuilt binaries can be downloaded from the latest CI build on appveyor for the following configurations:
-
Visual Studio 2015, CPU only, Python 3.5: Caffe Release,
Caffe Debug -
Visual Studio 2015, CUDA 8.0, Python 3.5: Caffe Release
-
Visual Studio 2015, CPU only, Python 2.7: Caffe Release, Caffe Debug
-
Visual Studio 2015,CUDA 8.0, Python 2.7: Caffe Release
-
Visual Studio 2013, CPU only, Python 2.7: Caffe Release, Caffe Debug
- Python for the pycaffe interface. Anaconda Python 2.7 or 3.5 x64 (or Miniconda)
- Matlab for the matcaffe interface.
- CUDA 7.5 or 8.0 (use CUDA 8 if using Visual Studio 2015)
- cuDNN v5
We assume that cmake.exe and python.exe are on your PATH.
The fastest method to get started with caffe on Windows is by executing the following commands in a cmd prompt (we use C:\Projects as a root folder for the remainder of the instructions):
C:\Projects> git clone https://github.com/BVLC/caffe.git
C:\Projects> cd caffe
C:\Projects\caffe> git checkout windows
:: Edit any of the options inside build_win.cmd to suit your needs
C:\Projects\caffe> scripts\build_win.cmd
The build_win.cmd script will download the dependencies, create the Visual Studio project files (or the ninja build files) and build the Release configuration. By default all the required DLLs will be copied (or hard linked when possible) next to the consuming binaries. If you wish to disable this option, you can by changing the command line option -DCOPY_PREREQUISITES=0. The prebuilt libraries also provide a prependpath.bat batch script that can temporarily modify your PATH envrionment variable to make the required DLLs available.
Below is a more complete description of some of the steps involved in building caffe.
By default CMake will download and extract prebuilt dependencies for your compiler and python version. It will create a folder called libraries containing all the required dependencies inside your build folder. Alternatively you can build them yourself by following the instructions in the caffe-builder README.
To use cuDNN the easiest way is to copy the content of the cuda folder into your CUDA toolkit installation directory. For example if you installed CUDA 8.0 and downloaded cudnn-8.0-windows10-x64-v5.1.zip you should copy the content of the cuda directory to C:\Program Files\NVIDIA GPU Computing Toolkit\CUDA\v8.0. Alternatively, you can define the CUDNN_ROOT cache variable to point to where you unpacked the cuDNN files e.g. C:/Projects/caffe/cudnn-8.0-windows10-x64-v5.1/cuda. For example the command in scripts/build_win.cmd would become:
cmake -G"!CMAKE_GENERATOR!" ^
      -DBLAS=Open ^
      -DCMAKE_BUILD_TYPE:STRING=%CMAKE_CONFIG% ^
      -DBUILD_SHARED_LIBS:BOOL=%CMAKE_BUILD_SHARED_LIBS% ^
      -DBUILD_python:BOOL=%BUILD_PYTHON% ^
      -DBUILD_python_layer:BOOL=%BUILD_PYTHON_LAYER% ^
      -DBUILD_matlab:BOOL=%BUILD_MATLAB% ^
      -DCPU_ONLY:BOOL=%CPU_ONLY% ^
      -DCUDNN_ROOT=C:/Projects/caffe/cudnn-8.0-windows10-x64-v5.1/cuda ^
      -C "%cd%\libraries\caffe-builder-config.cmake" ^
      "%~dp0\.."
Alternatively, you can open cmake-gui.exe and set the variable from there and click Generate.
If CUDA is not installed Caffe will default to a CPU_ONLY build. If you have CUDA installed but want a CPU only build you may use the CMake option -DCPU_ONLY=1.
The recommended Python distribution is Anaconda or Miniconda. To successfully build the python interface you need to install the following packages:
conda install --yes numpy scipy matplotlib scikit-image pip six
also you will need a protobuf python package that is compatible with pre-built dependencies. This package can be installed this way:
conda install --yes --channel willyd protobuf==3.1.0
If Python is installed the default is to build the python interface and python layers. If you wish to disable the python layers or the python build use the CMake options -DBUILD_python_layer=0 and -DBUILD_python=0 respectively. In order to use the python interface you need to either add the C:\Projects\caffe\python folder to your python path of copy the C:\Projects\caffe\python\caffe folder to your site_packages folder.
Follow the above procedure and use -DBUILD_matlab=ON. Change your current directory in MATLAB to C:\Projects\caffe\matlab and run the following command to run the tests:
>> caffe.run_tests()
If all tests pass you can test if the classification_demo works as well. First, from C:\Projects\caffe run python scripts\download_model_binary.py models\bvlc_reference_caffenet to download the pre-trained caffemodel from the model zoo. Then change your MATLAB directory to C:\Projects\caffe\matlab\demo and run classification_demo.
You can choose to use the Ninja generator instead of Visual Studio for faster builds. To do so, change the option set WITH_NINJA=1 in the build_win.cmd script. To install Ninja you can download the executable from github or install it via conda:
> conda config --add channels conda-forge
> conda install ninja --yes
When working with ninja you don't have the Visual Studio solutions as ninja is more akin to make. An alternative is to use Visual Studio Code with the CMake extensions and C++ extensions.
CMake can be used to build a shared library instead of the default static library. To do so follow the above procedure and use -DBUILD_SHARED_LIBS=ON. Please note however, that some tests (more specifically the solver related tests) will fail since both the test exectuable and caffe library do not share static objects contained in the protobuf library.
Should you encounter any error please post the output of the above commands by redirecting the output to a file and open a topic on the caffe-users list mailing list.
The previous windows build based on Visual Studio project files is now deprecated. However, it is still available in the windows folder. Please see the README.md in there for details.
- The
GPUTimerrelated test cases always fail on Windows. This seems to be a difference between UNIX and Windows. - Shared library (DLL) build will have failing tests.
- Shared library build only works with the Ninja generator
Refer to the BVLC/caffe master branch README for all other details such as license, citation, and so on.

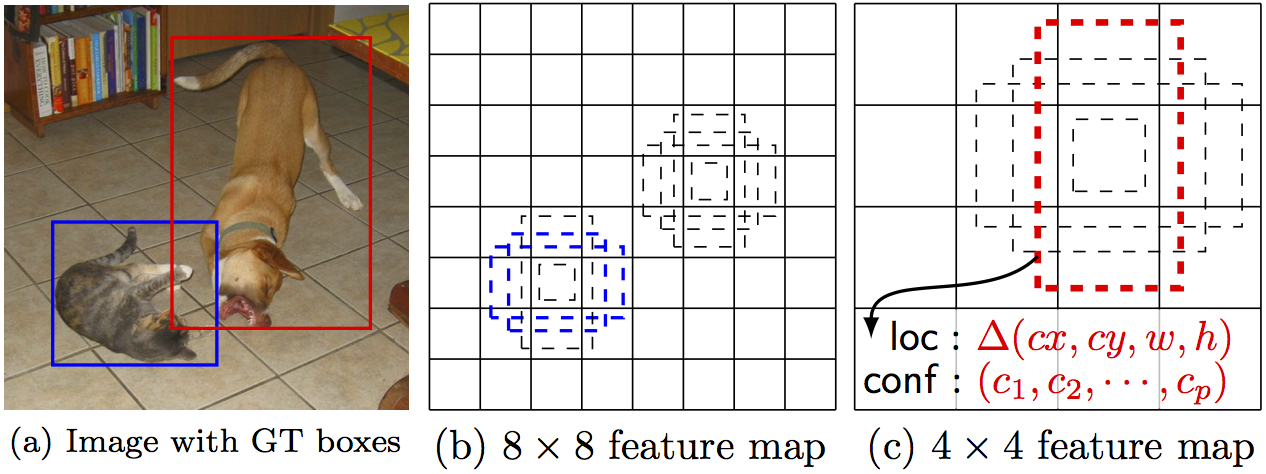
By Wei Liu, Dragomir Anguelov, Dumitru Erhan, Christian Szegedy, Scott Reed, Cheng-Yang Fu, Alexander C. Berg.
SSD is an unified framework for object detection with a single network. You can use the code to train/evaluate a network for object detection task. For more details, please refer to our arXiv paper and our slide.
| System | VOC2007 test mAP | FPS (Titan X) | Number of Boxes | Input resolution |
|---|---|---|---|---|
| Faster R-CNN (VGG16) | 73.2 | 7 | ~6000 | ~1000 x 600 |
| YOLO (customized) | 63.4 | 45 | 98 | 448 x 448 |
| SSD300* (VGG16) | 77.2 | 46 | 8732 | 300 x 300 |
| SSD512* (VGG16) | 79.8 | 19 | 24564 | 512 x 512 |

Note: SSD300* and SSD512* are the latest models. Current code should reproduce these results.
Please cite SSD in your publications if it helps your research:
@inproceedings{liu2016ssd,
  title = {{SSD}: Single Shot MultiBox Detector},
  author = {Liu, Wei and Anguelov, Dragomir and Erhan, Dumitru and Szegedy, Christian and Reed, Scott and Fu, Cheng-Yang and Berg, Alexander C.},
  booktitle = {ECCV},
  year = {2016}
}
- Get the code. We will call the directory that you cloned Caffe into
$CAFFE_ROOT
git clone https://github.com/weiliu89/caffe.git
cd caffe
git checkout ssd- Build the code. Please follow Caffe instruction to install all necessary packages and build it.
# Modify Makefile.config according to your Caffe installation.
cp Makefile.config.example Makefile.config
make -j8
# Make sure to include $CAFFE_ROOT/python to your PYTHONPATH.
make py
make test -j8
make runtest
# If you have multiple GPUs installed in your machine, make runtest might fail. If so, try following:
export CUDA_VISIBLE_DEVICES=0; make runtest-
Download fully convolutional reduced (atrous) VGGNet. By default, we assume the model is stored in
$CAFFE_ROOT/models/VGGNet/ -
Download VOC2007 and VOC2012 dataset. By default, we assume the data is stored in
$HOME/data/
# Download the data.
cd $HOME/data
wget http://host.robots.ox.ac.uk/pascal/VOC/voc2012/VOCtrainval_11-May-2012.tar
wget http://host.robots.ox.ac.uk/pascal/VOC/voc2007/VOCtrainval_06-Nov-2007.tar
wget http://host.robots.ox.ac.uk/pascal/VOC/voc2007/VOCtest_06-Nov-2007.tar
# Extract the data.
tar -xvf VOCtrainval_11-May-2012.tar
tar -xvf VOCtrainval_06-Nov-2007.tar
tar -xvf VOCtest_06-Nov-2007.tar- Create the LMDB file.
cd $CAFFE_ROOT
# Create the trainval.txt, test.txt, and test_name_size.txt in data/VOC0712/
./data/VOC0712/create_list.sh
# You can modify the parameters in create_data.sh if needed.
# It will create lmdb files for trainval and test with encoded original image:
#   - $HOME/data/VOCdevkit/VOC0712/lmdb/VOC0712_trainval_lmdb
#   - $HOME/data/VOCdevkit/VOC0712/lmdb/VOC0712_test_lmdb
# and make soft links at examples/VOC0712/
./data/VOC0712/create_data.sh- Train your model and evaluate the model on the fly.
# It will create model definition files and save snapshot models in:
#   - $CAFFE_ROOT/models/VGGNet/VOC0712/SSD_300x300/
# and job file, log file, and the python script in:
#   - $CAFFE_ROOT/jobs/VGGNet/VOC0712/SSD_300x300/
# and save temporary evaluation results in:
#   - $HOME/data/VOCdevkit/results/VOC2007/SSD_300x300/
# It should reach 77.* mAP at 120k iterations.
python examples/ssd/ssd_pascal.py
If you don't have time to train your model, you can download a pre-trained model at here.
- Evaluate the most recent snapshot.
# If you would like to test a model you trained, you can do:
python examples/ssd/score_ssd_pascal.py- Test your model using a webcam. Note: press esc to stop.
# If you would like to attach a webcam to a model you trained, you can do:
python examples/ssd/ssd_pascal_webcam.py
Here is a demo video of running a SSD500 model trained on MSCOCO dataset.
-
Check out
examples/ssd_detect.ipynborexamples/ssd/ssd_detect.cppon how to detect objects using a SSD model. Check outexamples/ssd/plot_detections.pyon how to plot detection results output by ssd_detect.cpp. -
To train on other dataset, please refer to data/OTHERDATASET for more details. We currently add support for COCO and ILSVRC2016. We recommend using
examples/ssd.ipynbto check whether the new dataset is prepared correctly.
We have provided the latest models that are trained from different datasets. To help reproduce the results in Table 6, most models contain a pretrained .caffemodel file, many .prototxt files, and python scripts.
-
PASCAL VOC models:
-
COCO models:
-
ILSVRC models:
[1]We use examples/convert_model.ipynb to extract a VOC model from a pretrained COCO model.
- Visual Studio 2015 - Choose to install visual c++ and Windows SDK during the installation.
- CMake
- ViennaCL - put it in the same directory as Caffe's source code.
- Python 2.7
Open a Windows command prompt console (cmd)
# cd caffe_source_dir
# set BUILD_PYTHON=0
# set BUILD_PYTHON_LAYER=0
# set USE_INTEL_SPATIAL=1
# scripts\build_win.cmd
If you also want to run the test suite
# set RUN_TESTS=1
Please be noted that, after building finished successfully, when you try to run the test suite or the application, it may encounter missing DLL files. If that is the case, you may have to copy those DLL to the directory of the executable file you are running now.


