abdulrcs / abdulrahman.id Goto Github PK
View Code? Open in Web Editor NEW⚡ Dynamic Portfolio Website built with Next.js, Chakra UI and Contentful!
Home Page: https://abdulrahman.id
License: MIT License
⚡ Dynamic Portfolio Website built with Next.js, Chakra UI and Contentful!
Home Page: https://abdulrahman.id
License: MIT License


Analyze whether an opinion on a specific topic is Positive / Negative / Neutral based on recent tweets! It's possible using the Natural Language Processing (NLP) concept called Sentiment Analysis that can determine if a chunk of text is positive, negative, or neutral based on its polarity.
I learned about Sentiment Analysis from my Linear Algebra professor at college and was inspired to combine those with my frontend engineering skills by creating a dynamic visualization with Chart.js.
After the API changes in Twitter, the live site no longer works, so here's a demo video I recorded back in 2021.
I designed the site first before writing any code to decide on the colors, components, etc to make sure everything is consistent.

Then, I created each React component based on the Figma I made, and added a Tweet component, that I sliced based on the real Tweet component on Twitter, to handle the Check Tweets feature.
After that, I created the API endpoint with Python to analyze the tweets, while making sure to filter retweets and links because most of them are spam.
@app.route('/api/<string:s>', methods=['GET'])
def analysis(s):
  searchTerm = str(s)
  data = {}
  auth = tweepy.OAuthHandler(consumer_key=consumerKey, consumer_secret=consumerSecret)
  auth.set_access_token(accessToken, accessTokenSecret)
  api = tweepy.API(auth)
  quantity = 25
  tweets = tweepy.Cursor(api.search, q=searchTerm+" -filter:retweets -filter:links", lang="en",tweet_mode="extended").items(quantity)

  wpositive = 0
  positive = 0
  spositive = 0
  wnegative = 0
  negative = 0
  snegative = 0
  neutral = 0
  avgPolarity = 0
  data["tweets"] = []
  data["polarity"] = {}
  for tweet in tweets:
    analysis = TextBlob(tweet.full_text)
    polarity = analysis.sentiment.polarity
    avgPolarity += polarity
    if (polarity == 0):
      neutral+=1
      data["tweets"].append([str(tweet.full_text), "Neutral"])
    elif (polarity > 0 and polarity <= 0.3):
      wpositive+=1
      data["tweets"].append([str(tweet.full_text),"Weakly Positive"])
    elif (polarity > 0.3 and polarity <= 0.6):
      positive+=1
      data["tweets"].append([str(tweet.full_text), "Positive"])
    elif (polarity > 0.6 and polarity <= 1):
      spositive+=1
      data["tweets"].append([str(tweet.full_text),"Strongly Positive"])
    elif (polarity > -0.3 and polarity <= 0):
      wnegative+=1
      data["tweets"].append([str(tweet.full_text), "Weakly Negative"])
    elif (polarity > -0.6 and polarity <= -0.3):
      negative+=1
      data["tweets"].append([str(tweet.full_text), "Negative"])
    elif (polarity > -1 and polarity <= -0.6):
      snegative+=1
      data["tweets"].append([str(tweet.full_text), "Strongly Negative"])

  data["polarity"]["spositive"] = spositive
  data["polarity"]["positive"] = positive
  data["polarity"]["wpositive"] = wpositive
  data["polarity"]["snegative"] = snegative
  data["polarity"]["negative"] = negative
  data["polarity"]["wnegative"] = wnegative
  data["polarity"]["neutral"] = neutral

return jsonify(data)Building Opiniometer was a lot of fun, it started from seeing a research project from my professor to making it live on a real site, this made me realize you can get an idea from anywhere, and implement it yourself while also adding your unique skill and personality into it!
In this article, I will explain in detail how I (finally) made changes to an Open-source project and my thought process behind it.
I was interested in competitive programming at the time and looking to practice some coding problems. There's this site called A2 Online Judge (A2OJ) that have a ladder of problem that we can follow based on difficulty and Codeforces Rating, It also has a feature that tracks the problem that we solved, but after some time of using it, the site is permanently shutdown.
As any programmers, my first instinct was to build it myself.., but I choose to not reinvent the wheel this time and lookup if anyone has made this yet.
Fortunately, I found a web app on Github that clones the original site. And many people already used it (It has 81 stars! 😲). Still, it doesn't have the ladder of problems based on the Codeforces Rating that I've enjoyed using before.
Since it doesn't have those feature I wanted, I start by creating a new issue on Github.
After some time thinking, I think it's better to contribute since many people already use that, and I think it will be helpful to other people as well.
Since I will add new data, I can just use existing code and figure those out, so I search where the problem list is located in the code and where the data is called in the front-end.
// ladder.py
div_a = [
    [1, 'Watermelon', '4', 'A'] ,
    [2, 'Way Too Long Words', '71', 'A'] ,
    [3, 'String Task', '118', 'A'] ,
    [4, 'Petya and Strings', '112', 'A'] ,
	....
I found out it's stored in an array like this, so I have to collect the data from the problem archive and just copy-paste it! Simple enough, right? 😅
There are 11 ladders, and every ladder has 100 problems. In total there's about 1100 Problem sets, so there's no way I'm going to do it manually... Luckily there's just the solution!
So I learned how to do web scraping with a Node.js library called Cheerio in a quick youtube tutorial, it turns out to be straightforward, this code fetch the A2OJ archive and format it just like the array in the repo that I've looked before.
const axios = require("axios")
const cheerio = require("cheerio")

// Fetch html function
async function fetchHTML(url) {
  const { data } = await axios.get(url)
  return cheerio.load(data)
}

(async () => {
const $ = await fetchHTML("https://a2oj.com/Ladder11.html")

let div = [];

// Get title to array
$('a').each(function (i,elem) {
  let title = $(this).text()
  let url = $(this).attr('href')
  let splitted = url.substr(41).split("/")
  div.push([i+1,title,splitted[0],splitted[1]]);
});

console.log(div);

})();
Perfect!, the array is formatted just like in the codebase. Now I can just add those array into the code.
I go back to the code that saves all the problems and follow the naming pattern of the variable, it was named div_a, div_b ..etc., so I called every ladder to be rating_1, rating_2 ..etc.
rating_1 = [
  [ 1, 'Young Physicist', '69', 'A' ],
  [ 2, 'Beautiful Matrix', '263', 'A' ],
  [ 3, 'Queue at the School', '266', 'B' ],
  [ 4, 'Borze', '32', 'B' ],
  [ 5, 'Beautiful Year', '271', 'A' ],
	..
	..
rating_11 = ..I imitate the code styling and do as minimum changes as I can.
	try:
		handle = request.GET['handle']
		div = request.GET['div']
+		rating = request.GET['rating']
...
	div = int(div)
+	rating = int(rating)
...
	elif div == 7:
		division = div_a
		div_head = "DIV 1.E"
	...
+	elif rating == 1:
+		division = rating_1
+		div_head = "Codeforces Rating < 1300"
...
And it turns out to be working!
So I pushed the code and created a pull request.
I was sooo satisfied after it's done and finally hitting the pull request button.
We don't have to understand the entire codebase. Just focus on the changes you're gonna make and the connection between those. After we broke it into these tiny pieces, it's gonna be so much easier.
We just have to imitate the existing code and extend it from there. This way, we can make minimum changes to the code and do it effectively.
We don't necessarily know what library/frameworks the codebase is using. We can learn it along the way.
This contribution really 'exposes' me to the world of Open-source and how awesome it is to make changes to a public project that many people use.
Yay! you made it this far! I hope this post can spark your interest and encourage you to dive into the world of open-source!
Hi, thanks for taking a look at my issue!
I'm fairly new to next.js, so I'm awful at debugging errors. Heres my error:
event - compiled successfully
event - build page: /
wait  - compiling...
event - compiled successfully
{
  sys: { type: 'Error', id: 'InvalidQuery' },
  message: 'The query you sent was invalid. Probably a filter or ordering specification is not applicable to the type of a field.',
  details: { errors: [ [Object] ] },
  requestId: '929ea726-ef17-4ddb-9b92-f0b2da654413'
}
Any help is appreciated, and feel free to ask any questions (like my OS, though it didnt work on github codespaces, vercel, or locally.)
Vim is a text editor that runs in the Terminal on systems like Linux. You can use Vim with the command vim (filename) in Linux, or you can also use WSL in the Windows Terminal. But in this article, we will discuss Vim as a shortcut rather than as a text editor as a whole, because we can also use Vim shortcuts in Visual Studio Code. We will learn the basics of Vim shortcuts and how you as a programmer can navigate through code and become faster and more productive.
Reasons why people use Vim:
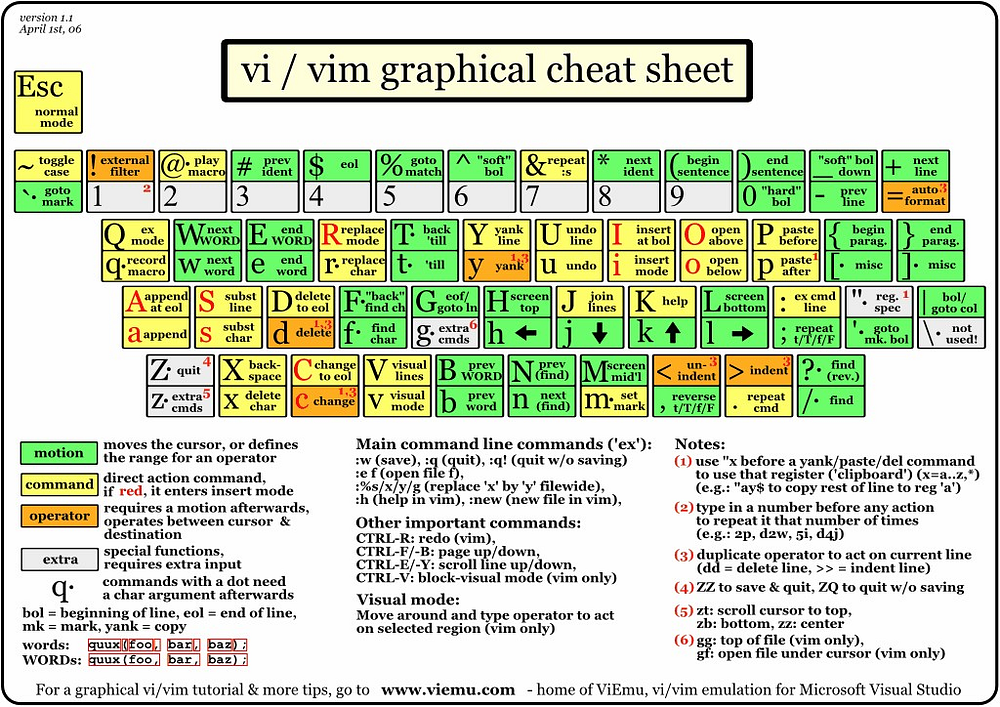
The above image is a summary of the shortcuts available in Vim, it looks like a lot, but one of the cool things about Vim is that you can start thinking inside Vim.
Vim is set up to function like a language, consisting of verbs, adjectives, and nouns.
For example, we can change the contents of an HTML tag by "changing inside tag" or c i t.

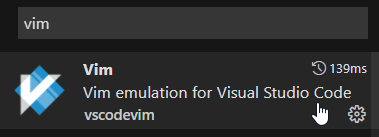
One of the reasons people don't use Vim is because they don't get the features in VScode. We can get the benefits of VSCode & Vim Shortcuts with the Vim extension in Visual Studio Code.
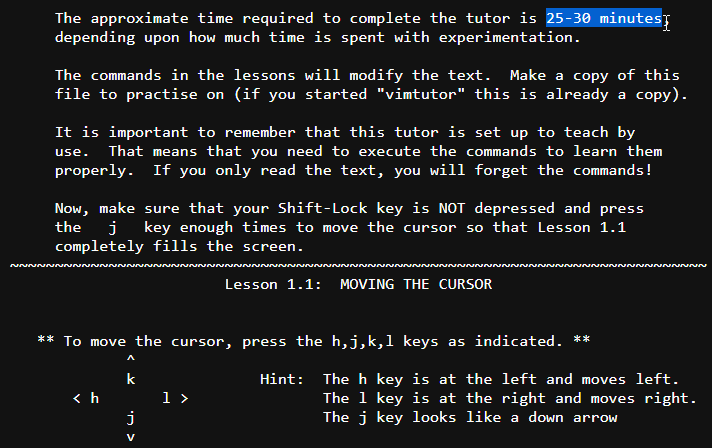
To learn Vim shortcuts, we can use vimtutor. If we use Linux we can use the vimtutor command to open it. Or we can just copy the text from here and open it in Visual Studio Code.
Above is the image of the contents of vimtutor, it's just a text file that contains the basics of Vim shortcuts, we can navigate through this vimtutor file until the end in about 25-30 minutes.
It takes a little practice to feel confident in using Vim shortcuts, but later on, you will be able to code faster and more accurately than before, go and try it!
creative@home is a website that provides a free learning roadmap during the pandemic for 6 different specialized fields in tech, including:
As a self-taught programmer, I know there are tons of free resources for learning tech. However, not everyone stumbles upon this goldmine. A lot of people get scared off by the high cost of those fancy coding bootcamps.

Plus, with everyone stuck at home during the pandemic, it felt like the perfect time to help people use that extra time for something cool like picking up a new programming skill that can change someone's future!
We used HTML, Javascript, and Sass to add another layer of efficiency to the styling process by enabling features like variables and mixins.
The main Javascript library we're using here is the Slide.js library to achieve a smooth presentation-like scrolling effect.
It grabs the attention right from the start with its typewriter effect animation that sets the tone for the interactive experience, the wording itself also plays a powerful role by asking "What if you could become a Software Engineer, Web Developer, Mobile Developer, etc" that aims to motivate the user to learn more about the free learning resources inside.

One of the standout features of creative@home is the optional voice narration. This accessibility feature provides the users who prefer learning by listening or just find it helpful to follow along with the audio.

To activate the voice narration, users can click on a charming SVG illustration of a person wearing headphones (I was so proud of this because I transformed the SVG file myself :D)
The homepage has an organized menu, that shows the different programming paths. It has 6 specialized fields. Each section of the menu has interesting visuals to complement the cards, we customized the SVG illustrations here by combining different SVGS into one.

The 6 different topics are :


First up, this site has a whooping 50 pages in total.

Designing the entire content from scratch on Figma was a challenge, we made sure everything looked sharp and worked smoothly together. Those SVG Illustrations are also key in this website, without them, the site wouldn't have the personality it has, so we customized every single one of those by combining different SVG resources while also making sure the art style is consistent.
Sticking with HTML and no fancy JavaScript frameworks was another challenge. We have no way of making a component for the pages even though the structure is the same. We finalized everything in Figma first so we don't have to deal with different HTML structures between pages.
Because it's very design-heavy, I learned a lot about design principles here, most of the work done in this project is done within Figma.
I learned how colors interact with each other by applying Color Theory, this Color Calculator helped me a lot to achieve harmony between the color and illustrations.
Another thing I learned is the process of manipulating SVGS, using the available resources online, by combining and customizing them into something new without breaking the overall vibe.
A code snippet is basically a small portion of a highly reusable code, so if you have a repeating code around your codebase like library imports, or a boilerplate in your app that you find yourself typing over and over again, that's where code snippets comes in 😉
Cool, so to get started with code snippets, you can do it without any setup at all, you can just download an extension that fits your liking.
For example, one of the popular ones is React Snippets, after you get the extension you can have a list of snippets in your React project!
But it doesn't stop there, to maximize your productivity, you can create a custom code snippet in your project!
Let's say you have some thing very specific in your project that you repeat over and over again,
In my case, inside my React Native project all my screens have this design.
So, I have to repeat this code everytime I create a new screen.
import React from 'react'
import PageContainer from 'components/PageContainer'
import NavHeader from 'components/NavHeader'

import { Text } from 'native-base'

export default function Homepage() {
  return (
    <PageContainer header={<NavHeader title="Homepage" />}>
      <Text>Hello World</Text>
    </PageContainer>
  )
}
We can create a custom snippet for that!
Creating a custom code snippet is very easy, you can go to https://snippet-generator.app/, give the description, tab trigger, and your code!
One thing to note here is I used ${1:${TM_FILENAME_BASE}}, which returns the current file name! It's one of the most common snippets variable in VSCode.
You can do CTRL + SHIFT + P and search for User Snippet, then choose Preferences: Configure User Snippets.
Then, you'll see an options to where your code snippets lives on, you can choose whether your code snippet lives globally, project only, or language specific.
In this case we'll choose New Snippets file for 'my-project', give the snippet a name, and copy the snippet from the snippets generator inside the object.
{
  "common page": {
    "prefix": "rfpage",
    "body": [
      "import React from 'react'",
      "import PageContainer from 'components/PageContainer'",
      "import NavHeader from 'components/NavHeader'",
      "",
      "import { Text } from 'native-base'",
      "",
      "export default function ${1:${TM_FILENAME_BASE}} () {",
      "",
      "  return (",
      "  <PageContainer header={<NavHeader title=\"${1:${TM_FILENAME_BASE}}\"/>}>",
      "    <Text>Hello World</Text>",
      "  </PageContainer>",
      "  )",
      "}"
    ],
    "description": "common page"
  }
}
That's it,
Now you can use it throughout your project!
In this article, I'm going to show you how to leverage Github Issues as a CMS, and integrate it into your Next.js blog 🚀

I recently migrated my open-source portfolio website from using Contentful API as a CMS (Content Management System) to GitHub Issues instead.
Here's the detailed PR I made in my portfolio repo to migrate Contentful API to use GitHub Issues if you're interested: abdulrcs/abdulrahman.id#17
I'm inspired by the blog from swyx.io that uses GitHub issues and comments, as mentioned here.
The friction of writing a GitHub issue is less daunting than using a fully-fledged CMS like Contentful because you have to log in to their page, navigate to the content section, host the images yourself, etc.
This will (hopefully) lead to more writings in the future 🤞
We can use a GitHub API wrapper using renatorib/github-blog to fetch our GitHub Issues.
Note: GitHub API is limited to 5000 requests/hour, so we need to statically render the blogs using
getStaticPropsandgetStaticPathsto make it scalable, more on that later.
First, generate the GitHub token here.
After that, create new labels in your issue named type:post, state:published, and state:draft.

Then, we can create a GitHub issue for our blog post!
Don't forget to add a front matter in the issue to create a slug for our post URL like this:
---
slug: your-slug-title
---
Install @rena.to/github-blog in your Next.js project.
yarn add @rena.to/github-blogHere's an example of how to fetch a list of posts statically using getStaticProps:
export async function getStaticProps() {
  const blog = new GithubBlog({
    repo: 'your-github-username/your-repo',
    token: process.env.GITHUB_TOKEN,
  })
  const posts = await blog.getPosts({
    query: {
      author: 'your-github-username',
      type: 'post',
      state: 'published',
    },
    pager: { limit: 10, offset: 0 },
  })

  return {
    props: {
      posts: posts.edges,
    },
  }
}In the /blog/[slug] page, you can query the exact post by using the slug:
export async function getStaticProps({ params }) {
  const blog = new GithubBlog({
    repo: 'your-github-username/your-repo',
    token: process.env.GITHUB_TOKEN,
  })
  const data = await blog.getPost({
    query: {
      author: 'your-github-username',
      search: params.slug,
    },
  })
  const metadata = data.post
  const source = metadata.body

  return {
    props: {
      metadata,
      source,
    },
    revalidate: 30,
  }
}We need to statically generate our post URL links by fetching all the posts, and mapping each unique slug inside getStaticPaths:
export async function getStaticPaths() {
  const blog = new GithubBlog({
    repo: 'your-github-username/your-repo',
    token: process.env.GITHUB_TOKEN,
  })

  const data = await blog.getPosts({
    query: {
      author: 'your-github-username',
      type: 'post',
      state: 'published',
    },
    pager: { limit: 10, offset: 0 },
  })

  return {
    paths: data.edges.map(({ post }) => ({
      params: { slug: post.frontmatter.slug },
    })),
    fallback: false,
  }
}We can use utteranc.es, a lightweight comment widget built on GitHub Issues to integrate authed comments in our blog.

This is brilliant because in a Developer Blog of course there's a big chance that our audience has a GitHub profile 😆
Since we already integrated the GitHub Issues as our blog, we can add comments to our blog by adding this script to our page:
<script src="https://utteranc.es/client.js"
        repo="[ENTER REPO HERE]"
        issue-term="title"
        theme="github-dark"
        crossorigin="anonymous"
        async>
</script>
I hope that integrating GitHub issues as the source of your posts will empower you to write more consistently and publish faster 🥳
When I was doing an internship at Qneksi (A referral-based recruitment company), I was given the responsibility to lead the development of the company's blog to maximize the exposure of the company, I also worked closely with and guided the marketing team to use Contentful CMS.
The primary goal of this project was to maximize Qneksi's online exposure and attract potential candidates and clients through relevant information. To achieve this, the blog needed to be:
We built the Qneksi blog with Next.js for speed and SEO, using Contentful for easy content management by the marketing team. We threw in next-seo to help with search engines finding the blog, and next-sitemap to create a map for them to crawl everything. Google Analytics keeps track of who's visiting.
next-sitemap to generate the site's sitemap so Google can efficiently crawl and index the blog's pages, ultimately contributing to improved SEO.next/localeIt was my first time doing SEO best practices, also working cross-team with the marketing team was a new experience for me at the time.
I learned how to do SEO best practices for making articles, handling markdown in Next.js, implementing analytics, and internalization.
It also marked a significant milestone in my development journey, for the first time, I led a whole project into production, and I was given the freedom to choose the tech stack and ultimately deliver a functional and valuable tool for the marketing team.
I faced the following error when deploying the project to Vercel:
Error occurred prerendering page "/blog/locus-of-control". Read more: https://nextjs.org/docs/messages/prerender-error
--
22:59:28.486 | FetchError: request to http://localhost:3000/api/views/locus-of-control failed, reason: connect ECONNREFUSED 127.0.0.1:3000
22:59:28.486 | at ClientRequest.<anonymous> (/vercel/path0/node_modules/node-fetch/lib/index.js:1461:11)
22:59:28.486 | at ClientRequest.emit (node:events:520:28)
22:59:28.486 | at Socket.socketErrorListener (node:_http_client:442:9)
22:59:28.487 | at Socket.emit (node:events:520:28)
22:59:28.487 | at emitErrorNT (node:internal/streams/destroy:157:8)
22:59:28.487 | at emitErrorCloseNT (node:internal/streams/destroy:122:3)
I identified that the problem stems from /blogs/slugs.js:
const views = await fetch(
    `${process.env.NEXT_PUBLIC_BASE_URL}/api/views/${params.slug}`,
  )
    .then((res) => res.json())
    .then((json) => json.views)

  return {
    props: {
      metadata: article,
      source: mdxSource,
      views: views,
    },
    revalidate: 30,
  }
Only by temporarily disabling the fetch call would I be able to deploy it successfully. Did some Googling and found the following posts:
Any idea on how to solve this?
This post was written on 24 November 2019 when I was learning Harvard's CS50 2019 - Introduction to Computer Science.
In week 5 of the course, I was assigned to create a homepage that tells about myself.
I've been close to a computer since an early age, it's about the first year of elementary school that I have a computer in my house. I was mesmerized by the technology back then. and in about 3rd grade, the internet is becoming more accessible. I've been surfing the internet ever since. I grew up with the computer.
Some people noticed this admiration of mine for computers, and a decent amount of people said "If you liked computers so much you should be a programmer!" A programmer? I didn't know what programmers do back then but I knew it had to do something with computers, so being a programmer has always been my dream, here's a photo of my yearbook from elementary school, I write "Programmer" in the What do you want to be when you grow up? section.

I liked to find out how to make things. I googled how to make VFX / visual effects, my favorite was "freddiew" (Freddie Wong) and Corridor Digital (Which is still big now), I learned about Windows Movie Maker and eventually Adobe After Effects. I made some short videos with my friends back in elementary school and put some action visual effects with a pistol we'd made from paper. They seem to like it, so making short videos is our favorite thing to do.

A photo of me with my friends back in elementary school (probably in 2011?) before we went out to shoot some short videos.
Besides that, I also googled how to make a video game and found software called RPG Maker VX, an engine to make RPG games easily, but I didn't manage to finish the actual game.

I thought everything I did at this point was programming, I was still intimidated to find out what it's really about since I heard it's challenging and involved math.

Minecraft was the best game ever created, Minecraft gives you the ability to find the creativity in yourself that you didn't even know you had. you can do anything and build anything you want there, once you find a good server to play at, you'll get addicted and play for hours.
I started playing Minecraft around 5th grade ~ 8th grade, and there's this thing called Redstone, which is like an electricity circuit system on the game, I was really into it. you can build traps, hidden doors, and automate stuff, it's basically like simplified programming in the game.

What I love the most about the game is when I'm doing a project, I always think about it all day and have a curious mind to solve the problem that my project had, like how the redstone contraption doesn't work properly, how to implement a redstone contraption in the building without making the whole thing looks asymmetrical. and ever so often I dreamed of doing the project and usually found the solution first thing in the morning. I'm not the only one that experienced this, most of my friends also experience this as well. It explains how thought-provoking the game was.
Another thing that I found interesting in Minecraft servers is the plugins. Which is an addition to the Minecraft system itself that the original Minecraft doesn't have.
However, a server with lots of plugins is very vulnerable, and one of my favorite things to do in Minecraft is to find those bugs and use them to become the number one player on the servers, it's like cheating, I know, but I was young back then 😅

One of my friends found out about this and suggested an idea to build a server together since he thought I knew how server plugins worked, The truth is I only found those bugs from playing the game a lot, but I always wanted to have my own Minecraft server, so I said yes to my friend, then he rents a cheap VPS for the server to run, and I manage the server plugins for the first time.
I thought to myself back then "Is this what coding is about?" because it's not so bad, you download some files, put them to the plugins folder via the FTP, and customize some things in a .json file. Here's an actual screenshot of what it looks like:

I spent a lot of time customizing the .json file of dozens of plugins and tried to make the best Minecraft server ever, spoiler alert we didn't release it because I spent too much time tweaking the server instead of launching it (I later found out this is a common programmer's trait 🤣), but on the positive side, I became more confident in the world of code because I enjoyed spending time on it. Also, the interface has fancy colorful text and a black background color that most of the programming IDE looks like.

I found out about CS50 randomly, I found out about it from the podcast I listen to when I'm commuting. It's like some unknown force is telling me to learn programming that I always wanted for years.
It's an Introduction to Computer Science class that everyone can take for free online. It's taught by David Malan who is the coolest teacher ever, I have so much respect for the guy, he really loves what he does. He has so many great analogies to explain a certain subject. My personal favorite is when he rips out a whole phonebook to explain Binary Search 🤣

CS50 has assigned a problem set for you to finish every week which is good for me to have a certain goal every week, one of the problems was to create that iconic Mario stairs with a bunch of "#" using C language and you're supposed to do it in a for loop.

I love how they added some "pop culture" into their problems, we're just learning for loops, but involving the good ol' Mario here? sign me up!
It was challenging, and I didn't solve it right away. I was thinking about how to solve it all day and eventually find the solution first thing in the mornin- wait, it's that good feeling again when I was doing a Minecraft project years ago.
I finally found out what programming was about, and decided to learn how to code!
Hey Abdulrahman
i have tried to run this project and i am not quite familiar with firebase could you please share a screenshot of the view you have created or a bit clearer instructions like the contentful ones.
i have also seen some random errors the site never loads e.g
              { sys: { type: 'Error', id: 'AccessTokenInvalid' },
                message:
                 'The access token you sent could not be found or is invalid.',
                requestId: '6adbb8ef-1637-4e3b-8235-64d9a92aaf44' }
              Warning: Invalid DOM property `crossorigin`. Did you mean `crossOrigin`?
                  at link
                  at html
                  at Html (webpack-internal:///./node_modules/next/dist/pages/_document.js:158:29)
                  at MyDocument (webpack-internal:///./pages/_document.js:12:1)
              Warning: Invalid event handler property `onload`. React events use the camelCase naming convention, for example `onClick`.
                  at link
                  at html
                  at Html (webpack-internal:///./node_modules/next/dist/pages/_document.js:158:29)
                  at MyDocument (webpack-internal:///./pages/_document.js:12:1)
              { sys: { type: 'Error', id: 'AccessTokenInvalid' },
                message:
i have put the right values in the .env.local file
It's an easy-to-use API to get today's (and tomorrow!) prayer time for your next project! (based on Muslim Pro)
This API was actually written because of my personal use case, it was holiday season at the time and I wanted to maximize those online gaming sessions with my friends, we all know online games (like Valorant) can't be paused mid-match, so I built an API for my personal Discord bot to know how much session we can play before the next prayer time.
But I published the API for general use cases for many people by providing a smooth way to integrate prayer times into their projects 🎉
Written in Python using Flask, Beautiful Soup, and duckduckgo_search.
{
  "city": "Mecca",
  "date": "25 March 2021",
  "today": {
    "Fajr": "05:04",
    "Sunrise": "06:20",
    "Dhuhr": "12:27",
    "Asr": "15:52",
    "Maghrib": "18:34",
    "Isha'a": "20:04"
  },
  "tomorrow": {
    "Date": "Fri 26 Mar",
    "Fajr": "05:03",
    "Sunrise": "06:19",
    "Dhuhr": "12:27",
    "Asr": "15:52",
    "Maghrib": "18:34",
    "Isha'a": "20:04"
  }
}There's a lot of complexities when you're doing web scraping.
My initial approach involved querying the Muslim Pro website directly for prayer times in various cities. However, this is ineffective because the URLs of the prayer time from each city are different and may involve the language of that city in the URL.
To address that issue, I had an idea of using a search engine, I can get the most relevant site by querying (city) prayer time site:muslimpro.com I can safely query any city in the world while making sure it's a valid Muslim Pro URL that way.
Then, the most inevitable problem of web scraping is the changes in the source website, Muslim Pro site has several HTML structure revisions, and I have to adjust and even rewrite the code at times.
This project turned out to be a win-win, because not only did I get to hone my coding skills by learning web scraping with Python, but I also created something that can be useful for others, the numerous thank-you notes to my email regarding this project were truly heartwarming.
It was the first time something I coded actually got used by other people, I still remember the first email I got and it really made my day :')
A declarative, efficient, and flexible JavaScript library for building user interfaces.
🖖 Vue.js is a progressive, incrementally-adoptable JavaScript framework for building UI on the web.
TypeScript is a superset of JavaScript that compiles to clean JavaScript output.
An Open Source Machine Learning Framework for Everyone
The Web framework for perfectionists with deadlines.
A PHP framework for web artisans
Bring data to life with SVG, Canvas and HTML. 📊📈🎉
JavaScript (JS) is a lightweight interpreted programming language with first-class functions.
Some thing interesting about web. New door for the world.
A server is a program made to process requests and deliver data to clients.
Machine learning is a way of modeling and interpreting data that allows a piece of software to respond intelligently.
Some thing interesting about visualization, use data art
Some thing interesting about game, make everyone happy.
We are working to build community through open source technology. NB: members must have two-factor auth.
Open source projects and samples from Microsoft.
Google ❤️ Open Source for everyone.
Alibaba Open Source for everyone
Data-Driven Documents codes.
China tencent open source team.