Setup AWS Cognito User and Identity Pools with an Azure AD identity provider to perform single sign-on (SSO) authentication in mobile app (Part 2).
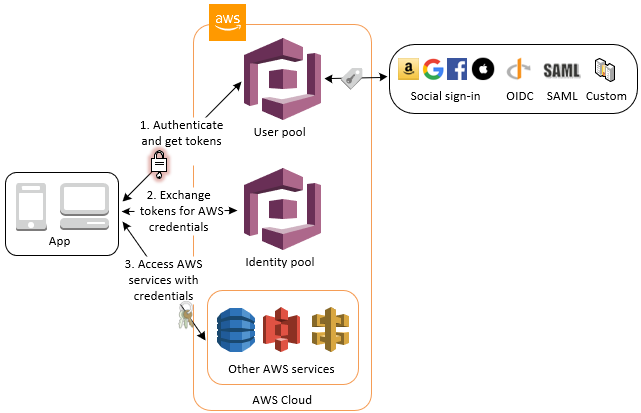
This is the second part of the tutorial of how to setup AWS Cognito User and Identity Pools with an Azure AD identity provider to perform SSO authentication. It aims to setup your iOS Project. First of all the user sign-in with a user pool. After success sign-in user will have an access to the AWS Services (for example S3) using an identity pool. The complete flow described on the diagram:
Please refer to the first part of the tutorial for more information and if you haven’t set up your Azure AD application or AWS Cognito User and Identity Pools.
Assuming you have done all the setup in AWS and Azure, so now you should have all required information:
- Amazon Cognito User Pool ID;
- Amazon Cognito Domain associated with User Pool;
- App client ID;
- App client secret;
- Callback URL;
- Sign Out URL;
- List of Allowed OAuth Scopes;
- Region.
And of course, the user credentials to test your solution.
- Add AWS frameworks to your project (existing or new).
- Add corresponding AWS keys to your project.
- Configure the Custom URL Scheme.
- Make corresponding changed in your source code.
AWS provides an SDK for work with Amazon Cognito Auth. It simplifies performing base operations like sign-up, sign-in get identity information within your app. You have the few ways how you can import Amazon Cognito Auth SDK to your app (more information on AWS Github page):
You should choose the option which is the best fit for your project needs. In this tutorial I will describe how to do it with CocoaPods:
- Install CocoaPods (if it not installed yet). Open terminal and type next:
$ gem install cocoapods $ pod setup - Go to your project directory (directory which contains *.xcodeproj file). In the Terminal and type next:
$ cd pathToYourDirectory
- Create Podfile (plain text file named Podfile without any file extension). In the Terminal type:
$ touch Podfile
- New Podfile should be created. Add the 3 frameworks to your Podfile:
    pod 'AWSCognitoAuth'
    pod 'AWSUserPoolsSignIn'
Your Podfile now should look like:
target 'YOUR_TARGET_NAME' do
use_frameworks!

pod 'AWSCognitoAuth'
pod 'AWSUserPoolsSignIn'

end
- Install frameworks by running the command:
$ pod install
Open up *.xcworkspace with Xcode and start setup corresponding AWS keys in your project.
In order for Amazon to verify your app client id, connect to the correct User and Identity Pools, redirect after sign-in and sign-out operations you need to setup corresponding keys to the Xcode project. You can do it in Info.plist file, or with code.
In this tutorial described the first option:
- Locate Info.plist file and
Open As->Source Code - To setup AWS keys in Info.plist file, locate your
Info.plist. Add this dictionary to your plist file:
    <key>AWS</key>
    <dict>
    <key>CognitoUserPool</key>
    <dict>
    <key>Default</key>
    <dict>
    <key>CognitoAuthScopes</key>
    <array>
    <string>_SETME_</string>
    </array>
    <key>CognitoAuthSignInRedirectUri</key>
    <string>_SETME_</string>
    <key>CognitoAuthSignOutRedirectUri</key>
    <string>_SETME_</string>
    <key>CognitoAuthWebDomain</key>
    <string>_SETME_</string>
    <key>CognitoUserPoolAppClientId</key>
    <string>_SETME_</string>
    <key>CognitoUserPoolAppClientSecret</key>
    <string>_SETME_</string>
    <key>CognitoUserPoolId</key>
    <string>_SETME_</string>
    <key>Region</key>
    <string>_SETME_</string>
    </dict>
    </dict>
    <key>CredentialsProvider</key>
    <dict>
    <key>CognitoIdentity</key>
    <dict>
    <key>Default</key>
    <dict>
    <key>PoolId</key>
    <string>_SETME_</string>
    <key>Region</key>
    <string>_SETME_</string>
    </dict>
    </dict>
    </dict>
    <key>IdentityManager</key>
    <dict>
    <key>Default</key>
    <dict/>
    </dict>
    </dict>
Now your Info.plist file should contain AWS dictionary like on the image below:

Fill the corresponding keys by replacing SETME with keys which you’ve prepared at the first part of the tutorial. To be sure that you set the correct keys to check the description for each key:
-
CognitoAuthScopes- this is an array of the Allowed OAuth Scopes. For the purpose of this tutorial we are using: aws.cognito.signin.user.admin, openid, email. -
CognitoAuthSignInRedirectUri- the URL which will be called after your app performs signIn operation. For the iOS project, this is custom your app custom URL Scheme likeiosappscheme://(see the Defining a Custom URL Scheme for Your App ). -
CognitoAuthSignOutRedirectUri- the URL which will be called after your app performs sign-out operation. You can use the same custom scheme as forCognitoAuthSignInRedirectUrior define another scheme. Make sure thatCognitoAuthSignInRedirectUriandCognitoAuthSignOutRedirectUriwhich you set in the app match with corresponding values for your app client (in AWS User Pool app client settings). -
AWSCognitoWebDomain- Amazon Cognito hosted domain for the address of your sign-up and sign-in webpages. You can also use own web address as a custom domain. See the tutorial how to set Amazon Cognito hosted domain. An example ofAWSCognitoWebDomainvalue: https://ios-app-tutorial.auth.us-east-1.amazoncognito.com -
CognitoUserPoolAppClientIdandCognitoUserPoolAppClientSecret- your app client id and secret. See the tutorial how to setup it. -
CognitoUserPoolId- id of your Cognito User Pool. See the tutorial how to setup it. -
PoolId- id of your Cognito Identity Pool. See the tutorial how to setup it.
After all your Info.plist file should looks similar to this:

After setup your Info.plist you need to add corresponding URL Schemes to your application (the URL which was set for CognitoAuthSignInRedirectUri and CognitoAuthSignOutRedirectUri). Because in the tutorial same scheme was set for both SignICognitoAuthSignInRedirectUrinRedirectUri and CognitoAuthSignOutRedirectUri we need to set up in Xcode project only one custom URL scheme. If you’ve set up different Callback URL for sign in and sign out - you need to add both.
To register your scheme open Info Tab of your target settings. Update the URL Types section to declare all of the URL schemes for CognitoAuthSignInRedirectUri and CognitoAuthSignOutRedirectUri. In this tutorial both CognitoAuthSignInRedirectUri and CognitoAuthSignOutRedirectUri set to iosappscheme://. Here how which scheme looks in the Xcode settings:

To enable AWSCognitoAuth handle session information when it redirects to your app, you need to change the openURL method:
func application(_ app: UIApplication, open url: URL, options: [UIApplication.OpenURLOptionsKey : Any] = [:]) -> Bool {
 return AWSCognitoAuth.default().application(app, open: url, options:options )
}
AWSCognitoAuth need a UIViewController to present the login UI over it. It may be the UIViewController from which you are calling the getSession. If you separate your UIViewController from AWSCognitoAuth and not invoke getSession explicitly - you need to pass your view controller there.
let cognitoAuth = AWSCognitoAuth.default()
cognitoAuth.delegate = self
cognitoAuth.getSession { (session: AWSCognitoAuthUserSession?, error: Error?) in
}
And handle AWSCognitoAuthDelegate method:
func getViewController() -> UIViewController {
    return self
}
let identityPool = AWSCognitoIdentityUserPool.default()
if  let user = identityPool.currentUser() {
    user.getDetails().continueWith { (taskResponse) -> Any? in
	    let userAttributes = taskResponse.result?.userAttributes
	    print("userAttributes \(userAttributes)")
	    return  nil
    }
}
cognitoAuth.signOut { (error:Error?) in
}
You can check the demo project, replace SETME values in Info.plist file with own to make it work.
- https://github.com/awslabs/aws-sdk-ios-samples/tree/master/CognitoAuth-Sample
- https://docs.aws.amazon.com/cognito/latest/developerguide/getting-started-with-identity-pools.html
- https://aws.amazon.com/blogs/mobile/amazon-cognito-user-pools-supports-federation-with-saml
- https://docs.aws.amazon.com/cognito/latest/developerguide/cognito-user-pools-saml-idp.html
- https://docs.microsoft.com/en-us/azure/active-directory/saas-apps/amazon-web-service-tutorial
- https://docs.microsoft.com/en-us/azure/active-directory/active-directory-enterprise-apps-manage-sso
- https://go.microsoft.com/fwLink/?LinkID=717349#configuring-and-testing-azure-ad-single-sign-on
- https://github.com/awslabs/aws-sdk-android-samples/tree/master/AmazonCognitoYourUserPoolsDemo
Kseniia Zozulia
Email: [email protected]
LinkedIn: Kseniia Zozulia


