串口作为单片机开发的一个常用的外设,应用范围非常广。大部分时候,串口需要接收处理的数据长度是不定的。那么怎么才能判断一帧数据是否结束呢,今天就以STM32单片机为例,介绍几种接收不定长数据的方法。
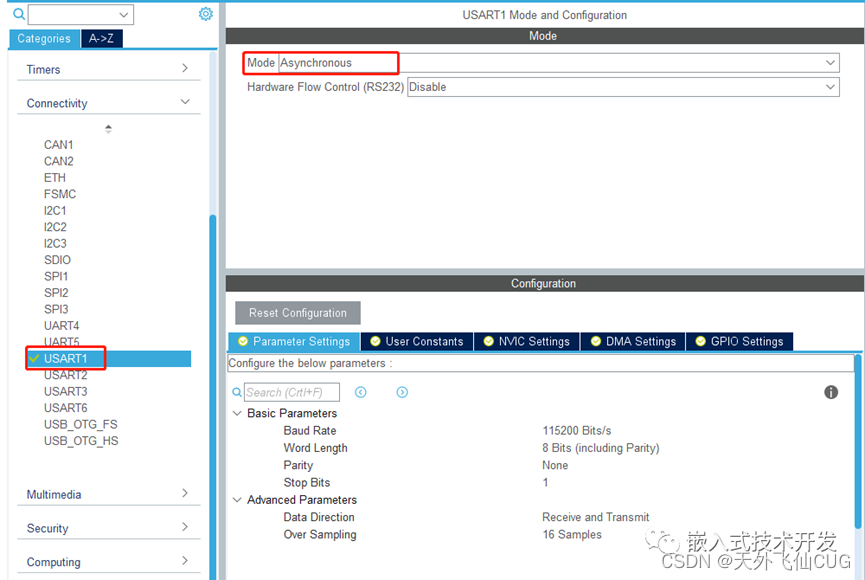
首先,我们需要打开一个串口,使用STM32CubeMx来配置,如下:
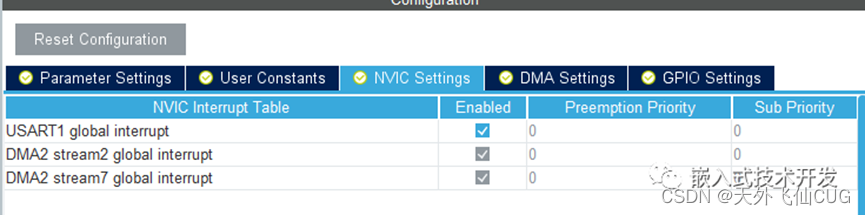
然后打开串口中断、添加发送和接收的DMA,DMA参数设置为默认即可,如下图。(DMA可根据自身需求选择是否打开)


配置一下时钟等,点击生成代码,这样就可以使用串口了。首先我们定义一个串口接收的结构体,并定义一个结构体变量,如下:
#define RX_MAXLEN 200 //最大接收数据长度
uint8_t RxBuf[RX_MAXLEN];//接收缓存
uint8_t RxStart; //开始接收标志
uint8_t RxFlag; //一帧数据接收完成标志
下面介绍几种接收数据的方法:
1.空闲中断
空闲中断可以配合接收中断或DMA来使用。
当使用DMA+空闲中断时,需要在初始化完成后手动打开空闲中断和DMA接收。
__HAL_UART_ENABLE_IT(&huart1,UART_IT_IDLE);//打开串口空闲中断
HAL_UART_Receive_DMA(&huart1, Uart1.RxBuf, RX_MAXLEN); //串口DMA接收数据
编写空闲中断函数,如下:
void UART_IDLECallBack(UART_HandleTypeDef *huart)
/*uart1 idle processing function*/
if((__HAL_UART_GET_FLAG(huart,UART_FLAG_IDLE) != RESET))
__HAL_UART_CLEAR_IDLEFLAG(&huart1);//清除标志位
HAL_UART_DMAStop(&huart1);//停止DMA
Uart1.RxLen = RX_MAXLEN - __HAL_DMA_GET_COUNTER(&hdma_usart1_rx);// 获取DMA中传输的数据个数
HAL_UART_Receive_DMA(&huart1,Uart1.RxBuf,RX_MAXLEN); //开启下次接收
在主程序中判断接收完成标志,并处理数据:
if(Uart1.RxFlag == 1)//接收完一帧数据
printf("Rev %d Bytes\r\n",Uart1.RxLen);
最后,别忘了在串口中断函数中调用自己编写的空闲中断函数。

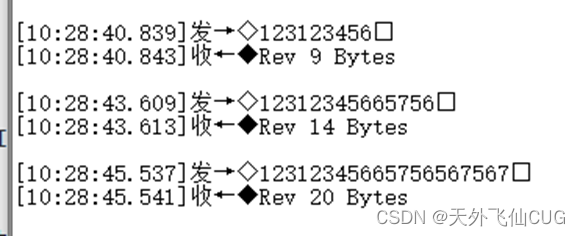
运行程序测试,结果如下:
使用接收中断+空闲中断与DMA类似,只不过需要打开接收中断:
__HAL_UART_ENABLE_IT(&huart1,UART_IT_IDLE);//打开串口空闲中断
HAL_UART_Receive_IT(&huart1, &RevByte, 1); //串口中断接收数据
编写接收中断回调函数,每次接收一个字节:
void HAL_UART_RxCpltCallback(UART_HandleTypeDef *huart)
if(huart->Instance==USART1)
Uart1.RxBuf[Uart1.RxCnt]=RevByte;
if(Uart1.RxCnt==RX_MAXLEN)
Uart1.RxCnt = RX_MAXLEN-1;
HAL_UART_Receive_IT(&huart1, &RevByte, 1); //串口中断接收数据
编写空闲中断回调函数,与DMA的方式类似,只是数据长度判断方式不一样:
void UART_IDLECallBack(UART_HandleTypeDef *huart)
/*uart1 idle processing function*/
if((__HAL_UART_GET_FLAG(huart,UART_FLAG_IDLE) != RESET))
__HAL_UART_CLEAR_IDLEFLAG(&huart1);//清除标志位
Uart1.RxLen = Uart1.RxCnt;
同样,在主程序中判断一帧数据的接收完成并处理。
2.特点协议判断帧头帧尾及长度
有时候我们需要自己定义协议传输数据,这时候就可以在通讯协议里添加特点的帧头帧尾以及数据长度字节,通过判断这些字节来判断数据的开始和结束。假设定义一个简单的传输协议如下:
| 帧头 | 数据长度,1字节 | 数据,N字节 |
| 0x5A,0xA5 | 数据部分的字节数 | 有效数据 |
可以使用中断方式接收数据:
HAL_UART_Receive_IT(&huart1, &RevByte, 1); //串口中断接收数据
接收中断函数如下:
void HAL_UART_RxCpltCallback(UART_HandleTypeDef *huart)
if(huart->Instance==USART1)
Uart1.RxBuf[Uart1.RxCnt]=RevByte;
if(Uart1.RxBuf[Uart1.RxCnt] == 0x5A)//帧头1正确
if(Uart1.RxBuf[Uart1.RxCnt] == 0xA5)//帧头2正确
Rx_len = Uart1.RxBuf[Uart1.RxCnt];
if((Rx_len+3) == Uart1.RxCnt)//数据接收完成
Uart1.RxLen = Uart1.RxCnt;
HAL_UART_Receive_IT(&huart1, &RevByte, 1); //串口中断接收数据
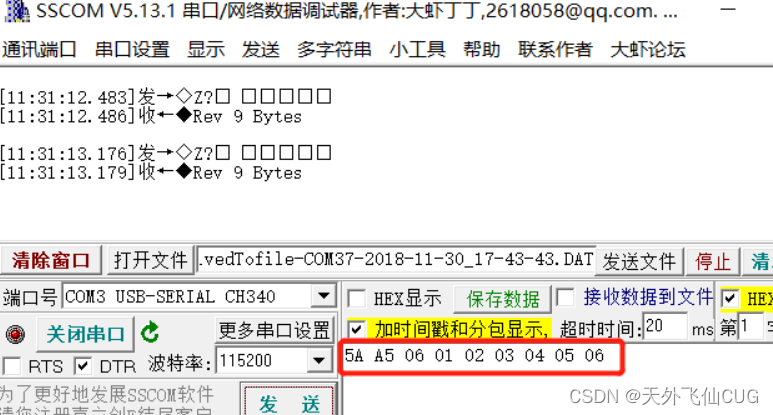
同样,在主程序中判断一帧数据的接收完成并处理,运行测试结果如下:
3.超时判断
超时判断其实与空闲中断的原理类似,只不过是通过定时器来取代空闲中断来判断一帧数据的结束,一般采样接收中断+超时判断的方式。之前的文章Freemodbus移植就是采样这种方式。
超时判断的时间跟波特率有关,假设串口起始位和结束位各1位,那么接收一个字节就需要8+2=10位,在9600波特率下,一秒钟就能接收9600/10=960字节。也就是一个字节需要1.04ms,那么超时时间最小可以设置为1.5倍的单字节接收时间,或者更长。
超时判断可以使用硬件定时器或软件定时器来实现。硬件定时器的方式可以参考之前的Freemodbus移植部分的程序。软件定时器定义一个计时变量,该变量在systick中断中+1实现计时,可以节省硬件资源,但计时最小分辨率跟systick中断有关。
编写中断接收函数:
void HAL_UART_RxCpltCallback(UART_HandleTypeDef *huart)
if(huart->Instance==USART1)
Uart1.RxBuf[Uart1.RxCnt]=RevByte;
Uart1.RxStart = 1;//开始接收标志
if(Uart1.RxCnt==RX_MAXLEN)
Uart1.RxCnt = RX_MAXLEN-1;
HAL_UART_Receive_IT(&huart1, &RevByte, 1); //串口中断接收数据
编写超时判断函数,在Systick中断中调用:
//串口接收超时判断,该函数在Systick中断(1ms中断一次)中调用
Uart1.RxLen = Uart1.RxCnt;
使用时只要打开接收中断即可,不再需要空闲中断。
HAL_UART_Receive_IT(&huart1, &RevByte, 1); //串口中断接收数据
同样,在主程序中判断一帧数据的接收完成并处理。测试结果就不贴了。
4.总结
上面几种方式都可以实现串口接收不定长数据,各有优缺点,可根据实际需求选择用哪种。需要注意的是,上面的例程只是简单地接收数据,实际应用中,还需要考虑连续接收多帧数据的情况,是缓存之后处理,还是舍弃后面的数据,都需要自己写程序实现。
串口作为单片机开发的一个常用的外设,应用范围非常广。大部分时候,串口需要接收处理的数据长度是不定的。那么怎么才能判断一帧数据是否结束呢,今天就以STM32单片机为例,介绍几种接收不定长数据的方法。
首先,我们需要打开一个串口,使用STM32CubeMx来配置,如下:
然后打开串口中断、添加发送和接收的DMA,DMA参数设置为默认即可,如下图。(DMA可根据自身需求选择是否打开)
配置一下时钟等,点击生成代码,这样就可以使用串口了。首先我们定义一个串口接收的结构体,并定义一个结构体变量,如下:
#define RX_MAXLEN 200 //最大接收数据长度
uint8_t RxBuf[RX_MAXLEN];//接收缓存
uint8_t RxStart; //开始接收标志
uint8_t RxFlag; //一帧数据接收完成标志
下面介绍几种接收数据的方法:
1.空闲中断
空闲中断可以配合接收中断或DMA来使用。
当使用DMA+空闲中断时,需要在初始化完成后手动打开空闲中断和DMA接收。
__HAL_UART_ENABLE_IT(&huart1,UART_IT_IDLE);//打开串口空闲中断
HAL_UART_Receive_DMA(&huart1, Uart1.RxBuf, RX_MAXLEN); //串口DMA接收数据
编写空闲中断函数,如下:
void UART_IDLECallBack(UART_HandleTypeDef *huart)
/*uart1 idle processing function*/
if((__HAL_UART_GET_FLAG(huart,UART_FLAG_IDLE) != RESET))
__HAL_UART_CLEAR_IDLEFLAG(&huart1);//清除标志位
HAL_UART_DMAStop(&huart1);//停止DMA
Uart1.RxLen = RX_MAXLEN - __HAL_DMA_GET_COUNTER(&hdma_usart1_rx);// 获取DMA中传输的数据个数
HAL_UART_Receive_DMA(&huart1,Uart1.RxBuf,RX_MAXLEN); //开启下次接收
在主程序中判断接收完成标志,并处理数据:
if(Uart1.RxFlag == 1)//接收完一帧数据
printf("Rev %d Bytes\r\n",Uart1.RxLen);
最后,别忘了在串口中断函数中调用自己编写的空闲中断函数。
运行程序测试,结果如下:
使用接收中断+空闲中断与DMA类似,只不过需要打开接收中断:
__HAL_UART_ENABLE_IT(&huart1,UART_IT_IDLE);//打开串口空闲中断
HAL_UART_Receive_IT(&huart1, &RevByte, 1); //串口中断接收数据
编写接收中断回调函数,每次接收一个字节:
void HAL_UART_RxCpltCallback(UART_HandleTypeDef *huart)
if(huart->Instance==USART1)
Uart1.RxBuf[Uart1.RxCnt]=RevByte;
if(Uart1.RxCnt==RX_MAXLEN)
Uart1.RxCnt = RX_MAXLEN-1;
HAL_UART_Receive_IT(&huart1, &RevByte, 1); //串口中断接收数据
编写空闲中断回调函数,与DMA的方式类似,只是数据长度判断方式不一样:
void UART_IDLECallBack(UART_HandleTypeDef *huart)
/*uart1 idle processing function*/
if((__HAL_UART_GET_FLAG(huart,UART_FLAG_IDLE) != RESET))
__HAL_UART_CLEAR_IDLEFLAG(&huart1);//清除标志位
Uart1.RxLen = Uart1.RxCnt;
同样,在主程序中判断一帧数据的接收完成并处理。
2.特点协议判断帧头帧尾及长度
有时候我们需要自己定义协议传输数据,这时候就可以在通讯协议里添加特点的帧头帧尾以及数据长度字节,通过判断这些字节来判断数据的开始和结束。假设定义一个简单的传输协议如下:
| 帧头 | 数据长度,1字节 | 数据,N字节 |
| 0x5A,0xA5 | 数据部分的字节数 | 有效数据 |
可以使用中断方式接收数据:
HAL_UART_Receive_IT(&huart1, &RevByte, 1); //串口中断接收数据
接收中断函数如下:
void HAL_UART_RxCpltCallback(UART_HandleTypeDef *huart)
if(huart->Instance==USART1)
Uart1.RxBuf[Uart1.RxCnt]=RevByte;
if(Uart1.RxBuf[Uart1.RxCnt] == 0x5A)//帧头1正确
if(Uart1.RxBuf[Uart1.RxCnt] == 0xA5)//帧头2正确
Rx_len = Uart1.RxBuf[Uart1.RxCnt];
if((Rx_len+3) == Uart1.RxCnt)//数据接收完成
Uart1.RxLen = Uart1.RxCnt;
HAL_UART_Receive_IT(&huart1, &RevByte, 1); //串口中断接收数据
同样,在主程序中判断一帧数据的接收完成并处理,运行测试结果如下:
3.超时判断
超时判断其实与空闲中断的原理类似,只不过是通过定时器来取代空闲中断来判断一帧数据的结束,一般采样接收中断+超时判断的方式。之前的文章Freemodbus移植就是采样这种方式。
超时判断的时间跟波特率有关,假设串口起始位和结束位各1位,那么接收一个字节就需要8+2=10位,在9600波特率下,一秒钟就能接收9600/10=960字节。也就是一个字节需要1.04ms,那么超时时间最小可以设置为1.5倍的单字节接收时间,或者更长。
超时判断可以使用硬件定时器或软件定时器来实现。硬件定时器的方式可以参考之前的Freemodbus移植部分的程序。软件定时器定义一个计时变量,该变量在systick中断中+1实现计时,可以节省硬件资源,但计时最小分辨率跟systick中断有关。
编写中断接收函数:
void HAL_UART_RxCpltCallback(UART_HandleTypeDef *huart)
if(huart->Instance==USART1)
Uart1.RxBuf[Uart1.RxCnt]=RevByte;
Uart1.RxStart = 1;//开始接收标志
if(Uart1.RxCnt==RX_MAXLEN)
Uart1.RxCnt = RX_MAXLEN-1;
HAL_UART_Receive_IT(&huart1, &RevByte, 1); //串口中断接收数据
编写超时判断函数,在Systick中断中调用:
//串口接收超时判断,该函数在Systick中断(1ms中断一次)中调用
Uart1.RxLen = Uart1.RxCnt;
使用时只要打开接收中断即可,不再需要空闲中断。
HAL_UART_Receive_IT(&huart1, &RevByte, 1); //串口中断接收数据
同样,在主程序中判断一帧数据的接收完成并处理。测试结果就不贴了。
4.总结
上面几种方式都可以实现串口接收不定长数据,各有优缺点,可根据实际需求选择用哪种。需要注意的是,上面的例程只是简单地接收数据,实际应用中,还需要考虑连续接收多帧数据的情况,是缓存之后处理,还是舍弃后面的数据,都需要自己写程序实现。