Comments (22)
 turanszkij
commented on May 27, 2024
turanszkij
commented on May 27, 2024
Hi, if you are looking for how to create lights, or meshes, you can check the following functions in wiScene.cpp:
- Scene::Entity_CreateCube : this will create a simple cube mesh in the scene with vertices, indices, materials from code
- Scene::Entity_CreateLight : this will create light inside the scene, with transformation, name, etc.
- Scene_Entity_Create... there are more creation functions like this for other kinds of things
Or are you looking to use low level graphics API example to draw triangle to render target directly?
from wickedengine.
 Enzojz
commented on May 27, 2024
Enzojz
commented on May 27, 2024
In fact I see nothing after I have created a triangle at (0, 0, 0), (1, 0, 0), (0, 1, 0), and a point light
The code is like above
	auto rootEntity = wi::ecs::CreateEntity();
	scene.transforms.Create(rootEntity);
	scene.names.Create(rootEntity) = "default";

	auto materialEntity = scene.Entity_CreateMaterial("default");
	scene.Component_Attach(materialEntity, rootEntity);

	auto& material = *scene.materials.GetComponent(materialEntity);
	material.baseColor = XMFLOAT4(0.5, 0.5, 0.5, 1);
	material.roughness = 1.0f;
	material.metalness = 1.0f;
	material.reflectance = 0.04f;

	material.SetDoubleSided(true);

	auto meshEnity = scene.Entity_CreateMesh("test");
	scene.Component_Attach(meshEnity, rootEntity);
	auto& mesh = *scene.meshes.GetComponent(meshEnity);


	mesh.subsets.push_back(wi::scene::MeshComponent::MeshSubset());

	mesh.subsets.back().materialID = 0;
	//auto material = scene.materials.GetComponent(mesh.subsets.back().materialID);

	uint32_t vertexOffset = (uint32_t)mesh.vertex_positions.size();

	mesh.indices.resize(3);

	mesh.subsets.back().indexOffset = (uint32_t)0;
	mesh.subsets.back().indexCount = (uint32_t)3;

	mesh.indices[0] = 0;
	mesh.indices[1] = 1;
	mesh.indices[2] = 2;

	mesh.vertex_positions.resize(3);
	mesh.vertex_positions[0] = XMFLOAT3(0, 0, 0);
	mesh.vertex_positions[1] = XMFLOAT3(1, 0, 0);
	mesh.vertex_positions[2] = XMFLOAT3(0, 1, 0);

	mesh.vertex_normals.resize(3);
	mesh.vertex_normals[0] = XMFLOAT3(0, 0, 1);
	mesh.vertex_normals[1] = XMFLOAT3(0, 0, 1);
	mesh.vertex_normals[2] = XMFLOAT3(0, 0, 1);

	mesh.vertex_tangents.resize(3);
	mesh.vertex_tangents[0] = XMFLOAT4(-1, 0, 0, 1);
	mesh.vertex_tangents[1] = XMFLOAT4(0, 1, 0, 1);
	mesh.vertex_tangents[2] = XMFLOAT4(1, 0, 0, 1);

	mesh.vertex_uvset_0.resize(3);
	mesh.vertex_uvset_0[0] = XMFLOAT2(0, 0);
	mesh.vertex_uvset_0[1] = XMFLOAT2(0, 0);
	mesh.vertex_uvset_0[2] = XMFLOAT2(0, 0);

	mesh.CreateRenderData();


	auto entity = scene.Entity_CreateLight("light");
	scene.Component_Attach(entity, rootEntity);
	auto& light = scene.lights[0];

	light.type = wi::scene::LightComponent::LightType::POINT;
	light.color = XMFLOAT3(0.5, 0.5, 0.5);
	light.intensity = 1000;
	light.range = std::numeric_limits<float>::max();
	light.SetCastShadow(true);

	scene.Update(0);
from wickedengine.
turanszkij
commented on May 27, 2024
I didn't see that you created an ObjectComponent. Without an ObjectComponent, a mesh can't be rendered. After an object is created, you also need to tell it which mesh to use:
		ObjectComponent& object = objects.Create(entity);

		MeshComponent& mesh = meshes.Create(entity);

		// object references the mesh entity (there can be multiple objects referencing one mesh):
		object.meshID = entity;
(Example from the CreateCube() function)
from wickedengine.
turanszkij
commented on May 27, 2024
Note that you don't need to create the mesh on the same entity as the object, but for simplicity this is also possible. Usually, there would be a separate mesh, and multiple objects referencing it (like lots of tree instances using one tree mesh)
from wickedengine.
Enzojz
commented on May 27, 2024
After merged the scene I created with sponza, I can see the light, but still found mesh nowhere, even with object component added.
Update: after added transform component to the mesh entity it works.
The code is like below
	auto materialEntity = scene.Entity_CreateMaterial("default");
	auto& material = *scene.materials.GetComponent(materialEntity);
	material.baseColor = XMFLOAT4(1.0, 1.0, 1.0, 1);
	material.SetDoubleSided(true);
	material.CreateRenderData();

	auto meshEnity = scene.Entity_CreateMesh("test");
	auto& object = scene.objects.Create(meshEnity);
	auto& mesh = *scene.meshes.GetComponent(meshEnity);
	object.meshID = meshEnity;
	scene.Component_Attach(materialEntity, meshEnity);

	mesh.subsets.push_back(wi::scene::MeshComponent::MeshSubset());

	mesh.subsets.back().materialID = materialEntity;

	uint32_t vertexOffset = (uint32_t)mesh.vertex_positions.size();

	mesh.indices.resize(3);

	mesh.subsets.back().indexOffset = (uint32_t)0;
	mesh.subsets.back().indexCount = (uint32_t)3;

	mesh.indices[0] = 0;
	mesh.indices[1] = 2;
	mesh.indices[2] = 1;

	mesh.vertex_positions.resize(3);
	mesh.vertex_positions[0] = XMFLOAT3(0, 0, 2);
	mesh.vertex_positions[1] = XMFLOAT3(1, 0, 2);
	mesh.vertex_positions[2] = XMFLOAT3(0, 1, 2);

	mesh.vertex_normals.resize(3);
	mesh.vertex_normals[0] = XMFLOAT3(0, 0, 1);
	mesh.vertex_normals[1] = XMFLOAT3(0, 0, 1);
	mesh.vertex_normals[2] = XMFLOAT3(0, 0, 1);

	mesh.vertex_tangents.resize(3);
	mesh.vertex_tangents[0] = XMFLOAT4(-1, 0, 0, 1);
	mesh.vertex_tangents[1] = XMFLOAT4(0, 1, 0, 1);
	mesh.vertex_tangents[2] = XMFLOAT4(1, 0, 0, 1);

	mesh.vertex_uvset_0.resize(3);
	mesh.vertex_uvset_0[0] = XMFLOAT2(0, 0);
	mesh.vertex_uvset_0[1] = XMFLOAT2(0, 0);
	mesh.vertex_uvset_0[2] = XMFLOAT2(0, 0);

	mesh.CreateRenderData();

	scene.transforms.Create(meshEnity);
	auto meshtrans = scene.transforms.GetComponent(meshEnity);
	meshtrans->Translate(XMFLOAT3(0, 0, 0));
	meshtrans->Scale(XMFLOAT3(1, 1, 1));


	auto lightEntity = scene.Entity_CreateLight("light");
	auto& light = scene.lights[0];

	light.type = wi::scene::LightComponent::LightType::POINT;
	light.color = XMFLOAT3(0.5, 0.5, 0.5);
	light.intensity = 1000;
	light.range = std::numeric_limits<float>::max();
	light.SetCastShadow(true);

	auto& transform = *scene.transforms.GetComponent(lightEntity);
	transform.Translate(XMFLOAT3(0.0, 0.0, 1.0));
	transform.UpdateTransform();

	scene.Update(0);
it gives a result like this.

from wickedengine.
Enzojz
commented on May 27, 2024
Note that you don't need to create the mesh on the same entity as the object, but for simplicity this is also possible. Usually, there would be a separate mesh, and multiple objects referencing it (like lots of tree instances using one tree mesh)
New question:
How many meshes an object can have? It seems be only one? What if I have an object with meshes organized in an tree like structure? Can I have objects as children of an object?
from wickedengine.
turanszkij
commented on May 27, 2024
An object can have one mesh only. You can create a parenting hierarchy of objects with Scene::Component_Attach function.
from wickedengine.
Enzojz
commented on May 27, 2024
That works.
Another question, what's the unit of FOV of a camera?
from wickedengine.
turanszkij
commented on May 27, 2024
Radians in the code but degrees in the editor slider. Every angle is like that, the code expects radians in every math function, but users can input degrees. Can convert with wi::math::DegreesToRadians finction.
from wickedengine.
Enzojz
commented on May 27, 2024
Radians in the code but degrees in the editor slider. Every angle is like that, the code expects radians in every math function, but users can input degrees. Can convert with wi::math::DegreesToRadians finction.
Ok. And is there any way that I can know the width of view of a camera? I want to calculate the target point of camera, so that when I roll the camera it rolls around the target point (3rd person view) not roll itself (1st person view)
from wickedengine.
turanszkij
commented on May 27, 2024
For width of the camera, there is CameraComponent::width. For third person camera, there is an example third person controller script in Content/scripts/character_controller. There is also an orbiting camera mode in Editor that you can take as example.
from wickedengine.
Enzojz
commented on May 27, 2024
much thanks
from wickedengine.
Enzojz
commented on May 27, 2024
Is there any simple clear exemple about the terrain generator? I walk acrossed the code in terrainwindow.cpp but still got lost in it.
I can so far have only this, seems a lot of parameter there but don't know how to fill them

from wickedengine.
turanszkij
commented on May 27, 2024
This is what you should see by default if you run the editor from the correct location and generate a terrain:

The correct location is the Editor folder in the root directory of the engine. Inside the Editor folder, there is a terrain folder that contains sample terrain configuration files and assets.
from wickedengine.
Enzojz
commented on May 27, 2024
Thank you, it works, now the next questions:
- What are terrain are, are they meshes or just rendered directly by the shader? (it seems they are made of chunks and each chunk holds its mesh?)
- For a coordinate (x,z) is it possible to know the y? (y-up)
- How to get the intersection (x, y, z) of terrain with a ray? or maybe with a (x, y) of the windows?
from wickedengine.
turanszkij
commented on May 27, 2024
The terrain ground chunks are regular meshes. You can use the regular intersection functions with them, for example with a ray, and those will return a position among other things. The Editor has example of picking with the mouse, in short you generate a pick ray from the mouse position and give it to scene.Intersects()
XMFLOAT4 currentMouse = wi::input::GetPointer();
Ray pickRay = wi::renderer::GetPickRay((long)currentMouse.x, (long)currentMouse.y, *this, camera); // "*this" is a RenderPath/canvas that contains the width/height
RayIntersectionResult result = scene.Intersects(pickRay);
float height = result.position.y;
(The Editor is using wi::scene::Pick() function instead of Intersects, just because it's from older code, but it does the same)
from wickedengine.
Enzojz
commented on May 27, 2024
The terrain ground chunks are regular meshes. You can use the regular intersection functions with them, for example with a ray, and those will return a position among other things. The Editor has example of picking with the mouse, in short you generate a pick ray from the mouse position and give it to scene.Intersects()
XMFLOAT4 currentMouse = wi::input::GetPointer();
Ray pickRay = wi::renderer::GetPickRay((long)currentMouse.x, (long)currentMouse.y, *this, camera); // "*this" is a RenderPath/canvas that contains the width/height
RayIntersectionResult result = scene.Intersects(pickRay);
float height = result.position.y;
(The Editor is using
wi::scene::Pick()function instead of Intersects, just because it's from older code, but it does the same)
Seems I don't get it right, with a terrain in the scene,
	auto ca = wi::scene::GetCamera();
	wi::primitive::Ray ray1(XMFLOAT3(ca.At.x, FLT_MAX, ca.At.z), XMFLOAT3(0.0, -1.0, 0.0));
	wi::primitive::Ray ray2(XMFLOAT3(ca.At.x, -FLT_MAX, ca.At.z), XMFLOAT3(0.0, 1.0, 0.0));
	auto result1 = wi::scene::GetScene().Intersects(ray1);
	auto result2 = wi::scene::GetScene().Intersects(ray2);
With code above, I get always (0, 0, 0) for both results
If I replace FLT_MAX with 300, I got some result but it doesn't change if I move the cam.
from wickedengine.
turanszkij
commented on May 27, 2024
ca.At is the camera lookAt direction, I don't think you meant to use that for ray origin? ca.Eye is the position.
from wickedengine.
turanszkij
commented on May 27, 2024
Also, I wouldn't use FLT_MAX, the ray tracing will not work beyond that distance. I notice you trace one from above and one from below, but if the terrain is at 0 height, then neither trace will work for it.
from wickedengine.
Enzojz
commented on May 27, 2024
What I am looking for is the y height of terrain at the location of my camera, so that I am able to avoid placing the camera under the terrain
from wickedengine.
Enzojz
commented on May 27, 2024
Get it working, so I set the camera 10 m above the terrain.
But I noticed two problems:
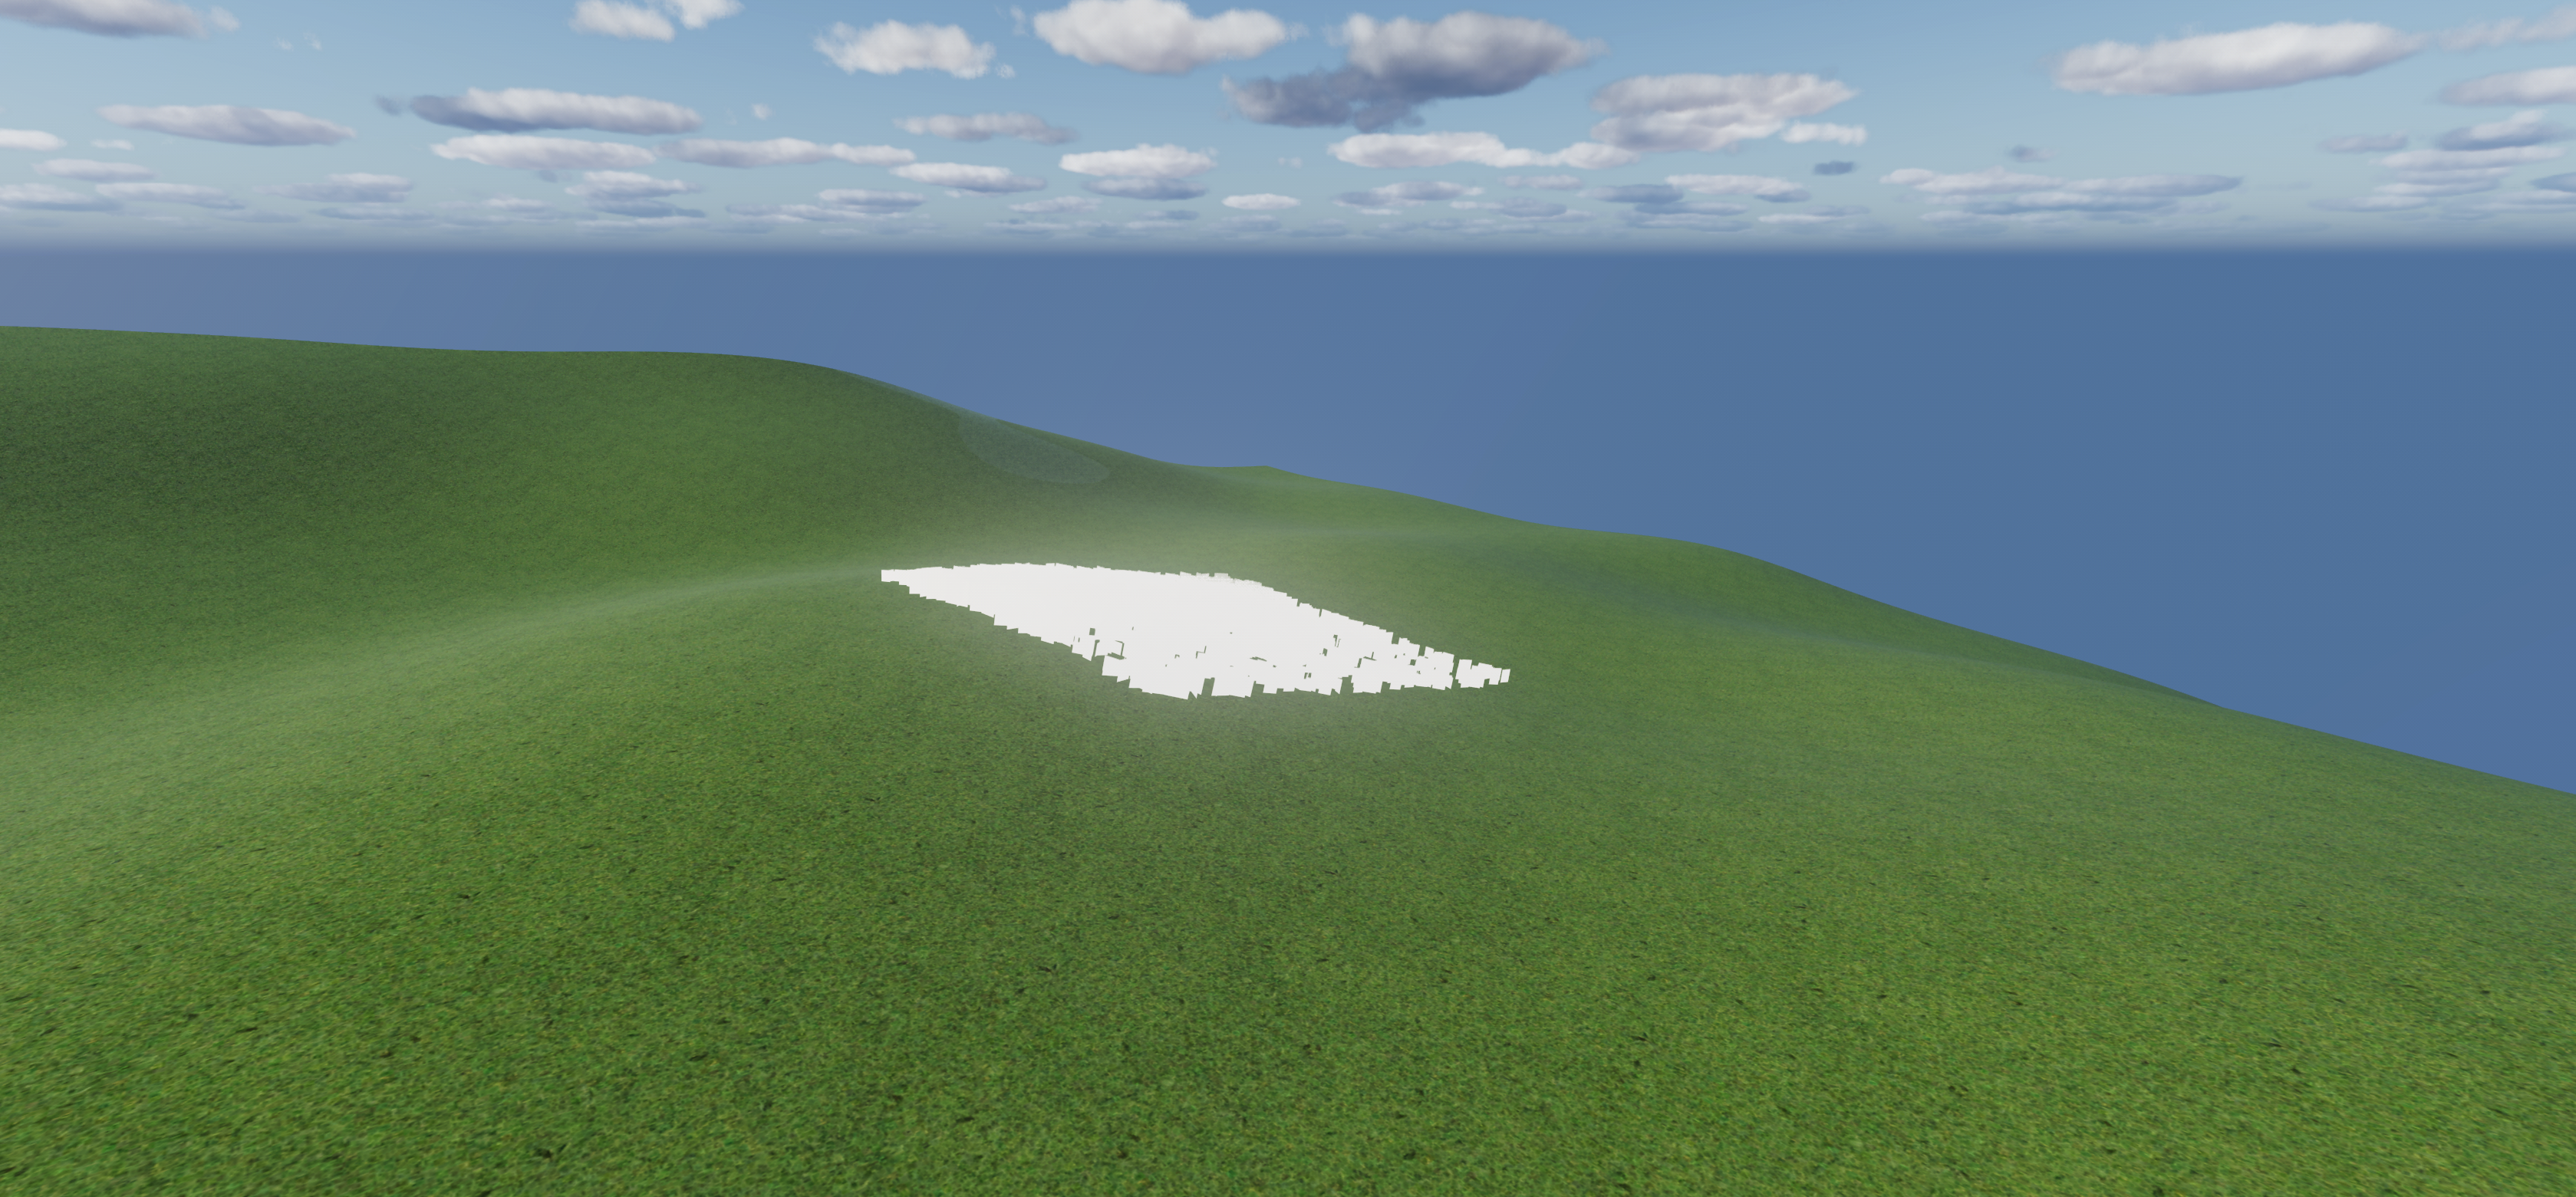
- what's the white thing?
- I see clearly the terrain far away is not visible, is it caused by the its LOD setting?
from wickedengine.
turanszkij
commented on May 27, 2024
the white thing seems to be grass but without texture. The terrain generation distance can be modified with wi::terrain::Terrain::generation
from wickedengine.
Related Issues (20)
- float emit in wiEmittedParticle clashes with qt emit HOT 4
- GetDepthStencil for path tracing HOT 7
- Shader compilation failure on Graphics 620 HOT 5
- What is the big idea? HOT 4
- How to import GLTF in the Editor? HOT 3
- Increased editor custom scaling then set it back to 1.0, now can't get editor font antialiasing back HOT 7
- [BUG] An error occurs when creating a hair particle from the editor with the RTAO option enabled. HOT 2
- [BUG] Collision bug in character_controller.lua HOT 1
- Editor - theme customizer
- Rectangle and disk area lights support HOT 2
- Editor - change font for better CJK character support HOT 8
- Graphics - render size mismatch when FSR2.1 and MotionBlur both enabled HOT 3
- Crash at startup on Linux (version 0.71.209) HOT 7
- wiscene not show
- Editor- Sound component window (BUG) HOT 1
- editor UI gets affected by lighting. (BUG?) HOT 1
- Linux Template Fails on Pipeline Creation HOT 8
- System lockup when FSR2 is enabled HOT 1
- Incorrect tooltip for FSR1 sharpening HOT 1
Recommend Projects
-
 React
React
A declarative, efficient, and flexible JavaScript library for building user interfaces.
-
Vue.js
🖖 Vue.js is a progressive, incrementally-adoptable JavaScript framework for building UI on the web.
-
 Typescript
TypeScript is a superset of JavaScript that compiles to clean JavaScript output.
-
TensorFlow
An Open Source Machine Learning Framework for Everyone
-
Django
The Web framework for perfectionists with deadlines.
-
 Laravel
A PHP framework for web artisans
-
D3
Bring data to life with SVG, Canvas and HTML. 📊📈🎉
-
Recommend Topics
-
javascript
JavaScript (JS) is a lightweight interpreted programming language with first-class functions.
-
web
Some thing interesting about web. New door for the world.
-
server
A server is a program made to process requests and deliver data to clients.
-
Machine learning
Machine learning is a way of modeling and interpreting data that allows a piece of software to respond intelligently.
-
Visualization
Some thing interesting about visualization, use data art
-
Game
Some thing interesting about game, make everyone happy.
Recommend Org
-
Facebook
We are working to build community through open source technology. NB: members must have two-factor auth.
-
Microsoft
Open source projects and samples from Microsoft.
-
Google
Google ❤️ Open Source for everyone.
-
Alibaba
Alibaba Open Source for everyone
-
D3
Data-Driven Documents codes.
-
Tencent
China tencent open source team.
from wickedengine.