Code Monkey home page Code Monkey logo

t.viewer's Introduction

T.Viewer - Tizen Log Viewer

Travis license language codecov

Cross Platform Tizen Log Viewer T.Viewer를 소개합니다. 타이젠의 dlog 메시지를 보다 쉽고 편하게 확인 할 수 있는 데스크탑 어플리케이션입니다. 사용중 불편 사항, 개선 의견, 버그 신고는 이슈를 생성해 주세요. 소스 코드는 MIT 라이센스로 모두에게 공개되어 있습니다.

T.Viewer Screenshot

설치하기

리눅스

tviewer-setup-{version}.AppImage 다운로드 후 실행

윈도우

tviewer-setup-{version}.exe 다운로드 후 실행하여 설치 후 실행

주요 기능 및 사용법

사용법

타겟 디바이스와의 SDB 연결을 먼저 확인하세요!

  1. Connection State Indicator
    • 전원 스위치와 연계 동작
  2. Log Level Filter
    • Verbose/Debug/Info/Warning/Error/Fatal
    • 선택된 level을 포함한 상위 level을 출력
    • Log Level에 따른 다른 색상 출력
  3. Tag Filter
    • 일치하는 Tag를 출력
    • 정규식 지원
  4. Message Filter
    • 해당 메시지를 포함하는 로그 출력
    • 정규식 지원
  5. Multi-Tab View
    • 각각의 독립된 탭 뷰 제공
  6. Setting
    • 글자 크기 조절
    • dlog 버퍼 삭제 후 실행
    • dlog timestamp 출력
  7. Shortcut
    • 글자 크기 키우기 ctrl + +
    • 글자 크기 줄이기 ctrl + -
    • 자동 스크롤 ctrl + q
    • 줄바꿈 ctrl + w
    • 화면 지우기 ctrl + e
    • 메세지 수신 ctrl + space

shortcut

프로젝트 참여 방법

다양한 방법으로 프로젝트에 참여가 가능합니다.

직접 코드를 수정하시고 싶으시다면, 아래 가이드를 참고해주세요.

Test Result

라이센스

본 프로젝트는 MIT 라이센스의 오픈소스 프로젝트 입니다.

(Eng) T.Viewer - Tizen Log Viewer

T.Viewer is open source cross-platform Tizen Log Viewer. It provides simple and easy way to view Tizen dlog message on desktop.

Installation

Linux

tviewer-setup-{version}.AppImage download and run

Windows

tviewer-setup-{version}.exe download and install Features and User Guide

User Guide

❗ Check SDB connection with target device first.

  1. Connection State Indicator
    • Connected also with power switch
  2. Log Level Filter
    • Verbose/Debug/Info/Warning/Error/Fatal
    • Output the upper level including the selected level
    • Different color output according to log level
  3. Tag Filter
    • Output matched tag log
    • Regular expression support
  4. Message Filter
    • Output log containing the message
    • Regular expression support
  5. Multi-Tab View
    • Independent filter option for each tab
  6. Setting
    • Font size
    • After clear dlog buffer
    • dlog timestamp print
  7. Shortcut
    • Font size up, ctrl + +
    • Font size down, ctrl + -
    • Auto Scroll, ctrl + q
    • Soft wrap ctrl + w
    • Clear tab, ctrl + e
    • Listen log, ctrl + space

Contributing

There are many ways in which you can participate in the project, for example:

If you are interested in fixing issues and contributing directly to the code base, please see the following:

License

Licensed under the MIT license.

t.viewer's People

Contributors

dependabot[bot] avatar min7choi avatar msaltnet avatar

Stargazers

 avatar  avatar  avatar  avatar  avatar  avatar  avatar  avatar  avatar  avatar  avatar  avatar  avatar  avatar

Watchers

 avatar  avatar  avatar  avatar  avatar

t.viewer's Issues

[Feature] Menu 정리

Menu에는 어떤 기능들이 들어가야 할까 어떻게 정리해야 할까. 적당히 고민해서 정리하자.

story9

[T.Viewer 개발일기] 9. Vuetify 소소한 수정

굳이 하나의 글로 뽑아서 쓸만한 내용인가 싶은 소소한 수정 사항을 적어봤다. Vuetify 진짜 편하다. 쉽고 빠르게 깔끔한 UI 만들 수 있어서 넘 좋다. 레퍼런스도 많고, QnA도 많아서 개발하기 참 좋다.

v-icon

v-icon은 아이콘을 쉽게 사용할 수 있는 컴포넌트이다. Bootstrap과는 달리 attribute나 property에 값을 넣는게 아니고, text 값에 따라서 아이콘이 변경되는 것이 독특하다.

Material Design Icons의 아이콘 들은 간단하게 mdi- prefix를 붙이고 사용할 수 있다.

    <v-icon>mdi-filter</v-icon>

Material DesignFont Awesome을 사용할 수도 있는데, 추가로 설치가 필요하다.

install-material-icons

v-select

html select element에 해당하는 콤포넌트로 v-select를 제공한다. 기본적으로 속성들이 비슷하다. 왠만한거 다 되는데, 최소 높이가 56px로 좀 높다. toolbar의 default 높이가 48px라서 그 안에 넣으면 망. stackoverflow 에도 관련된 문의들이 몇개 있는데, 썩 마음에 드는 방법을 못찾아서 일단 그냥 가고 나중에 더 손봐야 겠다. 수학 시험 볼 때 어려운 문제는 잠깐 패스하는 그런 스킬이랄까?ㅎ 일단 toolbar 높이를 높이는 것으로 고.

    <v-flex xs4>
        <v-select dense v-model="logLevelsSelected" :items="logLevels"></v-select>
    </v-flex>

log level 에 따라서 필터링하기

Tizen Dlog는 아래와 같은 로그 레벨을 갖고 있다. 6개의 레벨 중 하나를 선택하면 그 아래 레벨은 모두 출력되도록 구성할까 한다. 안스 로그캣처럼.ㅎ

  • V – verbose
  • D – debug
  • I – info
  • W – warning
  • E – Error
  • F – Fatal

로그는 이렇게 출력되는데, log level의 표시는 대문자 하나로 고정된 위치에 출력 되기 때문에 그냥 잘라서 단순 비교했다.

    // 07-10 14:51:21.337+0900 I/RESOURCED( 2617): heart-battery.c:....
    filterLogLevel: function (line) {
      const LOG_LEVEL_CHAR_START_POSITION = 24;
      let logLevelIndex = this.logLevels.indexOf(this.logLevelsSelected);
      let logChar = line.substr(LOG_LEVEL_CHAR_START_POSITION,1);

      if (logLevelIndex == 0 || this.logLevelChars[5] == logChar)
        return true;

      if (this.logLevelChars[4] == logChar) {
        return logLevelIndex <= 4;
      } else if (this.logLevelChars[3] == logChar) {
        return logLevelIndex <= 3;
      } else if (this.logLevelChars[2] == logChar) {
        return logLevelIndex <= 2;
      } else if (this.logLevelChars[1] == logChar) {
        return logLevelIndex <= 1;
      } else {
        return logLevelIndex == 0;
      }
    }

Window resize 이벤트 처리

데탑용 앱이라 윈도우 사이즈가 자유 자재로 변경이 가능한데, 이 부분에 대한 처리는 기존에 웹에서 하는 것과 동일하다. resize 이벤트를 수신해서 처리해주면 된다. Vue는 css도 바인딩이 되어서, height값을 변경만 해주어도 자동으로 반영이 된다.

mount 될 때 이벤트 리스너 붙여주고,

    window.addEventListener('resize', this.handleResize);

이벤트가 호출될 때 계산만 해주면,

    getEditorHeight() {
      console.log(window.innerHeight - toolbarHeightTotal);
      return window.innerHeight - toolbarHeightTotal;
    },
    handleResize() {
      this.editorHeight = this.getEditorHeight();
    },

css 스타일도 바로 업데이트가 된다.

    <div ref="viewer" :style="{'height': height + 'px'}"></div>

User Guide

README 를 좀 더 자세히 업데이트

story12-optimization

[T.Viewer 개발일기] 12. Optimization

Tizen Log Viewer 개발이 어느덧? 끝나간다. 아직 넣고 싶은 기능은 많지만, 그것을 내가 결정하기 보다는 주요 기능을 갖추고 얼른 사용자들 손에 쥐어준 다음 뒷일을 결정하기로 했다. 요즘 개발 트렌드.ㅎ

마지막으로 마무리 하는 과정에서 있었던 몇 가지 이야기를 정리해 봤다.

resource pre-load

boilerplate 코드의 index.html파일을 보면 아래와 같이, font를 CDN으로부터 받아오도록 되어 있다. 용량도 얼마 안되는거 바이너리에 포함시키자. 오프라인에서도 잘 쓸 수 있게.

    <link rel="stylesheet" href="https://fonts.googleapis.com/css?family=Roboto:100,300,400,500,700,900">
    <link rel="stylesheet" href="https://cdn.jsdelivr.net/npm/@mdi/font@latest/css/materialdesignicons.min.css">

일단 아이콘 폰트는 Material Design Icons를 사용하고 있는데, 이 부분은 공식 사이트에 가이드가 잘 되어 있다. src/plugins/vuetify.js 구조가 왜 있나 했는데, 이런 식으로 Vuetify를 확장해서 사용하는 방법이라는 것을 이제서야 알게되었다.ㅋ 뭐, 워낙 잘되어 있어서...^^;

Install Material Design Icons

// src/plugins/vuetify.js

import '@mdi/font/css/materialdesignicons.css' // Ensure you are using css-loader
import Vue from 'vue'
import Vuetify from 'vuetify/lib'

Vue.use(Vuetify)

export default new Vuetify({
  icons: {
    iconfont: 'mdi', // default - only for display purposes
  },
})

다음으로 Roboto 폰트 역시 로컬에 설치해주고,

    npm install typeface-roboto --save

아까 그 위치에서 로드해 주었다.

// src/plugins/vuetify.js

import 'typeface-roboto/index.css'
import '@mdi/font/css/materialdesignicons.css' // Ensure you are using css-loader

로딩 시간을 줄일 수 있기도 하지만, 만약에 CDN의 리소스가 변경되면, 개발하면서 확인된 폰트와 아이콘과는 다른 UI가 보여질 수도 있기 때문에 하위호환성이 확실히 보장되지 않는 lib이나 리소스는 다운로드해서 패키지에 넣거나, 내 서버에 따로 올려둔다.

icon

아이콘에서 최적화를 논할만한 내용은 아닐 수도 있지만, 품질을 위해서 중요한 부분이 있다. 아이콘은 두군데에서 처리가 필요하다. 하나는 파일에 사용되는 아이콘이고, 다른 하나는 프로그램이 실행될 때 사용되는 아이콘이다.

전자는 packaging과 관련되어 있기 때문에 builder를 어떤것을 사용하는 지에 따라서 설정 방법이 다르다. 나는 약간의 시행착오를 거쳐 vue.config.js에서 설정해 주었다. 패키징 관련된 부분이기 때문에 플랫폼마다 다른 파일이 요구된다. 클라우드 변환 사이트가 많으니 편하게 사용하면 된다.

  builderOptions: {
    appId: 't.viewer',
    asar: false,
    productName: 'T.Veiwer',
    win: {
      target: [
        {
            target: 'portable',
            arch: [
            'x64',
            ],
        },
      ],
      icon: 'assets/icons/icon.ico'
    },
    linux: {
      target: [
        {
            target: 'AppImage',
            arch: [
            'x64',
            ],
        },
      ],
      icon: 'assets/icons/icon.png'
    },
  },

다음으로 런타임에 사용되는 아이콘은 BrowserWindow를 생성할 때 설정해줘야 한다.

    // Create the browser window.
    let iconPath = 'assets/icons/icon.ico';

    // linux AppImage
    if (process.platform !== 'win32') {
        if (process.env.WEBPACK_DEV_SERVER_URL)
            iconPath = 'assets/icons/icon.png';
        else
            iconPath = path.join(__dirname, '../../tviewer.png');
    }

    win = new BrowserWindow({
        width: 1024, height: 700,
        webPreferences: {
            nodeIntegration: true
        },
        icon: iconPath,
        show: false
    })
    mainWindowState.manage(win);

이 부분이 중요한데, 여기에서 png 포맷을 사용하는 가이드도 많던데, png를 쓰면 아무리 고 해상도를 해도 프로그램 아이콘이 찌그러진다. 런타임에 리사이징을 하려다보니 퀄리티가 떨어지는 것으로, 가능하면, multi-size ico를 만들어서 설정하는 것을 추천한다.

이 시점에 문제가! 리눅스는 png를 사용해야 해야 해서 플랫폼 분기문이 들어갔는데, AppImage로 배포하려니 배포패키지에서 자꾸 아이콘을 못찾아오는 이슈가 있다. 관련된 이슈가 엄청 많은걸보니 에휴...적당히 workaround 적용해 주었는데, 리눅스의 경우 package에서 실행될 때와 npm run serve로 실행될 때 또 달라서, 분기문이 또 들어갔다.

// 아이콘 해상도 차이 스크린샷

32px을 포함하는 ico 파일을 사용했을 때 확실히 품질이 좋았다. window 10에서!

keep preference

폰트 사이즈랑 텝 정보들을 기억해 두었다가 다시 꺼내줬야 한다. 당연한 기능인데ㅎ 사용하는데 문제는 없도록 다른 기능을 모두 다 작성하고 추가하였다. 어떤 유용한 모듈이 있을까 검색해 봤다.

electron-config vs electron-settings vs electron-store

//스샷

기세가 좋은 electron-store를 적용했다. 모듈 분리가 잘 되어 있고, 기능과 데이터도 분리가 잘 되어 있어서 적용이 매우 쉬웠다!

거의 다 했는데, 윈도우 사이즈가 매번 초기화 된다. electron-window-state 이런 모듈이 있네? 허허. 좋구만. 마지막 위치까지 기억해주는 구만ㅋ

    // Load the previous state with fallback to defaults
    let mainWindowState = windowStateKeeper({
        defaultWidth: 1024,
        defaultHeight: 768
    });

    win = new BrowserWindow({
        'x': mainWindowState.x,
        'y': mainWindowState.y,
        'width': mainWindowState.width,
        'height': mainWindowState.height,
        webPreferences: {
            nodeIntegration: true
        },
        icon: iconPath,
        show: false
    })

마치며

최적화라고 말하기도 민망한 내용들이다. 그 만큼 별 내용이 없었다는? 쉽고 빠르게 개발 할 수 있어서 좋았다. 진짜 최적화는 공개 후 올라오는 이슈들을 상대하면서 진행하게 될듯...

story-11-ace editor

[T.Viewer 개발일기] 11. ACE Editor

Tizen Log Viewer 개발은 Web 기반 ACE Editor가 있었기에 쉽고 즐겁게 진행할 수 있었던 것 같다. 귀찮고 복잡한 일들의 상당수를 editor가 처리해주었다.ㅋ

Ace editor는 웹을 위한 고성능 코드 에디터를 표방하는 오픈소스 커뮤니티 프로젝트이다. vim 이나 sublime과 어깨를 나란히 한다고 한다니, 별 하나 드리고 시작한다.

Ace is an embeddable code editor written in JavaScript. It matches the features and performance of native editors such as Sublime, Vim and TextMate.

Edit mode

Ace editor를 사용하는 방법은 설명도 잘되어 있고, 예제도 잘 나와있어서 쉽게 적용할 수 있었다. 그마나 조금 복잡했던 부분이 edit mode에 대한 부분인데, 편집하는 대상의 모드에 따른 동작을 재정의 할 수 있게 설계되어있다. 이런 방식이 복잡하다는 것을 알고 있는지 Best practice를 잘 정리해 두어서 테스트를 하면서 금방 이해할 수 있었다. Best Practice로 잘 쓰게 만드는 것! 진짜 중요하다!

Creating or Extending an Edit Mode

위의 내용을 바탕으로 내가 구성한 내용을 아래 붙인다. 거의 그대로 가져왔고, 디버그 레벨에 따라 token을 달리 적용해야하기 때문에 Rule 부분만 추가해 주었다.

const ace = require("ace-builds/src-noconflict/ace.js");

export default class AceEditor {
    static init() {
        ace.define('ace/mode/log', (require, exports) => {
            const oop = require("ace/lib/oop");
            const TextMode = require("ace/mode/text").Mode;
            const LogHighlightRules = require("ace/mode/log_highlight_rules").LogHighlightRules;

            const Mode = function() {
                this.HighlightRules = LogHighlightRules;
            };
            oop.inherits(Mode, TextMode);

            exports.Mode = Mode;
        });

        ace.define('ace/mode/log_highlight_rules', (require, exports) => {
            const oop = require("ace/lib/oop");
            const TextHighlightRules = require("ace/mode/text_highlight_rules").TextHighlightRules;

//07-10 14:51:21.337+0900 D/RESOURCED( 2617): heart-battery.c:....
// D/RESOURCED( 2617): heart-battery.c:....

            const verboseRule = {
                token: "verbose",
                regex: "^V.*|^[0-9].{23}V.*"
            };

            const debugRule = {
                token: "debug",
                regex: "^D.*|^[0-9].{23}D.*"
            };

            const LogHighlightRules = function() {
                this.$rules = {
                    start: [verboseRule, debugRule],
                };
            }

            oop.inherits(LogHighlightRules, TextHighlightRules);
            exports.LogHighlightRules = LogHighlightRules;
        });
    }

    static createViewer(DOMElement, globalSettings) {
        const viewer = ace.edit(DOMElement);

        viewer.setOptions({
            wrap: true,
            readOnly: true,
            highlightActiveLine: false,
            showPrintMargin: false,
            mode: "ace/mode/log",
            fontFamily: "Consolas, monaco, 'Courier New', Courier, monospace",
            fontSize: globalSettings.fontSize + "px"
        });

        return viewer;
    }
}

token은 정규식에 해당하는 text를 <span class="ace_<token>"> 이런 태그로 감싸주어서 커스텀한 스타일을 적용할 수 있도록 해주는 것이다. 블로그나 깃헙에서 흔히 볼 수 있는 Syntax highlight 기능을 위한 동작이라고 보면 된다. 나는 로그 한 줄을 통째로 변경하도록 적용하였다.

When one is found, the resulting text is wrapped within a tag, where is defined as the token property.

token 이외에도 state 에 대해서도 잘 설명이 되어 있다. t.viwer의 경우 state 변경은 필요없어서 따로 사용하지 않았는데, 참 설계를 잘 했다는 생각이 든다. 자세한 내용을 아래 링크를 타고 들어가서 확인.

Ace editor - higlighter

search box

이걸 또 어떻게 구현하나...고민하고 있었는데, 헐. 그냥 되네? 단, 아래 extension을 추가해줘야 한다. 한 것도 없이 잘되니까 민망하면서도 든든.

    require("ace-builds/src-noconflict/ext-searchbox.js");

clear

화면을 싹 지우는 클리어 버튼에 대한 동작으로 쓸 method를 딱히 못 찾아서 구글링 해봤는데, 넘 간단!

    this.viewer.setValue('');

text append

로그 뷰어이다 보니 새로운 로그를 아래 쪽에 밀어 넣어야 하는데, append method가 없네. 커서를 옮겨서 넣어보기도 했는데, 그럴 경우 클릭한 위치에 로그가 들어가버리는 문제가 생긴다. 확실한 방법은 아애 제일 아래쪽에 넣는 것이다.ㅎ

    let session = this.viewer.session;
    session.insert({
        row: session.getLength(),
        column: 0
    }, line.line);

wrap

줄바꿈은 그냥 옵션에서 설정 가능하다.

    viewer.setOptions({
        wrap: true,
        readOnly: true,

동적으로 적용하려면 session.setUseWrapMode 메소드 사용하면 된다.

    this.viewer.session.setUseWrapMode();

font size

폰트 사이즈도 손 쉽게 척척!

    this.viewer.setFontSize("20px");

auto scroll

text가 입력될 때 가장 아래쪽으로 이동하면 되니까. scrollToLine을 사용하면 된다.

    this.viewer.scrollToLine(this.viewer.session.getLength());

마치며

Ace editor가 없었더라면 어땠을까? 아마 다른 이름의 오픈소스 프로젝트가 있었겠지?ㅎ 요즘은 참 좋은 세상이다. 있으면 좋을 법한 좋은 프로젝트들이 잘 관리되고, 널리 사용되면서 개발 생산성이 엄청 좋아졌다. 겸손하게 감사를 표한다.

[Feature] RE-filter from Main tab

이미 로깅이 끝난 상태라면 기존 탭에서 필터링된 데이터가 필요할 듯.
어떤 UX를 가져가야 할지 고민중.

[Long Term] Installer 적용 (업데이트)

exe 파일을 다운로드해서 사용하는 것은 편하기도 하지만, 새로운 기능이나 버그가 수정된 업데이트를 제공하기 어렵다.
고립무원에 혼자 두지 않기위해서...고민은 해보지만, 이것은 개발과는 또 다른 배포의 문제가 있다.

story10

[T.Viewer 개발일기] 10. regex 정규식 검색

Android logcat이나 VS Code의 검색창을 보면 Regex 체크박스가 있다. 우리도 지원해 줘야 할 것 같아서, 지난번에 체크 박스는 넣어놨는데. 로직은 어떻게 하지? 아, VS Code랑 똑같이 하믄 되겠다! 흐흐 오픈소스 묻어가기.

VS Code의 로직 엿보기

유명한 오픈소스 프로젝트 답게 소스 정리가 아주 잘 되어 있다. 쉽게 찾을 수 있었다.

FindModelBoundToEditorModel class 에서, private research 메소드가 호출될 때 _findMatches에서 editor 인테페이스의 findMatches 메소드를 호출 함으로써 매치되는 Range Array를 리턴받는다.

  /**
    * Search the model.
    * @param searchString The string used to search. If it is a regular expression, set `isRegex` to true.
    * @param searchScope Limit the searching to only search inside this range.
    * @param isRegex Used to indicate that `searchString` is a regular expression.
    * @param matchCase Force the matching to match lower/upper case exactly.
    * @param wordSeparators Force the matching to match entire words only. Pass null otherwise.
    * @param captureMatches The result will contain the captured groups.
    * @param limitResultCount Limit the number of results
    * @return The ranges where the matches are. It is empty if no matches have been found.
    */
  findMatches(searchString: string, searchScope: IRange, isRegex: boolean, matchCase: boolean, wordSeparators: string | null, captureMatches: boolean, limitResultCount?: number): FindMatch[];

내가 필요한 것은 구현체의 로직인데, textModel.ts에서 찾을 수 있다. regex 일때, 로그 한 줄에 매치되는 단어가 있는지만 확인하면 되므로 범위를 더 좁힐 수 있다.

  public findMatches(searchString: string, rawSearchScope: any, isRegex: boolean, matchCase: boolean, wordSeparators: string | null, captureMatches: boolean, limitResultCount: number = LIMIT_FIND_COUNT): model.FindMatch[] {
    this._assertNotDisposed();

    let searchRange: Range;
    if (Range.isIRange(rawSearchScope)) {
      searchRange = this.validateRange(rawSearchScope);
    } else {
      searchRange = this.getFullModelRange();
    }

    if (!isRegex && searchString.indexOf('\n') < 0) {
      // not regex, not multi line
      const searchParams = new SearchParams(searchString, isRegex, matchCase, wordSeparators);
      const searchData = searchParams.parseSearchRequest();

      if (!searchData) {
        return [];
      }

      return this.findMatchesLineByLine(searchRange, searchData, captureMatches, limitResultCount);
    }

    return TextModelSearch.findMatches(this, new SearchParams(searchString, isRegex, matchCase, wordSeparators), searchRange, captureMatches, limitResultCount);
  }

textModelSearch.tsfindMatches가 나에게 필요한 부분인데, 검색 문자열의 전처리를 먼저 해야 한다. 할게 많구나.

  public static findMatches(model: TextModel, searchParams: SearchParams, searchRange: Range, captureMatches: boolean, limitResultCount: number): FindMatch[] {
    const searchData = searchParams.parseSearchRequest();
    if (!searchData) {
      return [];
    }

    if (searchData.regex.multiline) {
      return this._doFindMatchesMultiline(model, searchRange, new Searcher(searchData.wordSeparators, searchData.regex), captureMatches, limitResultCount);
    }
    return this._doFindMatchesLineByLine(model, searchRange, searchData, captureMatches, limitResultCount);
  }

parseSearchRequest 에서 전처리를 하는데, 각종 파라미터들과 함께 다시 strings.createRegExp를 통해 비교 정규식을 만들어 내는고 있었다.

  public parseSearchRequest(): SearchData | null {
    if (this.searchString === '') {
      return null;
    }

    // Try to create a RegExp out of the params
    let multiline: boolean;
    if (this.isRegex) {
      multiline = isMultilineRegexSource(this.searchString);
    } else {
      multiline = (this.searchString.indexOf('\n') >= 0);
    }

    let regex: RegExp | null = null;
    try {
      regex = strings.createRegExp(this.searchString, this.isRegex, {
        matchCase: this.matchCase,
        wholeWord: false,
        multiline: multiline,
        global: true,
        unicode: true
      });
    } catch (err) {
      return null;
    }

    if (!regex) {
      return null;
    }

    let canUseSimpleSearch = (!this.isRegex && !multiline);
    if (canUseSimpleSearch && this.searchString.toLowerCase() !== this.searchString.toUpperCase()) {
      // casing might make a difference
      canUseSimpleSearch = this.matchCase;
    }

    return new SearchData(regex, this.wordSeparators ? getMapForWordSeparators(this.wordSeparators) : null, canUseSimpleSearch ? this.searchString : null);
  }

createRegExp는 아래와 같고, RegExp를 생성해서 리턴한다.

export function createRegExp(searchString: string, isRegex: boolean, options: RegExpOptions = {}): RegExp {
  if (!searchString) {
    throw new Error('Cannot create regex from empty string');
  }
  if (!isRegex) {
    searchString = escapeRegExpCharacters(searchString);
  }
  if (options.wholeWord) {
    if (!/\B/.test(searchString.charAt(0))) {
      searchString = '\\b' + searchString;
    }
    if (!/\B/.test(searchString.charAt(searchString.length - 1))) {
      searchString = searchString + '\\b';
    }
  }
  let modifiers = '';
  if (options.global) {
    modifiers += 'g';
  }
  if (!options.matchCase) {
    modifiers += 'i';
  }
  if (options.multiline) {
    modifiers += 'm';
  }
  if (options.unicode) {
    modifiers += 'u';
  }

  return new RegExp(searchString, modifiers);
}

이제 다시 스택을 거슬러 올라가서, 생성된 정규식이 실질적으로 사용되는 _doFindMatchesLineByLine을 살펴보자. 주석까지 잘 달려있는데, 내가 필요한건 라인 한 줄에 대한 평가니까 _findMatchesInLine만 있으면 된다.

  private static _doFindMatchesLineByLine(model: TextModel, searchRange: Range, searchData: SearchData, captureMatches: boolean, limitResultCount: number): FindMatch[] {
    const result: FindMatch[] = [];
    let resultLen = 0;

    // Early case for a search range that starts & stops on the same line number
    if (searchRange.startLineNumber === searchRange.endLineNumber) {
      const text = model.getLineContent(searchRange.startLineNumber).substring(searchRange.startColumn - 1, searchRange.endColumn - 1);
      resultLen = this._findMatchesInLine(searchData, text, searchRange.startLineNumber, searchRange.startColumn - 1, resultLen, result, captureMatches, limitResultCount);
      return result;
    }

    // Collect results from first line
    const text = model.getLineContent(searchRange.startLineNumber).substring(searchRange.startColumn - 1);
    resultLen = this._findMatchesInLine(searchData, text, searchRange.startLineNumber, searchRange.startColumn - 1, resultLen, result, captureMatches, limitResultCount);

    // Collect results from middle lines
    for (let lineNumber = searchRange.startLineNumber + 1; lineNumber < searchRange.endLineNumber && resultLen < limitResultCount; lineNumber++) {
      resultLen = this._findMatchesInLine(searchData, model.getLineContent(lineNumber), lineNumber, 0, resultLen, result, captureMatches, limitResultCount);
    }

    // Collect results from last line
    if (resultLen < limitResultCount) {
      const text = model.getLineContent(searchRange.endLineNumber).substring(0, searchRange.endColumn - 1);
      resultLen = this._findMatchesInLine(searchData, text, searchRange.endLineNumber, 0, resultLen, result, captureMatches, limitResultCount);
    }

    return result;
  }

이제 정규식이랑 매치되는 부분이 나올것 같은데도 안나오는뎈ㅋㅋ 이게 전체 editor에서 검색이라 로직이 훨씬 복잡하다. Searchernext메소드에서 정규식과 매치되는 부분을 찾고,
createFindMatch을 통해서 매치되는 부분의 위치를 결과 값으로 정리하는 것으로 마무리가 된다.

	private static _findMatchesInLine(searchData: SearchData, text: string, lineNumber: number, deltaOffset: number, resultLen: number, result: FindMatch[], captureMatches: boolean, limitResultCount: number): number {
		const wordSeparators = searchData.wordSeparators;
		if (!captureMatches && searchData.simpleSearch) {
			const searchString = searchData.simpleSearch;
			const searchStringLen = searchString.length;
			const textLength = text.length;

			let lastMatchIndex = -searchStringLen;
			while ((lastMatchIndex = text.indexOf(searchString, lastMatchIndex + searchStringLen)) !== -1) {
				if (!wordSeparators || isValidMatch(wordSeparators, text, textLength, lastMatchIndex, searchStringLen)) {
					result[resultLen++] = new FindMatch(new Range(lineNumber, lastMatchIndex + 1 + deltaOffset, lineNumber, lastMatchIndex + 1 + searchStringLen + deltaOffset), null);
					if (resultLen >= limitResultCount) {
						return resultLen;
					}
				}
			}
			return resultLen;
		}

		const searcher = new Searcher(searchData.wordSeparators, searchData.regex);
		let m: RegExpExecArray | null;
		// Reset regex to search from the beginning
		searcher.reset(0);
		do {
			m = searcher.next(text);
			if (m) {
				result[resultLen++] = createFindMatch(new Range(lineNumber, m.index + 1 + deltaOffset, lineNumber, m.index + 1 + m[0].length + deltaOffset), m, captureMatches);
				if (resultLen >= limitResultCount) {
					return resultLen;
				}
			}
		} while (m);
		return resultLen;
	}

최종적으로 RegExpexec 메소드를 사용해서 매치되는 부분은 next 메소드 안에서 확인 할 수 있다.

  public next(text: string): RegExpExecArray | null {
    const textLength = text.length;

    let m: RegExpExecArray | null;
    do {
      if (this._prevMatchStartIndex + this._prevMatchLength === textLength) {
        // Reached the end of the line
        return null;
      }

      m = this._searchRegex.exec(text);
      if (!m) {
        return null;
      }

T.Viewer에 적용하기

생각보다 되게 길게 VS Code의 코드를 설명했는데 간단하게 정리해보면, 필요한 것은 매우 간단하다.

  1. 전처리를 통해서 정규식을 확정한다.
  2. 정규식으로 비교한다.

전처리라고 해서 대단한 것은 없고, unicode 설정만 추가해주면 된다.

regex 체크박스 상태가 변경되었을 때, RegExp 인스턴트를 생성해 두고, 필터에서 바로 사용하도록 했다.

    onChangeTagRegex: function () {
      if (this.tagRegexSetting)
        this.tagRegex = new RegExp(this.tagFilter, 'u');
    },
    onChangeMessageRegex: function () {
      if (this.messageRegexSetting)
        this.messageRegex = new RegExp(this.messageFilter, 'u');
    },
    filterMessage: function (line) {
      if (this.messageFilter == '')
        return true;

      if (!this.messageRegexSetting)
        return -1 != line.indexOf(this.messageFilter);

      return this.messageRegex.test(line);
    },

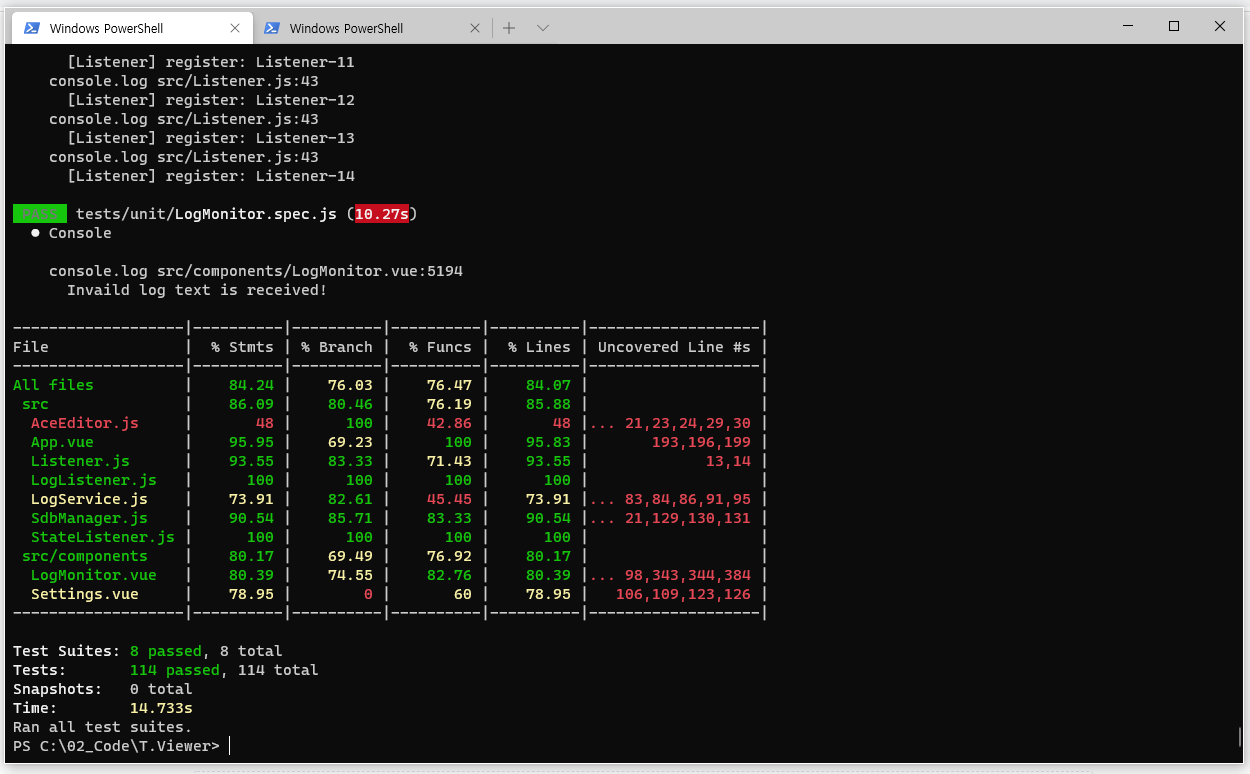
이런 로직이 제대로 동작하는지 확인할 때 단위 테스트가 정말 유용하다. 여러가지 상황별 테스트를 쉽고 빠르게 적용해 볼 수 있기 때문이다. 간단하게 정규식이 제대로 적용되는지 테스트를 작성해보았다.

    it('should filterTag return correct value when tagRegexSetting is true', () => {
      const wrapper = mount(LogMonitor, {
        localVue,
        vuetify,
      })
      const msgTagBanana = "07-10 14:51:21.337+0900 V/Banana( 2617): heart-battery.c banana";
      const msgTagBar = "07-10 14:51:21.337+0900 F/Bar( 2617): heart-battery.c orange";
      const msgTagMangoBarSpace = "07-10 14:51:21.337+0900 F/MangoBar   ( 2617): heart-battery.c orange";
      const vm = wrapper.vm;
      vm.tagFilter = '^Ba';
      vm.tagRegexSetting = true;
      vm.onChangeTagRegex();
      expect(vm.filterTag(msgTagBanana)).toEqual(true);
      expect(vm.filterTag(msgTagBar)).toEqual(true);
      expect(vm.filterTag(msgTagMangoBarSpace)).toEqual(false);

      vm.tagFilter = '.*Bar';
      vm.tagRegexSetting = true;
      vm.onChangeTagRegex();
      expect(vm.filterTag(msgTagBanana)).toEqual(false);
      expect(vm.filterTag(msgTagBar)).toEqual(true);
      expect(vm.filterTag(msgTagMangoBarSpace)).toEqual(true);

      vm.tagFilter = 'Bar$';
      vm.tagRegexSetting = true;
      vm.onChangeTagRegex();
      expect(vm.filterTag(msgTagBanana)).toEqual(false);
      expect(vm.filterTag(msgTagBar)).toEqual(true);
      expect(vm.filterTag(msgTagMangoBarSpace)).toEqual(true);
    })
``

정작 적용된 코드는 몇 줄 안됨. 뭥미. VS Code 관광한 셈 치자.ㅋ

## 마치며...
정규식 적용은 생각보다 어렵지 않았다. VS Code의 소스를 보면서 좋은 소스 코드의 구조에 대해서 한 번 더 생각해 볼 수 있어서 좋았다.

[msaltnet/T.Viewer - Apply regular expression feature](https://github.com/msaltnet/T.Viewer/commit/2017447ea562d6f7092b48ab3c84cb1979cde68a)
[RegExp-MDN](https://developer.mozilla.org/ko/docs/Web/JavaScript/Reference/Global_Objects/RegExp)

Recommend Projects

  • React photo React

    A declarative, efficient, and flexible JavaScript library for building user interfaces.

  • Vue.js photo Vue.js

    🖖 Vue.js is a progressive, incrementally-adoptable JavaScript framework for building UI on the web.

  • Typescript photo Typescript

    TypeScript is a superset of JavaScript that compiles to clean JavaScript output.

  • TensorFlow photo TensorFlow

    An Open Source Machine Learning Framework for Everyone

  • Django photo Django

    The Web framework for perfectionists with deadlines.

  • D3 photo D3

    Bring data to life with SVG, Canvas and HTML. 📊📈🎉

Recommend Topics

  • javascript

    JavaScript (JS) is a lightweight interpreted programming language with first-class functions.

  • web

    Some thing interesting about web. New door for the world.

  • server

    A server is a program made to process requests and deliver data to clients.

  • Machine learning

    Machine learning is a way of modeling and interpreting data that allows a piece of software to respond intelligently.

  • Game

    Some thing interesting about game, make everyone happy.

Recommend Org

  • Facebook photo Facebook

    We are working to build community through open source technology. NB: members must have two-factor auth.

  • Microsoft photo Microsoft

    Open source projects and samples from Microsoft.

  • Google photo Google

    Google ❤️ Open Source for everyone.

  • D3 photo D3

    Data-Driven Documents codes.