Comments (6)
 allasca
commented on September 26, 2024
allasca
commented on September 26, 2024
I use this
class MainApp extends StatelessWidget {
  const MainApp({super.key});

  @override
  Widget build(BuildContext context) {
    return GetBuilder(
        init: MainController(),
        builder: (_) {
          return GetMaterialApp(
            title: "Lestaripedia",
            theme: ThemeData(
              colorScheme: ColorScheme.fromSeed(
                seedColor: Colors.green,
                brightness: Brightness.light,
              ),
              useMaterial3: true,
            ),
            darkTheme: ThemeData(
              colorScheme: ColorScheme.fromSeed(
                seedColor: Colors.green,
                brightness: Brightness.dark,
              ),
              useMaterial3: true,
            ),
            themeMode: _.isDarkMode.value ? ThemeMode.dark : ThemeMode.light,
            home: const LoginUi(),
          );
        });
  }
}
just need to call update()
from getx.
 abetoluwani
commented on September 26, 2024
abetoluwani
commented on September 26, 2024
1. Create a Theme Folder
Create a folder named theme inside your lib directory.
2. Define Themes in Separate Files
Inside the theme folder, create a file app_theme.dart and define your themes there.
File: lib/theme/app_theme.dart
import 'package:flutter/material.dart';
import '../widgets/space.dart';
import 'colors.dart';

class AppTheme {
  static ThemeData get theme {
    return ThemeData(
      scaffoldBackgroundColor: AppColors.white,
      dialogBackgroundColor: AppColors.white,
      dialogTheme: const DialogTheme(
        backgroundColor: AppColors.white,
        surfaceTintColor: AppColors.white,
      ),
      primaryColor: AppColors.primary,
      cardColor: AppColors.white,
      appBarTheme: const AppBarTheme(
        backgroundColor: AppColors.white,
        iconTheme: IconThemeData(color: AppColors.black),
        surfaceTintColor: Colors.transparent,
      ),
      chipTheme: ChipThemeData(
        padding: simPad(5, 5),
        shape: const StadiumBorder(
          side: BorderSide.none,
        ),
        side: BorderSide.none,
      ),
      primaryColorLight: AppColors.white,
      popupMenuTheme: const PopupMenuThemeData(color: AppColors.white),
    );
  }

  static ThemeData get darkTheme {
    return ThemeData(
      scaffoldBackgroundColor: AppColors.black,
      dialogBackgroundColor: AppColors.grey900,
      dialogTheme: const DialogTheme(
        backgroundColor: AppColors.grey900,
        surfaceTintColor: AppColors.grey900,
      ),
      primaryColor: AppColors.primary,
      cardColor: AppColors.grey850,
      appBarTheme: const AppBarTheme(
        backgroundColor: AppColors.grey900,
        elevation: 0,
        surfaceTintColor: Colors.transparent,
        iconTheme: IconThemeData(color: AppColors.white),
      ),
      chipTheme: ChipThemeData(
        shape: RoundedRectangleBorder(
          borderRadius: BorderRadius.circular(10),
        ),
      ),
      dividerColor: AppColors.grey200,
      primaryColorLight: AppColors.white,
      popupMenuTheme: const PopupMenuThemeData(color: AppColors.grey900),
    );
  }
}
3. Update Your Main App File
Modify your main.dart file to use the new theme setup.
File: lib/main.dart
import 'package:flutter/material.dart';
import 'package:flutter_screenutil/flutter_screenutil.dart';
import 'package:get/get.dart';
import 'theme/app_theme.dart';
import 'routes/app_pages.dart'; // Ensure this is the correct path to your routes file
import 'bindings/splashscreen_binding.dart'; // Ensure this is the correct path to your binding file

class MyApp extends StatelessWidget {
  const MyApp({super.key});

  @override
  Widget build(BuildContext context) {
    return ScreenUtilInit(
      designSize: const Size(375, 812),
      minTextAdapt: true,
      splitScreenMode: false,
      builder: (_, child) {
        return GetMaterialApp(
          debugShowCheckedModeBanner: false,
          initialRoute: AppPages.INITIAL,
          initialBinding: SplashscreenBinding(),
          getPages: AppPages.routes,
          darkTheme: AppTheme.darkTheme,
          theme: AppTheme.theme,
        );
      },
    );
  }
}

void main() {
  runApp(const MyApp());
}
4. Define Colors
Ensure that you have a colors file where you define all your color constants.
File: lib/theme/colors.dart
import 'package:flutter/material.dart';

class AppColors {
  static const Color white = Colors.white;
  static const Color black = Colors.black;
  static const Color primary = Colors.blue; // Replace with your primary color
  static const Color grey200 = Color(0xFFEEEEEE);
  static const Color grey850 = Color(0xFF1C1C1C);
  static const Color grey900 = Color(0xFF121212);
}
5. Ensure simPad Utility
Ensure you have the simPad function or a similar utility for padding.
File: lib/widgets/space.dart
import 'package:flutter/material.dart';

// Assuming simPad is a predefined utility function
EdgeInsets simPad(double horizontal, double vertical) {
  return EdgeInsets.symmetric(horizontal: horizontal, vertical: vertical);
}
With these steps, your project will have a well-structured theme folder, allowing you to manage light and dark themes effectively. The predefined simPad and AppColors are utilized as expected but are not necessary
from getx.
abetoluwani
commented on September 26, 2024
@allasca @jasonlaw @BppleMan @lsm i thinkthis should solve it
from getx.
 BppleMan
commented on September 26, 2024
BppleMan
commented on September 26, 2024
I use this
class MainApp extends StatelessWidget {
  const MainApp({super.key});

  @override
  Widget build(BuildContext context) {
    return GetBuilder(
        init: MainController(),
        builder: (_) {
          return GetMaterialApp(
            title: "Lestaripedia",
            theme: ThemeData(
              colorScheme: ColorScheme.fromSeed(
                seedColor: Colors.green,
                brightness: Brightness.light,
              ),
              useMaterial3: true,
            ),
            darkTheme: ThemeData(
              colorScheme: ColorScheme.fromSeed(
                seedColor: Colors.green,
                brightness: Brightness.dark,
              ),
              useMaterial3: true,
            ),
            themeMode: _.isDarkMode.value ? ThemeMode.dark : ThemeMode.light,
            home: const LoginUi(),
          );
        });
  }
}
just need to call update()
I prefer this solution at the moment, because I have already reserved a series of ThemeData, I just want to simply replace the entire ThemeData, not the Color, in the app running.
thanks @abetoluwani
from getx.
abetoluwani
commented on September 26, 2024
Yeah i forgot to add @BppleMan
themeMode: ThemeMode.system,
this would automatically select the theme data for any theme data you create
from getx.
 halloweens1
commented on September 26, 2024
halloweens1
commented on September 26, 2024
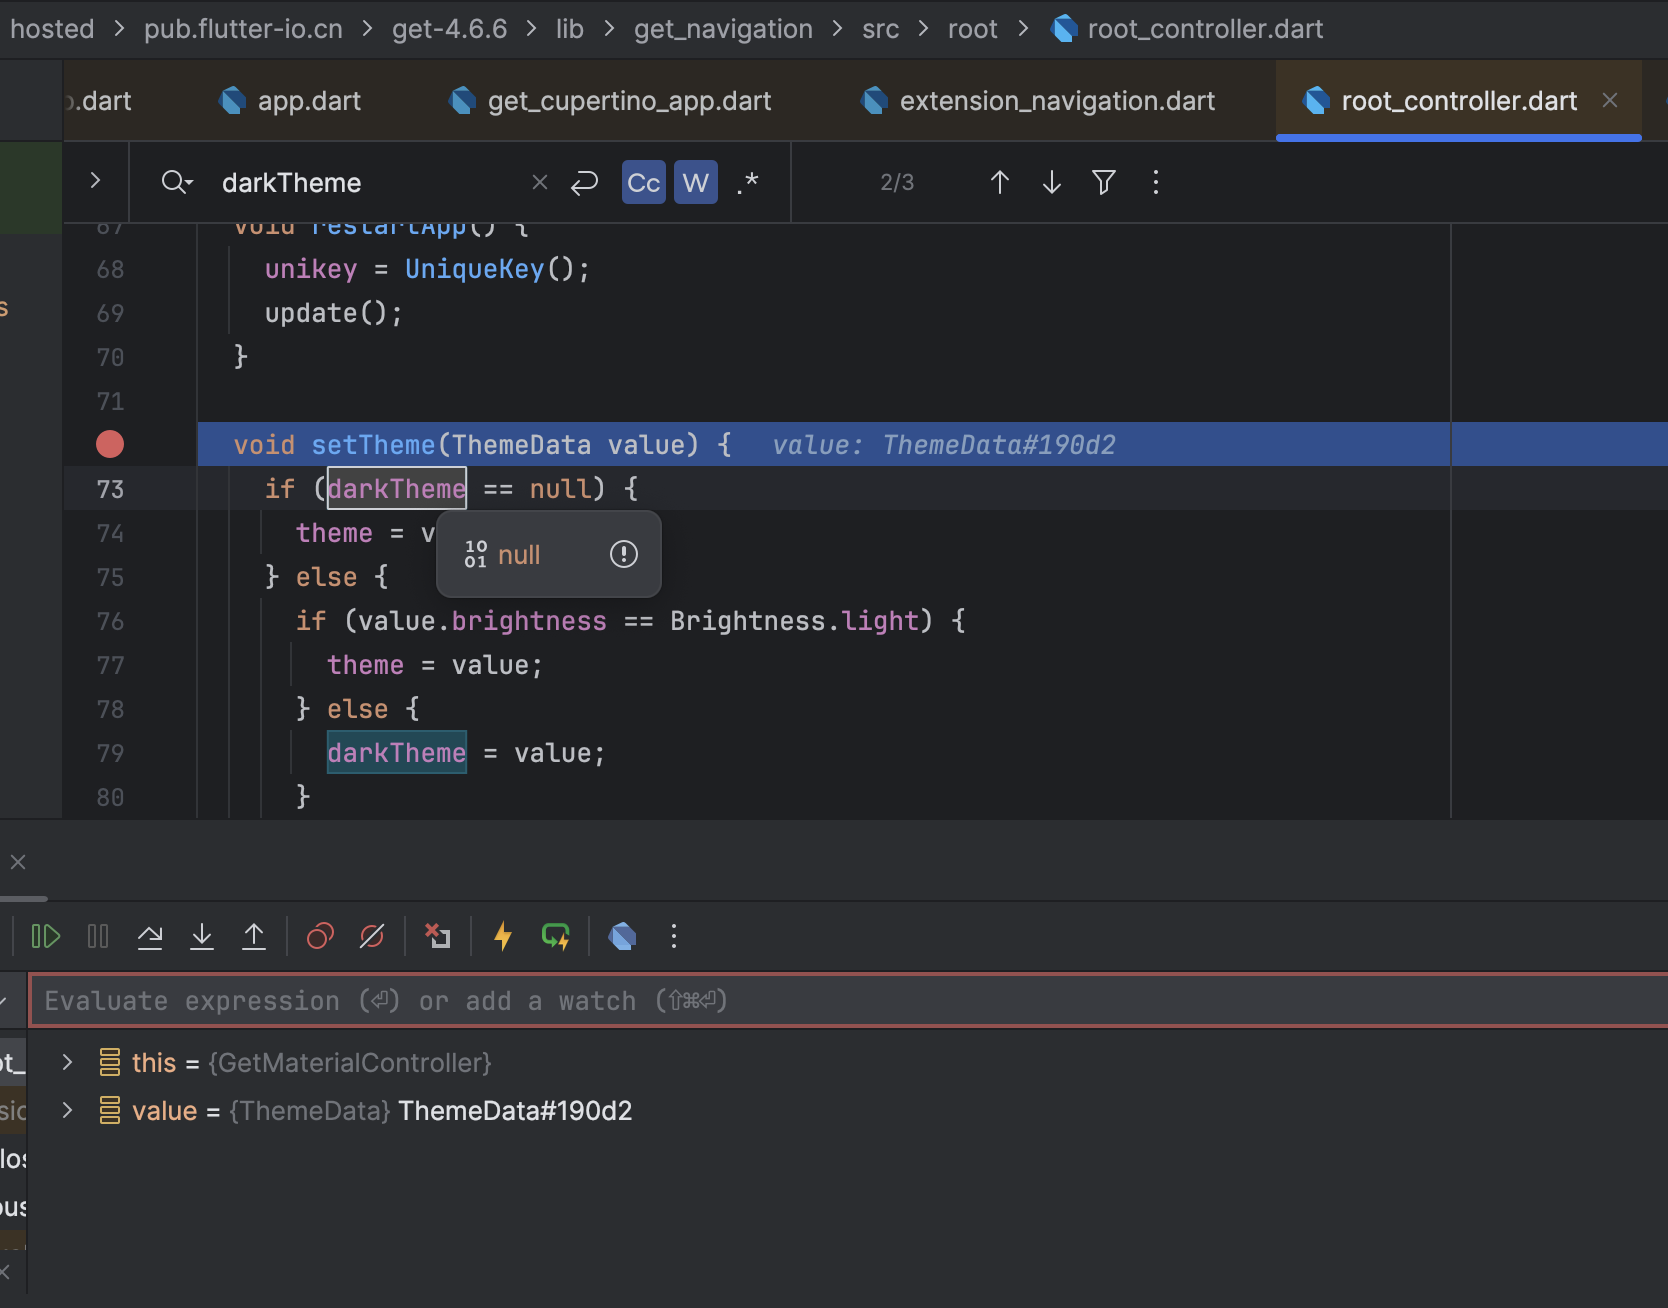
Ran into same issue, I've debugged that Get.changeTheme, which leads to GetMaterialController's method setTheme, I found out that darkTheme's value will be always null, cuz I couldn't find where sets its value, I did double check it, turned out the same result, I don't know whether I'm right or not, I highly suspect that if statement about darkTheme == null is the reason for having no effect after applying Get.changeTheme in dark mode, cuz it only changes the theme, not the darkTheme, due to the darkTheme's value is always null.
from getx.
Related Issues (20)
- getx is dead? HOT 1
- Navigation Transition HOT 1
- Can't load Kernel binary: Invalid kernel binary format version HOT 1
- Please add new transition type: Transition.predictiveBack HOT 3
- Get 5.0.0 Nested Navigation duplicate routes HOT 5
- You need to call "Get.put(xx)" or "Get.lazyPut(()=>xx()) HOT 9
- Nested Navigation State Not Retained on Back to "Navigation" Tab HOT 3
- Unable to ecustomize `rootDelegate.pickPagesForRootNavigator` HOT 1
- Keyboard not appearing after swipe-back gesture when returning to a screen with TextField using GetX HOT 3
- A Controller's task continues to execute even after being deleted. HOT 1
- getx tree routing problem HOT 1
- An improper use of GetX has been detected when building PopupMenuButton in Obx
- [5.0.0-release-candidate-6] - PopScope not working in Flutter WEB HOT 1
- [5.0.0-release-candidate-6] - Get.back(result: true) or Get.close(result: true) does not return HOT 2
- GetResponsiveView not return the correct width when mobile orientation changes
- use GetX with routefly
- Flutter - get package: The getter 'backgroundColor' isn't defined for the class 'ThemeData' HOT 5
- get.dialog() animation HOT 1
- Prevent rebuild entire SliverGrid on LOAD more data
Recommend Projects
-
 React
React
A declarative, efficient, and flexible JavaScript library for building user interfaces.
-
Vue.js
🖖 Vue.js is a progressive, incrementally-adoptable JavaScript framework for building UI on the web.
-
 Typescript
TypeScript is a superset of JavaScript that compiles to clean JavaScript output.
-
TensorFlow
An Open Source Machine Learning Framework for Everyone
-
Django
The Web framework for perfectionists with deadlines.
-
 Laravel
A PHP framework for web artisans
-
D3
Bring data to life with SVG, Canvas and HTML. 📊📈🎉
-
Recommend Topics
-
javascript
JavaScript (JS) is a lightweight interpreted programming language with first-class functions.
-
web
Some thing interesting about web. New door for the world.
-
server
A server is a program made to process requests and deliver data to clients.
-
Machine learning
Machine learning is a way of modeling and interpreting data that allows a piece of software to respond intelligently.
-
Visualization
Some thing interesting about visualization, use data art
-
Game
Some thing interesting about game, make everyone happy.
Recommend Org
-
Facebook
We are working to build community through open source technology. NB: members must have two-factor auth.
-
Microsoft
Open source projects and samples from Microsoft.
-
Google
Google ❤️ Open Source for everyone.
-
Alibaba
Alibaba Open Source for everyone
-
D3
Data-Driven Documents codes.
-
Tencent
China tencent open source team.
from getx.