React is a library for building composable user interfaces. It encourages the creation of reusable UI components, which present data that changes over time.
JSX:
- JSX stands for JavaScript XML.
- JSX allows us to write HTML in React.
- JSX makes it easier to write and add HTML in React.
- write HTML within the javascript and we can also write javascript inside of the HTML.
const element = <h1>Hello, world!</h1>;
Some Important Keywords
- react-dom: ReactDOM is a package that provides DOM-specific methods that can be used at the top level of a web app to enable an efficient way of managing DOM elements of the web page.
- react-script: The react-scripts package is a set of scripts from the create-react-app starter pack which helps you kick off projects without configuring. The react-scripts start command sets up the development environment and starts a server, as well as hot module reloading.
- cra-template: This is the official base template for Create React App. If you don't specify a template (for example, --template typescript ), this template will be used by default.
ReactDOM.render(WHAT TO SHOW(only take 1 parameter) , WHERE TO SHOW IT);
- it helps in what to display on the web page
- we can write multiple element like:
ReactDOM.render(
  <div>
  <h1>Hello World!</h1>
  <p>This is the paragraph</p>
  </div>,
document.getElementById("root"));
-
we can also use the name of variable which we want to display in the HTML with
{VARIABLE NAME}import React from "react"; import ReactDOM from "react-dom"; const name="Bhaskar"; ReactDOM.render(<h1>Hello World i am {name}!</h1>, document.getElementById("root"));=>=>=>=> but in the
{}we can write the javascript expression but we cannot write the javascrpt statement like if,for loop etc.import React from "react"; import ReactDOM from "react-dom"; const fname="Bhaskar"; const lname="kulshrestha"; ReactDOM.render( <div> <h1>Hello World! my name is {fname +" "+ lname}</h1> <=<=< </div>, document.getElementById("root") );use of
${}=> we can write javascript inside of HTML;import React from "react"; import ReactDOM from "react-dom"; const fname="Bhaskar"; const lname="kulshrestha"; ReactDOM.render( <div> <h1>Hello World! my name is {`${fname} ${lname}`}</h1> <=<=< </div>, document.getElementById("root") );
BabeL:The compiler of the Javascript
Babel is a toolchain that is mainly used to convert ECMAScript 2015+ code into a backwards compatible version of JavaScript in current and older browsers or environments. Here are the main things Babel can do for you:
- Transform syntax
- Polyfill features that are missing in your target environment (through a third-party polyfill such as core-js)
- Source code transformations (codemods)
For Example:
ReactDOM.render(<h1>Hello World!</h1>, document.getElementById("root"));to
import { jsx as _jsx } from "react/jsx-runtime";
ReactDOM.render( /*#__PURE__*/_jsx("h1", {
  children: "Hello World!"
}), document.getElementById("root"));
The difference between using ReactDOM.createRoot().render() and ReactDOM.render()
The main difference between ReactDOM.createRoot().render() and ReactDOM.render() lies in the rendering mode and behavior of React components.
- ReactDOM.createRoot().render():
This is the new rendering method introduced in React 18. It is generally employed when using the create-react-app CLI
It enables Concurrent Mode, which allows React to work on rendering updates in a more asynchronous and concurrent manner, improving performance and responsiveness.
The createRoot() is used to create a root instance that represents the top-level component in your application. The render() is used to render the component within the root instance.
This method is more optimized for performance and supports features like concurrent rendering and partial hydration.
It is recommended to use this method in React 18 and newer versions to take advantage of the new features and improvements.
- ReactDOM.render(, document.getElementById('root')):
This is the traditional rendering method used in previous versions of React, that is React 17 and below.
It renders the component directly into the DOM element with the id of 'root'.
It does not enable Concurrent Mode or the new performance optimizations introduced in React 18.
This method is suitable for most applications and versions of React that do not utilize Concurrent Mode or require specific performance optimizations.
JSX attribute and styling
import React from "react";
import ReactDOM from "react-dom";

ReactDOM.render(
  <div>
    <h1 className="heading" contentEditable="true">
      Hello world
    </h1>
    <ul>
      <li>First</li>
      <li>second</li>
      <li>Third</li>
    </ul>
  </div>,
  document.getElementById("root")
);
=>==>=> Remember that className != classname , WE WOULD ALWAYS USE THE CAMEL CASING.
=>=>=> Significance of the self closing tags or /
In JSX, self-closing tags are used for elements that don't have any children. They are closed with a / before the closing > (e.g., ![]() ). Regular closing tags are used for elements that have children, and they require an opening and a closing tag (e.g.
). Regular closing tags are used for elements that have children, and they require an opening and a closing tag (e.g.
Styling in JSX
import React from "react";
import ReactDOM from "react-dom";

ReactDOM.render(<h1 style={{color:"red"}}>Hello World!</h1>,document.getElementById("root")
);
in JSX the style element is taken as a javascript object like: "style={{color:"red"}}"
Another Example:
INLINE STYLING
import React from "react";
import ReactDOM from "react-dom";

const customstyling = {
  color: "red",
  fontSize: "20px",
  border: "1px solid black"
}

ReactDOM.render(
  <h1 style={customstyling}>Hello World!</h1>,
  document.getElementById("root")
);
Example:
font-size => fontSize
Reason to use inline styling:
if at any point of time i want to change any attribute then we can simple chaange it with like:
customstyling.color="blue";
Making of the components
Components are independent and reusable bits of code. They serve the same purpose as JavaScript functions, but work in isolation and return HTML. Components come in two types:
- Class components
- Function components
we can give diffrent functionality with the help of React components.
- TYPE 1:
import React from "react";
import ReactDOM from "react-dom";

// MAKING OF THE DIFFRENT COMPONENT NAMED AS HEADING .⚠️ Remeber the name of the React component is always starts with a capital letter, this helps us to diffrentiate between the custom components and the react components.
//

function Heading() {
  return <h1>This is the heading through fuction</h1>;
}

ReactDOM.render(
  <div>
    <Heading />
    <ui>
      <li>First</li>
      <li>Second</li>
      <li>Third</li>
    </ui>
  </div>,
  document.getElementById("root")
);
- TYPE 2
or we can make diffrent files of the components
file:index.js
import React from "react";
import ReactDOM from "react-dom";
import Heading from "./Heading";
import List from "./List";

ReactDOM.render(
  <div>
    <Heading />
    <List />
  </div>,
  document.getElementById("root")
);
Now we can simply import the componets file named as:HEading and List
file:Heading.js
import React from "react";

function Heading() {
  return (
    <h1>This is the heading through fuction which is in another folder</h1>
  );
}

export default Heading;
file:List.jsx
import React from "react";

function List() {
  return (
    <ul>
      <li>First</li>
      <li>Second</li>
      <li>Third</li>
    </ul>
  );
}

export default List;
IMPORT AND EXPORT Functionlaity
Export:
we can export like:
- export default App; => Where App is the name of the function.
- using export { add, multiply, subtract, divide }; => Where (add,multiply,subtract,divide) is the name of the function.
IMPORT
We can import like:
-
import Appp from "./App" where Appp is the alias name and we can give any name to it.
-
import * as cal from "./Calculate";
But to use this whildcart operator(*) we have to write like:
- cal.add()
-
import {add,sub,mul,divide} from "./calculator"; : In this the name present in the
{}should be same as the name give in the export statement. -
import PI,{add,sub,mul,divide} from "./calculator"; => In this the name present in the
{}should be same as the name give in the export statement. and the name PI is the alais name that can be changed and is given to the default export.
npx create-react-app my-app
cd my-app
npm start
Here's a comparison of commonly used npm scripts in tabular form:
| Command | Purpose | Description |
|---|---|---|
npm start |
Run development server | Starts a development server for your project. Typically used during development to see changes in real-time. |
npm run build |
Build production-ready code | Compiles and bundles your project's source code for production deployment. Generates optimized files. |
npm test |
Run test suite | Executes the specified test suite(s) for your project. Typically used for running unit or integration tests. |
npm run eject |
Eject from Create React App (CRA) | Specifically for projects created with Create React App (CRA). Allows you to "eject" from the default CRA configuration, giving you full control over project setup and dependencies. |
These commands are commonly used in JavaScript development, especially in projects created with tools like Create React App, but their exact behavior may vary depending on the project setup and the scripts defined in your package.json file.
Diffrence between NPM and NPX
| Aspect | npm | npx |
|---|---|---|
| Purpose | Package manager for Node.js dependencies. | Executes Node.js packages from the registry. |
| Installation | Installed globally on your system. | Part of npm, comes with npm installation. |
| Usage | Manages packages and dependencies. | Executes packages without installing them. |
| Command Syntax | npm <command> |
npx <package> |
| Example | npm install <package> |
npx create-react-app my-app |
| Use Case | Installing and managing packages. | Running packages temporarily. |
| Execution | Requires installed packages globally/local | Downloads and executes packages once. |
| Version Control | Manages package versions in package.json. |
Executes the latest version of a package. |
| Registry | Uses the npm registry for package storage. | Uses npm registry, but for one-time tasks. |
- Props are arguments passed into React components.
- Props are passed to components via HTML attributes.
- It helps to Create the custom components.
- React Props are like function arguments in JavaScript and attributes in HTML.
- To send props into a component, use the same syntax as HTML attributes:
- Props are Read only.
- Example:
const myElement = <Car brand="Ford" />;
- The component receives the argument as a props object:
function Car(props) {
  return <h2>I am a { props.brand }!</h2>;
}
Another Example:
function Card(props) {
  console.log(props);
  return (
    <div>
      <h2>{props.name}</h2>
      <img src={props.img} />
      <p>{props.tel}</p>
      <p>{props.email}</p>
    </div>
  );
}

ReactDOM.render(
  <div>
    <h1>My Contacts</h1>

    <Card
      name="Beyonce"
      img="https://blackhistorywall.files.wordpress.com/2010/02/picture-device-independent-bitmap-119.jpg"
      tel="+123 456 789"
      email="[email protected]"
    />
     </div>,
  document.getElementById("root")
);
Here in
<Card

name="Beyonce"

img="https://blackhistorywall.files.wordpress.com/2010/02/picture-device-independent-bitmap-119.jpg"

tel="+123 456 789"

email="[email protected]"

/>`
we are defining the properties of the component.
if we console.log() the operation of the above then it would be:
{name: "Beyonce", img: "https://blackhistorywall.files.wordpress.com/2010/02/picture-device-independent-bitmap-119.jpg", tel: "+123 456 789", email: "[email protected]"}
Now this can be used anywhere like we defined in the function card:
function Card(props) {
  console.log(props);
  return (
    <div>
      <h2>{props.name}</h2>
      <img src={props.img} />
      <p>{props.tel}</p>
      <p>{props.email}</p>
    </div>
  );
}
className inside the props because it will treate it as the custom property for the given component. we have to set this value inside the function that we make.
In React, the map() function is a built-in JavaScript method used to iterate over arrays and create a new array of transformed or modified elements. It's commonly used in React to render a list of elements, such as components, based on the data from an array.
- You start with an array of data that you want to render, often stored in the component's state or received as props.
- You use the map() function to iterate over this array. Inside the map() function, you define a function that takes - each element of the array and returns a new element, typically a React component or JSX code.
- The map() function returns a new array containing the modified elements.
- You can then render this new array of elements in your React component's JSX code.
import React from 'react';

const MyComponent = () => {
  const items = ['Item 1', 'Item 2', 'Item 3'];

  const renderedItems = items.map((item, index) => (
    <li key={index}>{item}</li>
  ));

  return (
    <ul>
      {renderedItems}
    </ul>
  );
};

export default MyComponent;
here key is used to give every component a unique id and is also a special property given by React.
Warning: Card: `key` is not a prop. Trying to access it will result in `undefined` being returned. If you need to access the same value within the child component, you should pass it as a different prop. (https://fb.me/react-special-props)
To use the is we simply make a another variable and [ass the same data as of the key.
- Map -Create a new array by doing something with each item in an array
- Filter - Create a new array by keeping the items that return true
- Reduce - Accumulate a value by doing something to each item in an array
- Find - find the first item that matches from an array
- FindIndex - find the index of the first item that matches.
var numbers = [3, 56, 2, 48, 5];

Map -Create a new array by doing something with each item in an array.

function double(x) {
  return x * 2;
}
const newNumbers = numbers.map(double);

var newNumbers = [];
numbers.forEach(function (x) {
  newNumbers.push(x * 2);
});

const newNumbers = numbers.map(function (x) {
  return x * 2;
});

console.log(newNumbers);

Filter - Create a new array by keeping the items that return true.

const newNumbers = numbers.filter(function(num) {
  return num < 10;
});

var newNumbers = [];
numbers.forEach(function(num) {
  if (num < 10) {
    newNumbers.push(num);
  }
})

Reduce - Accumulate a value by doing something to each item in an array.

var newNumber = numbers.reduce(function (accumulator, currentNumber) {
  console.log("accumulator = " + accumulator);
  console.log("currentNumber = " + currentNumber);
    return accumulator + currentNumber;
})

var newNumber = 0;
numbers.forEach(function (currentNumber) {
  newNumber += currentNumber
})

Find - find the first item that matches from an array.

const newNumber = numbers.find(function (num) {
  return num > 10;
})

console.log(newNumber);

FindIndex - find the index of the first item that matches.

const newNumber = numbers.findIndex(function (num) {
  return num > 10;
})

console.log(newNumber);var num = [1, 2, 3, 4, 5];
const newnumbers = num.map((x) => {
return x * x;
});
console.log(newnumbers);
More Shorter Form
var num = [1, 2, 3, 4, 5];

const newnumbers = num.map(x => x * x);
console.log(newnumbers);
condition==True ? True statements : False Statements.
AND refers to the logical AND
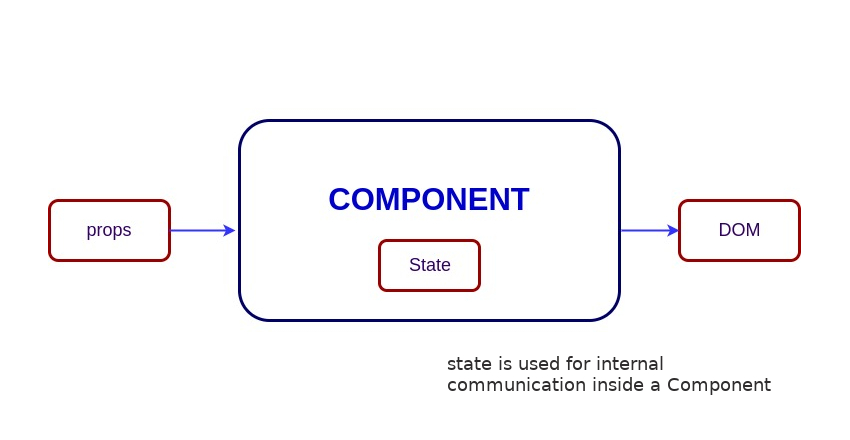
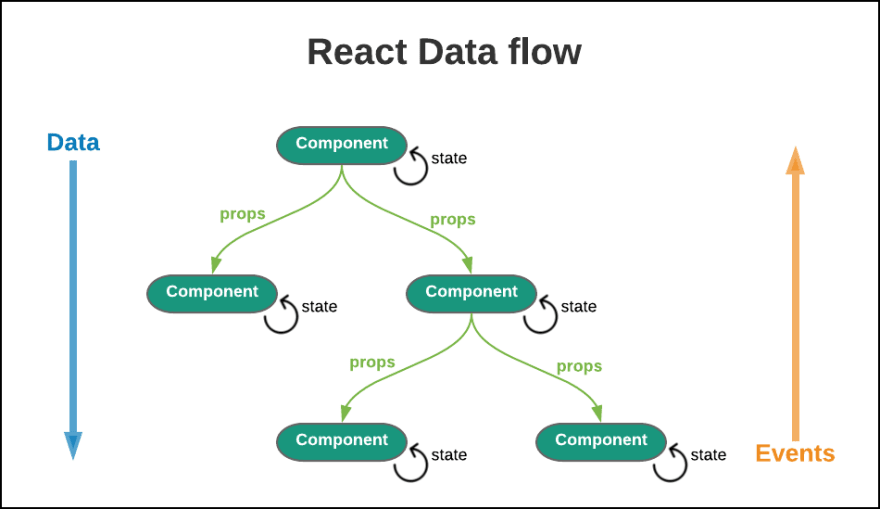
"The state is a built-in React object that is used to contain data or information about the component. A component's state can change over time; whenever it changes, the component re-renders"
Diffrence between Declaratice programming and Impreative programming
| Aspect | Declarative Programming | Imperative Programming |
|---|---|---|
| Focus | What should be done | How it should be done |
| Description | Describes the desired | Describes step-by-step |
| outcome or result | instructions to achieve | |
| Mutable State | Typically avoids mutable | Often relies on mutable |
| state (immutable data) | state (variables change) | |
| Control Flow | Less explicit control | Explicit control |
| flow; often abstracted | flow; detailed control | |
| Examples | SQL, HTML, CSS, some | C, C++, Java, Python, |
| functional programming | JavaScript, Ruby | |
| Parallelism and | Easier to parallelize | Can be harder to |
| Concurrency | and reason about | reason about |
| Debugging and | Easier to debug since | May be more challenging |
| Testing | it focuses on what | due to the emphasis on |
| should be achieved | how things are done |
"They let you use state and other React features without writing a class. You can either use the built-in Hooks or combine them to build your own. "
🌟 To use the Hook we have to use it in the functional component i.e we have to make the function that renders the components,and inside the functions we can use Hooks.
const [initial value , Function for changes] = useState(0)
here inside useState(0)here 0 defines the initial state or initial value.
destructuring the array
const [red,green,blue] = [9,12,15]

That means:
red=9
green=12
blue=15
destructuring the objects
const {name,sound} = animals;
where animal is an object.
if we want to give the diffrent name to the variables that are in the object.
const {name:nameanother,sound:soundanother} = animals;

Now nameanother and soundanother is the alias name for the variables.
If we want to give the default name for the variabl in the object,this will only work if object where we are importing the data does not have that feild.
const {name="Fluffy",sound="abcd"} = animals;
Destructurin for the nested object
cosnt {name,sound,feeding:{food,water}} = animals
=>=>=> How to change the style of the elemnt => we can change the style attribute of an element in the tag itself only by:
style={{ backgroundColor: ismouseOver ? "black" : "white" }};
For Exmaple:
import React, { useState } from "react";

function App() {
  const [headingText, setHeadingText] = useState("Hello");
  const [ismouseOver, setMouseOver] = useState(false);

  function handleClick() {
    setHeadingText("Submitted");
  }

  function handleMouseOver() {
    setMouseOver(true);
  }

  function handleMouseOut() {
    setMouseOver(false);
  }

  return (
    <div className="container">
      <h1>{headingText}</h1>
      <input type="text" placeholder="What's your name?" />
      <button
        style={{ backgroundColor: ismouseOver ? "black" : "white" }}
        onClick={handleClick}
        onMouseOver={handleMouseOver}
        onMouseOut={handleMouseOut}
      >
        Submit
      </button>
    </div>
  );
}

export default App;
to find the value for the form , like what we input in the input feild of the form,we use event
<input
        onChange={handleChange}
        type="text"
        placeholder="What's your name?"
      />
then we can see the changes in the inpuit feild by:
  function handleChange(event) {
    console.log(event.target.value);
    console.log(event.target.placeholder);
    console.log(event.target.type);
  }
It will result in the output :
Bhaskar
What's your name?
text
In HTML elemnts are responsible for handling their own state.
In HTML, form elements such as <input>, <textarea>, and <select> typically maintain their own state and update it based on user input. In React, mutable state is typically kept in the state property of components, and only updated with setState().
Pleaser Read the documnetation for controlled Components: Controlled Components => For Refrence.
const [fullName, setfullname] = useState({
    fname: "",
    lname: ""
  });
how can we hold teh previous value that we give in the form because sometimes when we try to write something on another input the data gets erased. to solve this:
setfullname((prevValue) => {
      if (name === "fName") {
        return {
          fname: newValue,
          lname: prevValue.lname
        };
      } else if (name === "lName") {
        return {
          fname: prevValue.fname,
          lname: newValue
        };
      }
    });
const citrus=['Lime','Lemon','Oranges']
const fruit=['Apple','Banana','Mango']

if we want to push all the items of citrus into fruits we can simply use the `spread` operator

const citrus=['Lime','Lemon','Oranges']
const fruit=['Apple','Banana','Mango',...citrus]

The spread operator is : ...Name
More Specific use: to set in ...prevVal
setNote((prevVal) => {
      return {
        ...prevVal,
        [name]: value
      };
    });
we can simple make a function and pass it as the props in the component to access it in the parent component.
function deleteItem(id) {     <=<=<=
    // console.log(id);
    setItems((prevVal) => {
      return prevVal.filter((items, index) => {
        return index !== id;
      });
    });
  }
  return (
    <div className="container">
      <div className="heading">
        <h1>To-Do List</h1>
      </div>
      <div className="form">
        <input onChange={handleChange} type="text" value={inputText} />
        <button onClick={addItem}>
          <span>Add</span>
        </button>
      </div>
      <div>
        <ul>
          {items.map((todoItem, index) => (
            <Todoitem
              key={index}
              id={index}
              text={todoItem}
              onChecked={deleteItem}    <=<=<=
            />
          ))}
        </ul>
      </div>
    </div>
  );
and the child class has:
import React from "react";

function Todoitem(props) {
  return (
    <li
      onClick={() => {
        props.onChecked(props.id);      <=<=<=
      }}
    >
      {props.text}
    </li>
  );
}

export default Todoitem;
In the aobve code we can simply access the onChecked function in the parent class.
